Sunday, June 30, 2013

The Impact Umbrella Clamp Revisited


I wrote an earlier post about the Impact Umbrella Bracket and how it could be re-configured to better align a speedlight along a shoot-through umbrella’s axis for more even light distribution. This was because it had two possible entries for the cold-shoe spigot. There are also two possible entries when mounting the bracket on a light stand, a monopod, or on whatever else you may wish to use. By inserting the monopod spigot in the alternate position as I have done here, you can increase the offset just enough for the umbrella to lie flat when stored. 


A minor point is the spigot. This threads onto the 1/4 x 20 thread ( or 3/8" threads) on your monopod, converting it to the 5/8 diameter “pin” that becomes the attaching point between the bracket and the light stand. The ones that are normally available through retail channels will prove a bit long when mounting the bracket in the alternative position, resulting in a lopsided attachment. The readily available brass spigot, shown at the left, is noticeably longer than the more desirable short (steel) one. 


Here the short spigot allows for proper contact on the raised portions, resulting in a more secure installation. I'll update this post when I remember where I got the short ones. I may have been shipped with the bracket.


Sunday, June 9, 2013

Designer Showcase In Woodside - Part 2


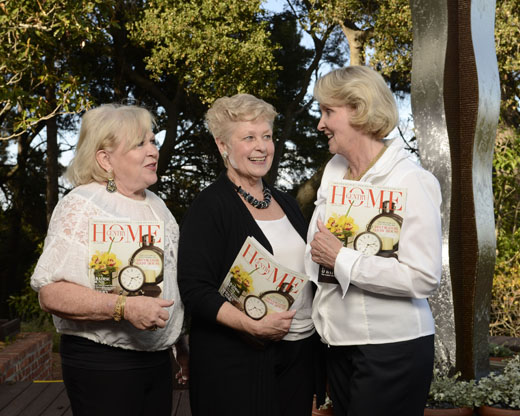
This is the shot that was selected to run in the Daily Journal. The woman on the right was the lead designer on this room, so I was not inclined to attempt to move anything for the sake of a single photo.

The main light was the same Zumbrella with twin NIkon SB-800s, triggered by a third unit mounted on camera. The accent on the pinball machines was provided by the same Calumet Wireless/SB-800 combination I used to accent the garden sculpture. It was being held by the event publicist, who had some difficulty understanding my directions. The speedlight did provide the highlight I wanted, but also put a nasty reflection in the mirrored wall in the background. Ditto the Zumbrella, which can be seen at the right edge of the mirror.

Would, Coulda, Shoulda. I do love tripods. I just wish they weren't so cumbersome to use. If I had used one, I might have noticed the left glare spot and been in a position to do something about it. Now if the camera were absolutely stationary (as only a tripod can make it), I'd have had the left hand designer move to the left until her head effectively covered the hot spot. Looking at the final image, I would like to think that the glare spots make the shot "edgy". The final exposure was 1/15, F7.1, ISO 200, which allowed me to extend the exposure to add a glow to the two end table lights.


Time Gets Tight. More and more guests were starting to arrive, so I had to work faster. I left the Zumbrella behind and decided that any photos made from this point forward would be ceiling bounce from an on-camera flash. I still had the Calumet transceiver and carried the speedlight with me for this shot. Ceiling bounce was giving me the overall illumination I wanted, but I was having trouble with the glasses and Scot's deep set eyes. I decided to do a "Hail Mary" and aimed the radio controlled remote flash directly at the floor, hoping to bounce some light into the eyes. After some experimentation, I was able to get some small catch lights in my his eyes. I couldn't up the exposure because the bounced light started to seriously overexpose the chair.


Gotta Go. The place was starting to jump. This had to be my last shot, and as it turned out, it was more challenging than the rest. I wanted to include as much of the room as possible, so I stepped back as far as I could. I used three light sources. The on-camera speedlight bounced light off the ceiling to give the overall illumination. A second light, triggered by the Calumet Wireless Transmitter, was wearing a snoot and was placed on the floor and directed towards the chandelier made of broken plates. I held a third light with a makeshift snoot in my left hand, and aimed it directly at the designer's face. I couldn't be sure that the ceiling bounce would create a catch light, so this last flash, dialed down to 1/64 power, would hopefully do the trick. As with the first shot of this post, the shutter was kept on the long side (1/40 @ F 5.0, ISO 400) so the lamp in the background could add some color.

I had allocated 30 minutes of setup and 15 minutes of shooting time for the single planned shot. By my calculations, one hour, maximum. I had scheduled the first shot for 6:00 pm. But I wound up leaving at 7:30.  And while my planned shot was finished on schedule, the additional shots were just too irresistible to pass up.

Sunday, June 2, 2013

Designer Showcase In Woodside - Part 1

Assignments like this can challenge a photographer in a variety of ways. Shots like this require some level of lighting expertise, but the tough part is balancing the preferences of one's editor and the opinions of the publicist who handles how the event is portrayed to the public. There can be an inherent conflict because my paper's audience may not have the same level of curiosity as the  publicist might believe.

It is my goal to provide a shot that is visually interesting, makes a personal connection with the viewer, and accurately represents of the mood of the event. At this particular fundraiser, over 20 design teams each decorated one room of a 9 bedroom, 8 bath, 9,800 square foot home. The Publicist had some specific ideas about how she wanted the event represented, so I decided to follow her lead.


Initially, we had agreed that two shots would be made. The first was an outdoor shot that would include the Event Chairs and highlight a wonderful Archie Held sculpture on the back patio. Lighting was simple. I used 2 Nikon SB-800 speedlights and a Zumbrella on a tall light stand placed camera left. I used my camera bag to hold the stand steady. I settled on an exposure of 1/200 at 5.6, ISO 200. If you look closely, you can see the shadow made by the Zumbrella at the base of the sculpture.

Oops. If you're wondering about the difference in appearance, the image (above) was level adjusted, while the image (below) is straight out of camera.


I brought some extra SB-800s, so I attached one to a Calumet Wireless Trigger and set it manually to 1/4 power. I placed it behind a potted plant at the left edge of the image. This provided a splash of light at the base of the sculpture to better match the brightness of the upper half. Being radio controlled, it could be hidden from view, although the tell-tale hot-spot can be barely seen on the wooden deck. I raised the head slightly, and the hot spot went away.

Quick note: These are "sketch images", so if they appear off kilter, it's because the images weren't cropped or been adjusted in any way.


Now to add the talent. I gave the three event chairs a magazine to hold. This gives everybody an excuse to bend their arms, which I believe helps draw attention to the subject's faces. The shot is still a picket fence, but it does have the sculpture in the background.


This next shot came after some prompting to "relax" and talk about the show, which animates the subjects. The proportions are different because I cropped it a bit. It's a nice shot, but I felt the viewer might have some difficulty appreciating the sculpture I tried so hard to light.


It only took a moment to step closer and make a shot the emphasizes the individual chairs, as I did for this second photo. By moving close, the sculpture loses it prominence, but I wanted this shot to be about them, not it. I changed out my 11-16mm Tokina with a 24-70 Nikkor, not wanting the deal with the perspective changes a short lens would have produced.

The working conditions for this shot were ideal. Lots of space to work in, lots of time to work with. Things would change when I moved indoors for the second planned shot.