 |
| 1/125 second, F 5.6, ISO 1600 |
Trying Something Different: I've photographed members of San Mateo's legal community for several years, and frequently find myself in the historic Courthouse in Redwood City. The rotunda is especially photogenic, but at times difficult to light properly. In the past, I'd use a speedlight with a shoot-through Zumbrella* mounted on a light stand. But the last time I was there, I left the lightstand in the car and simply bounced a camera-mounted speedlight off of a large wall behind me. By using a high ISO, I was able to get a proper exposure with a Godox V1 flash. The wall bounce created a lighting surface many times larger than the one created by a shoot-through umbrella or a softbox. Notice that the shadow edges are extremely soft, and that the highlights on my subject's foreheads are very broad.

Next, I needed to balance the background with the bounce-lit foreground. I clamped a second V1 flash on the balustrade and aimed it towards the wall behind my subjects. I own one Nikon and one Fuji version, and when the shoe mounted Fuji version was used as a commander, it can communicate with the Nikon unit, so long as the group and channel settings on both units match. This cuts costs and increases compatibility when you work with two different platforms, as I do.
Because of the distance across the rotunda, the flash output was at nearly full power. You can see the Gorillapod I used to attach the flash on the rail. The flash was held in place with a cold shoe mounted on the 'pod's 1/4 x 20 tripod screw. When the flash was properly aligned, gave me the results I wanted. It turns out that stability of the arrangement was an issue. More on that later.
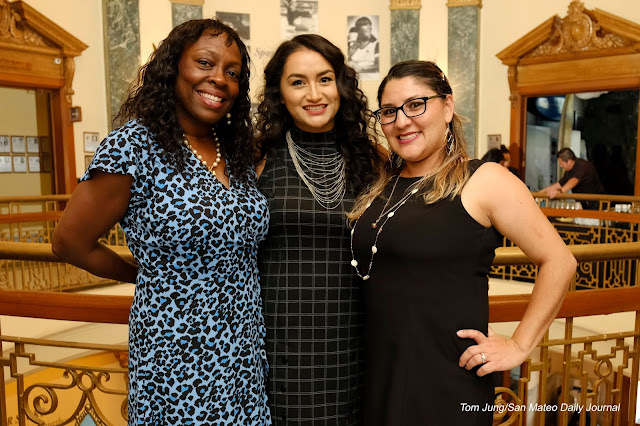
Because the flash to subject and flash to background distances remain fairly constant, some balancing of the two lights may be required. Once the optimal output was determined, moving closer to my three subjects required no major exposure adjustments. While the photograph appears to have only one light source, careful examination will show that there are some indicators of my twin-flash lighting solution. If you look at the archway on the left side of the background, you will see a distinct vertical shadow, a sign that a second light was used. The shadow is also an reminder of how dark the background would have been if the a second flash was not used.

 Bumps In The Road:
 As is my habit, I invited my host to gather as many group photos as she liked, simply because it wouldn't involve any additional effort once the lighting solution has been established. I noticed that this series of photos didn't look like the others because it appeared that my background light had failed to trigger. After this shot was made, I dismissed the group and discovered that the Gorillapod had rotated on the round railing and was now facing straight down, probably bumped by one of my subjects. If you look at the cropping on the right, you can see the highlights created by that wayward flash. In the future, I'll be sure that the 'pod legs have something else to grab onto for additional support. I also purchased a medium-sized lightweight photo clamp with a tiny ball head for mounting a 1/4 x 20 cold shoe. This should prove more secure.
The Takaway: There is an important takeaway from this assignment: A second flash can really improve the appearance of the final photo without too much additional work. When I attempt a similar shot in the future, I would start by determining the background flash output and ISO combination necessary to produce a suitably exposed background at F 5.6. Next, I'll stand exactly where I plan to place my subjects and make selfies, adjusting the power output on the flash until I get a suitable selfie exposure. Once this is done, I'll only need to adjust the exposure on my on-camera flash.
 Radio Triggering Alternative:
 You may know that I've taken to using Godox flashes, primarily for their fast recycling times and built-in radio triggers. While convenient, they can be flummoxed when you cannot establish an unobstructed line-of-sight relationship between the controller and the remote. In the future, I may include a Nikon SB-800 speedlight to use an an optical trigger. Forgive my terrible mockup. I'd tape my snooted SB-800 (red bubble) set to the optical trigger (SU-4) mode on the other side of the rotunda. Both the flash head and the sensor would be rotated to face the backs of my subjects. Then I would re-configure the Godox flash on the balustrade to trigger with its built-in optical trigger. The on-camera Godox would be configured in the manual mode. In use, my on-camera flash would bounce off the back wall, providing enough light to trigger my background SB-800. When it flashes, the light will be directed across the rotunda towards the rail-mounted Godox, causing it to fire and illuminate the background. This execution is very convoluted, but necessary if the native radio triggers in the Godox units fail to communicate properly.
I bring this up because this kind of lighting can be obtained using almost any flash with manual output controls. An optical trigger can be attached to the existing flash hot shoe, or in the case of some select Nikon speedlights, the built in in SU-4 modes deployed. I dare say that similar results can be had with very little cash output, a little imagination, and an appropriate amount of planning.
*The Zumbrella is a proprietary shoot-through umbrella manufactured for, and sold through, David Ziser, a well-known Kentucky wedding photographer. The fabric was less opaque than the normal shoot-through umbrella, allowing more light to reach the subject.


 I ran a quick series of selfies using a camera-mounted bounce flash as my key light and the gridded Godox flash to produce a hard round highlight on the background. I set the Godox to trigger optically, and placed it on a light stand about four feet from the wall. As before, the shots were fired with the least restrictive configuration (one grid) on the upper left to the most restrictive (four grids) in the lower right.


