Sunday, March 26, 2023

Cat Labs Focus Tab


I bought my Laowa 10mm F 4.0 lens for use as a compact backup lens. But with its compact size and wide field of view came came some handling problems. My modestly sized fingers would occasionally "photo bomb" my images. The situation was made worse when I added a 55mm polarizing filter and requisite 39mm - 55mm step up ring. The additional diameter of the filter created a trough that made it even more difficult to access the already narrow focusing ring.

Buy yours here.
A company called CatLABS offers its Lens Focus Tab, a rubber focusing ring with a raised finger hold. It comes in three diameters to accommodate lens focusing rings As it turned out, the 1.5" size fits the Laowa perfectly, the internal "teeth" engaging the focusing rings knurling to assure good traction between the ring and the lens.

The raised focusing tab isn't a new idea. It is featured prominently on many of the Leitz lenses where a little extra gripping surface would be helpful. In keeping with the whole rangefinder vibe that permeates the Fuji world, this product was a natural. While lacking the traditional metal construction, its stretchy rubber composition makes it adaptable to a wide variety of lens focusing rings.

Laowa lens without (left), and with (right) the focusing ring installed.

I've used this tab for several weeks, and can report it has been very helpful. Unfortunately, when used on the Laowa, it completely covers the distance scale. That might not matter, were it not for a problem specific to this Laowa lens: The infinity stop is not properly adjusted, allowing the user to potentially focus past infinity. The image at the upper left shows where the lens physically stops when the infinity symbol is past. In the few situations when I don't verify focus using the viewfinder, I simply rotate the focusing ring as far as it will go, and then back off a bit. which allows me to take advantage of the broad depth of field. It hasn't eliminated my finger's tendency to intrude into the frame, but has reduced its frequency.

All in all, I'm happy with this accessory. Its rubber construction is easily detected when my fingers wander about this compact lens, and if I'm completely lost, the raised thumb tab stands very proud to the focusing ring. And to prevent finger intrusions, I always do a final viewfinder check before pressing the shutter release. It's a pretty simple solution.

Polarizers Part 2

Click here to view image source.
I started out thinking that my long-forgotten polarizing filters could add something in my photos: skies rendered dark and in intense shades of blue.

I decided to test my polarizer in a parking lot in a recreational area in Richmond. For this exercise, I placed my camera on a tripod to ensure that all of the images were identical in framing. I used a  Fuji X-E1 body and my newish Laowa 10mm F 4.0 lens. I chose the Aperture Priority exposure mode.  I can't give complete exposure information because manual lenses do not provide aperture values for the EXIF data, but if memory serves, the aperture was set to F 8.0. No adjustments to exposure (Levels) were made in post processing.

Camera Position: If you look closely at the orange pole, you notice that it has no visible shadow. The camera was positioned to yield perfect front lighting conditions. If the "Finger Point Rule" is followed, one's extended thumb would trace a line parallel to the horizon. This was meant to minimize the uneven darkening of the sky seen in my earlier side-lit photos that I made in Sausalito.

First Pair, Exposure Compensation  Value = 0: The photo on the left was made without the polarizer, the one on the right, with. After making the first shot (left), I rotated the polarizer to achieve the maximum effect, and held it in front of the lens while the exposure was made (right).

Second Pair, Exposure Compensation  Value = -1 Stop: The photo on the left was made without the polarizer, the one on the right, with. You can see that the polarized image on the right has a dramatically darkened the sky. But when compared to the unpolarized image on the left, reducing the exposure by - 1 stop produced a similar effect. 

My dad used to say the every black and white print needs to have one true white and one true black. I have applied this rule to my color shots. A black and a white reference point helps to convince the viewer that the colors are "true", even though the use of the polarizer and the overall underexposure yield a saturated, almost surreal, interpretation.

Conclusion: For the moment, it appears that one full stop of underexposure can nearly duplicate the effects created by a properly oriented polarizing filter in a perfect, front lit environment. Earlier, less formal testing demonstrated the limitations of the filter when used in side lit situations. Also, the banding, shown here in a photo made during the late afternoon appears to validate the Finger Point Rule (band of maximum darkening following the arc indicated by the outstretched thumb). It may also validates the warning about using wide angle lenses with polarizers, but the images made in Richmond seem to show that " It ain't necessarily so" in all circumstances.


In this final shot (same lens, with polarizer), you can see that I changed my position. The shadows indicate that the sun is coming from high over my left shoulder, but the image is basically front lit.  The top edge of the frame has been darkened, and is darker still in the upper left and right corners, no doubt due to lens vignetting. It's still a pleasing photo, subject matter notwithstanding. But knowing what I know now, I will be more likely to underexpose the image before reaching for my polarizing filter and its requisite adapter ring.

This fun video for dpreview.com gives you a quick, fun, summary of everything you really need to know about polarizers. I thought it would be a fun way to end this post!

Sunday, March 19, 2023

What You Saw, What I Saw

View the original here.
I was checking sculptor Sandra Shaw's website when I discovered this photograph. Ms. Shaw is the sculpture who created the bronze statue to honor the Japanese Americans who were interned during World War II. I knew that there were photographers standing on the raised partition behind me. One of them captured this image.

On closer inspection, I noticed a familiar camera with a familiar flash, held aloft by a photographer. By golly, that's me, using the "Hail Mary" technique to get a better angle on the scene. If you at the image at the right, you can see my trusty Fuji T-2, and a Flashpoint Zoom LI-on X flash with its head angled upwards.

Ethics: When submitting a photograph as "news", there is an ethical standard that photographers must meet. "Photos Do Not Lie" is central to the viewer's trust in our images. and we must follow a standard of "Photographers Must Not Lie" when submitting our images as true representations of what we saw.


It is apparent that my photo was taken at almost the same time from almost the same position. I was closer to the edge of the crowd and slightly lower, which is why the spectators at the edge of the frame are easily recognizable. The only significant difference is the flash, which allowed me to add detail into the shadow side of the nearest spectators.

The human eye is amazing. It can effortless switch between areas of bright sunlight and darker shadow, within reason, and can extract information from either situation. Neither film nor digital sensors can do this without some help. which in my case, was the addition of the flash to the mix. By using flash, I was able to capture the mood of the crowd, and their individual expressions. This supplementary-lit photo also maintained more detail when published on newsprint. For me, it was win-win.

Ethically, some may question the addition of flash was an artificial influence on the subject. I contend the flash merely gave the viewer the ability to more closely examine the details that the first photo didn't. The "golden" tone it gave to the statue was unfortunate, but inescapable due to the flash placement so close to the lens axis. At the very least my photo provided a better sense of the audience reaction to the unveiling. There is one drawback. By optimizing the flash to ambient exposure for the foreground, the people in the distance were too dark. I think that using the flash was the only way to go.

Eugene Smith: There is a famous quote attributed to photographer W. Eugene Smith (1918- 1978). When asked about lighting technique, he said, in effect, that he only used available light, which many assumed to mean natural light. After a pause, he clarified:

"Available light is any damn light that is available!"

Sunday, March 12, 2023

Gary Fong's Classic Light Sphere


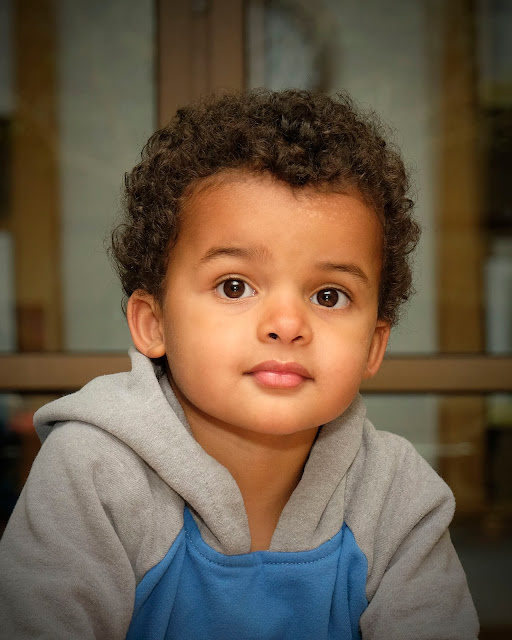
Guapo: This photo of "Guapo*" was made on my last assignment using a Gary Fong Lightsphere. Those who have followed my blog know that I was an early adopter, and that I still recommend it as you first, and possibly your last, flash modifier. It's simple to use, reliable, and durable. Since it was an exhibition, I assumed the quarters might be cramped, so a single, on-camera flash was the best choice. 

Order yours here.

For this assignment, I brought a Godox flash with a rectangular head profile since my Light Sphere wouldn't fit on my preferred, round headed Godox V1. There is a wide variety of accessories that attach magnetically to the round head including color correction gels, snoots, grids, and diffusion domes. 

I happened to visit the Gary Fong website, and found that they have updated the Light Sphere to accommodate the Godox V1 as you can see from this photo. In this photo taken from the Gary Fong website, you see the Light Sphere without the removable cloud dome. You can see that the magnetic bezel of the V1 is clearly visible, and accessible to a filter holder. This solves my gelling problem, and moves this round-headed wonder back into my camera bag.  It turns out that with the dome removed, it can be stuffed into the compartment in my Domke F2 Camera Bag where I normally stow my X-T2, nose down, with its 16-55mm lens. It takes up no additional space, and it adds some additional padding. The dome is removed and then stowed behind one of the bag's internal dividers.

Light Sphere In Use: Normally the LS is used with the flash pointing straight up and the dome in place. To the good, it make deflects all of the light back into the LS, directing it outward at 360 degrees on the horizontal. The light is free to bounce off the walls to provide some gentle fill light. This being said, the light is basically an above axis light source placed higher above a conventional, forward facing flash. The takeaway is the Light Sphere with its Dome in place can function in rooms with high ceilings.

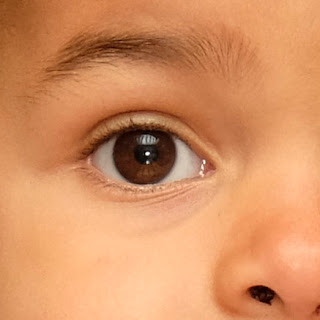
Alternatively, in venues with rooms having conventional ceilings, you can remove the dome and orient you flash to an optimal bounce configuration. Guapo's photo was made with the dome off in a room with a conventional eight-foot ceiling. In the sample at the top of this post, the dome was removed and the flash pointed straight up. You can see that the lighting is even from front to back bouncing down from the ceiling onto the wood panels in the background. Examination of the catchlights shows a large catchlight from the ceiling. accompanied by a smaller one  from the Light Sphere itself. You can see this in the tight crop of the eye shown here. The third, small catchlight is probably from the varnished wooden bench my subject was sitting on. The latter two catchlights can be removed in post, if they bother you.

Alternate Techniques: As I mentioned, there are alternative bounce techniques when the dome is removed. For this shot I pointed the flash towards the wall so the light would land evenly on the wall. In this case, it worked fairly well, and the image, if submitted for publication, would require minimal exposure correction. The LS itself provided the light the illuminates the viewer at the left. As you can see by the shadow on my subject's jawline, there is sufficient modeling on her face in spite of the fact this is on-camera flash, but a little higher than normal.

The Light Sphere has been copied overseas, and while the original costs a little more, it's worth it. I've been using them for about fifteen years now (I consider myself a relatively early adopter) and is still the flash modifier I recommend if one is just starting out. And the product keeps improving, so I'm glad to add this newest iteration, the Gen 5, to my camera bag.

Update - March 19: As of today, I have not yet received my Light Sphere Generation 5. I ordered it a week ago, and received the Dome, but not the LSG5 itself. All attempts to contact the company have been bounced back. I can understand some production and delivery problems, but as of now, nothing but crickets. Will update this post when the LSG5 finally arrives. I have faith.

*Spanish for "handsome".

Wednesday, March 8, 2023

The Spirit Of Lomography

Sharpness: Upon close examination of any of these Morning Walk photos. it is easy to see that these images are in focus, but not particularly sharp. I accept this, simply because it brings me closer to the limitations of my original carry camera, an Olympus 35SP. Sadly, it never lived up to the hype about the sharpness of its lens. And since the negatives were being enlarged using an ancient Solar 4X5 enlarger and a pre-war Schneider enlarging lens, my soft negatives were softened further. It wasn't until I upgraded to a Pentax Spotmatic camera, an Omega X22 enlarger, and a 50mm F 2.8 Nikkor enlarging lens that I started to see a major improvement in sharpness. Until that point, I was in my happy place, finding solace in my Father's advice: If I couldn't make them (my prints) sharp, make them small. In those days, 5" x 7" was considered my standard sized print. Getting a sharp 8" x 10" print from a 35mm negative was a challenge until I upgraded to a 2 1/4" Mamaya twin lens reflex whenever print quality was important.

Going Digital: My standards for satisfactory sharpness have lowered considerably since going full digital for input (creating my images) and output (posts on my blog). When viewed on a laptop, my resolution floor of 300 dots per inch and standardized crop of 8"x12" is overly dot-dense. When such an image is uploaded to my blog, it is reduced to less than 1/5 of its original pixels. There are bound to be compromises throughout the journey to a digitally published product, and if I adopt the attitude that all digital images are by their nature ephemeral, the only lasting impression will be the qualities that the photographer chooses to elicit in the viewer, which for me distills down to the joys of color.


Lomographer At Heart: The Pandemic drastically reduced the number of photographic assignments, and with it, the critical need for super sharp images. Since the start, I began making photographs during my morning walks using inexpensive, manual focus lenses in an effort to both distract me from the physical lockdown and to see what all the fuss was about Fuji's Focus Peaking feature. It also brought me closer to my analog roots, resorting to a more careful approach to composition and critical focus. These photos were taken with my 10mm F 4.0 Loawa, a lens that had received some good press. The above photo is shown with a cropped portion, demonstrating that the lens is capable of satisfactory images when viewed online.

My Sister's Influence: My sister has always been a traveler, and I suspect the reason for her becoming a teacher was her summers would be free to explore the world. Before her camera of choice was a Nikormat Ftn with a 43-86mm zoom lens, she carried a Konica C35, a compact camera whose primary claim to fame was its compact size. She used the  C35 to make the photo that has always been my favorite. Somewhere in the Mediteranian, she photographed an inverted yellow rowboat on a background consisting of early morning skies and blue, still waters. It was underexposed, making the yellow boats almost too saturated to believe. I can still visualize the photo, even though the original transparency has been lost to the ages. Without realizing it at the time, this simple snapshot was my first lesson in complimentary colors.

In some ways, these photos, taken with my collection of inexpensive manually focused lenses, are an homage to her memorable image where sharpness took a back seat to the simple joy of color.