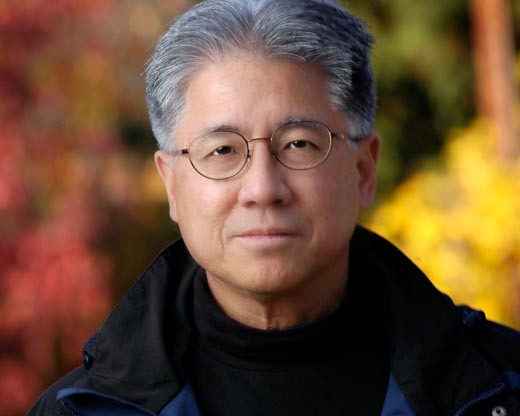
I was trying to make a photograph that took advantage of the vibrant reds and yellows in the trees surrounding the parking lot of the Marin Arts and Gardens Center in San Anselmo in Marin County. It was a quiet Saturday and the parking lot was almost empty. While I arranged all of the lighting and made the appropriate exposure settings, a friend made the actual photograph.
Establishing The Background Exposure: If there is one thing that digital brings to the table, it is the ability to evaluate your photograph instantly. This image was built from the background forward. I selected a group of colorful leaves as a background. I established the proper exposure by taking a reading in the Aperture Priority mode, and transferring the settings manually to the camera. I made several test shots, experimenting with modest degrees of under and over exposure until I got something I liked. Examining the post-exposure histogram on the back of the camera told me the hightlights were not over-exposed beyond recovery. However, I had no idea of how the background would actually appear in the final photo. I concentrated only on the exposure, and settled on settings of 1/125 of a second at F 10.0, ISO 200, with a Cloudy White Balance preset on a Nikon D70s.
Establishing The Mark: In order to prevent the existing sunlight from affecting the exposure on my face, I moved myself until my own shadow completely disapppeared in the shadows cast by the surrounding trees. Next, I put a rock exactly where I stood. This would be my mark.
Background Test Shot: To get a better idea of how the background would actually appear, I moved to where I planned to make the photo. Next, I focused on the rock. With the focus locked in place, I re-framed the image so the background filled the frame, and made an exposure. This showed me how the background would actually look when I eventually stood on my mark, in front of the background, and had my photo taken.
Lighting The Foreground: Now came the foreground (subject) exposure. Since the final product was to be a tight head shot, I moved a lightstand as close as I could without it intruding in the final image. In the end, it was so close that I could reach out and adjust it. I shot an Nikon SB-800 through an Zumbrella from high camera left. I made sure that the speedlight's sensor eye pointed directly toward the camera positon. I believe the final output setting was 1/4 power (manual output), possibly lower than that. The flash was triggered with an infra-red triggering device, a Nikon SU-800, part of Nikon's iTTL Creative Lighting System. A convention optical light trigger could have been used, but the flash coming from an on-camera position can be distracting to your subject. The infrared signal from the SU-800 is far less obtrusive.
Getting The Look: When my photographer friend was ready to make the photo, I had her position herself, up and down, left and right, until the background behind me had a nice balance of light and dark. This resulted in her taking a bent, half-crouching stance. The real trick was selecting a longest focal length on my zoom lens. In this case, the distance from the subject to the camera as about 15 feet. The focal length was set to 300mm. The foreshortening effect made the background appear larger in relation to the foreground subject.
And with a single press of the shutter release, everything fell into place.