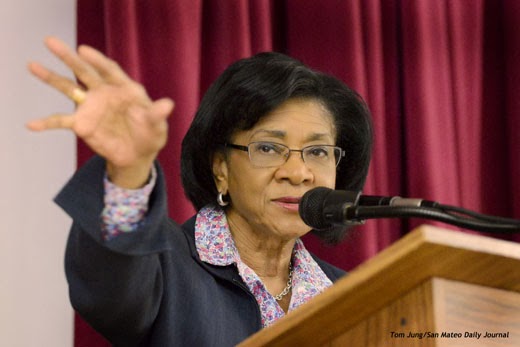
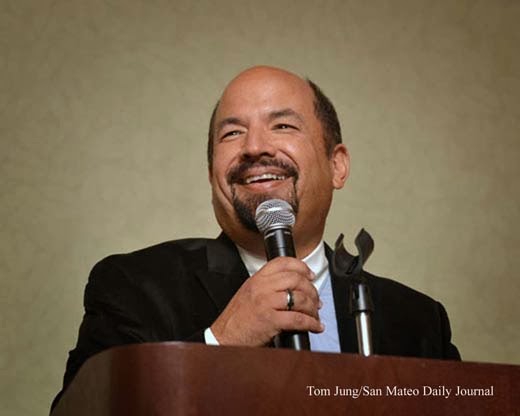
Sunday, October 27, 2013

Outdoor Flash - Beating The Sun With 2 Big Flashes


Photo #1
I made this photograph (Photo #1) of one of the four student soccer teams competing for the Mr. T Cup at the San Mateo Adult School's summer soccer tournament. While the shot isn't going to win me a Pulitzer, it does have the virtue of even lighting with great facial detail. I scouted out the playing field the day before to find a suitable background for the team shot. I chose to shoot into the sun to get more relaxed expressions on my subjects, knowing full well I would need to use flash to raise the brightness levels on the players closer to that of the open sky background.

For this shot, the "big guns" came out, namely a pair of Quantum T series flash heads connected to Norman 200B battery packs mounted on 8' light stands. They were placed about 30 degrees to the left and right of center, with the camera placed between the two stands. The flashes were triggered with a pair of Eilenchrome Skyport receivers and a camera-mounted radio transmitter. With both heads set to full power, I had a total of 400 watt-seconds between the two heads. One final note: the duration of the flash at full power, based on a table in the instruction manual, is about 1/400th of a second. 
The camera was a Nikon D7000 at ISO 100, flash white balance, with a 24-70 2.8 Nikkor set to 27mm. Instead of the D7000’s normal top flash synchronization speed of 1/250, the shutter was set to 1/200 due to the slight delay associated with radio transmitters. The aperture was set to F10, pretty much through a process of trial and error. So in a nutshell, the highest possible shutter speed would give me the darkest sky possible, and the aperture based on the output of the two flashes.

Photo #2

This closeup (Photo #2) of this player shows that the camera right flash appears to have been a bit stronger than the one on camera left, based on the shadow cast by the nose. This is because the subject is closer to the camera right flash, and therefore slightly more intense. If you look at his teammate at the opposite side (Photo #3), you'll see a change in the placement of the shadows.


In the final analysis, the shot works. The sky will be whatever brightness level (think shade of blue) the shutter speed and aperture will allow, and the aperture is based on how much flash power can be made available.

Sunday, October 20, 2013

Selfies


Get yourself a mirror and paint your own portrait, over and over. It's a great chance to experiment, you'll discover things about yourself, and you don't have to pay the model! (Susan Avishai)

Selfies. Ya Gotta Love 'em. Up until recently, I didn't know they had a name.

The shot at the top of this posting (Photo #1) never fails to amuse. Right after I made it, I brought it to my favorite lunchtime haunt, Nini's in San Mateo, and showed my handiwork to the waitresses, telling them I was photographed with my two identical triplet brothers. All believed it, at least for a moment, but their growing skepticism forced me to reveal my digital trickery. However, one viewer went so far as to state "...the middle one must be Tom, because he's the oldest". Ya gotta love 'em. More details later.

Making selfies in the film era was problematic because you could not gauge your success until after your prints were delivered. The immediately feedback provided by the digital camera's LCD panel allows you to adjust your exposure or composition should you wish.
Photo #2
Here are some useful strategies and techniques. The Left Hand Hold (Photo #2) is a very useful technique to master. Since all of my lenses have UV filters, I can use them as a mirror to assure proper alignment. 

There is one problem that you may encounter, particularly if you are not a supermodel, which I am not. The ergonomics of the camera make the Left Hand Hold relatively easy to hold, but pretty much forces you to photography yourself from the left side, or straight on. Supermodels may be many things, but being a successful photographic model requires a high degree of left to right symmetry in the face and body, a quality that is often overlooked.

If you look at yourself in the mirror, you may notice that one eye appears larger than the other. In my case, my left eye is slightly larger, perhaps due to a heavier lid on my right eye. Whenever I face away from the camera,  the left eye, which is nearer to the camera, will appear larger still, giving my face a slightly off-kilter look.

Photo #3
In Photo #3, I used a filtered flash coupled with an appropriate custom white balance setting to produce a proper skin rendition but forced the background to take on a magenta hue.

For this shot I used Gary Fong's Collapsible Light Sphere with one of his green fluorescent filters. I has been my experience that all of these filters work best when a custom white balance reading is taken, which I did. Doing so had the same effect as adding a magenta (color compliment to the green filtration) filter in front of the lens which gave a twilight look to the background. And since the (green) filter was attached to the primary light source (the Light Sphere), my skin tones are quite natural. I did crop the image slightly to remove some traces of bed-head. 

Photo #4
The next shot (Photo #4) was something of an extreme drag shutter shot. Taken at night, the key light was a speedlight bounced off the walls of the darkened dining room in front of me. The foreground exposure was provided by a single speedlight bounced off the wall. The background was illuminated by a  table lamp with a warm-white fluorescent bulb. For all intents and purposes, the bounced key light never reached the wall behind me, so the lamp provided all of the ambient light. In fact, you can see a reflection of the bounced light in the framed artwork in the background. The exposure was 1/2 second, and my slight movements created the irregular outline around me. The white balance preset was "Flash" to match the speedlight. In this shot, camera shake provided the ghostly edging.

Photo #5
When used outdoors, this same technique can produce some interesting images. In this photo made outside of my home, the street and window lights were used as simple accents because there wasn't enough light to fully illuminate the homes. In Photo #5, the left sample was made with the camera held relatively still, while the right was made with the camera panned from one side to the other.

Photo #6
This last shot (Photo #6) was featured in an earlier post. In this case I used an open aperture and a telephoto lens to provide the background blur. To make the shot, I positioned myself at the edge of a shadow cast by a nearby tree. This gave me total control over the light on my face, which in this case was a speedlight shot through an umbrella. The photo as actually made by a friend after I had done the setup and determined the appropriate exposure. It would have been impossible to hand-hold the camera since the camera was about ten feet away when the shot was made. Additional details on the shot can found by clicking here.

There is one take-away from these experiments: When in doubt, select the white balance setting that provides the best skin tones. In the mixed lighting conditions presented by these two experiments, I tried to keep the skin tones "realistic" and let the background go along for the ride. In Photo #3 I wanted the background to take on a magenta tone so I essentially set the camera's white balance to a generic Fluorescent setting and gelled the flash to match. In Photo #4, the white balance matched the off-camera flash, and the background just "did its thing".

Playing with different light sources and exposures can lead to some interesting results. While none of these selfies will be printed, each serves as a record of a lighting experiment that may provide a solution for a future lighting problem. Now if I can only get my subject to smile...

The lead shot was a sandwich composed of three layers. The three images (Photo #5) were made in front of a textured background using high frontal lighting with an accent light coming from the rear. The secret, if there is one, is to be sure that the camera is mounted on a steady tripod and that the camera not be allowed to re-focus between photos. This insures proper registration when the layers are merged together.

Photo #5

Sunday, October 13, 2013

Mr. Manners Meets Goofus And Gallant

Eustace Tilley, from The New Yorker
Gentle Photographer: 

Recent events made it imperative that Mr. Manners speak his mind concerning observations that have caused me great distress. I am speaking about behavior I would consider most inappropriate when one is engaged in recreational, professional, or semi-professional photographic endeavors. But I digress.

When you're in the field, remember that you can't make a photograph unless you have a subject to photograph. If you work with people as much as I do, you will definitely need your subject's cooperation if you're going to get what you came for. A recent assignment reminded me about how we, as photographers, should present ourselves in public. There are a number of things I routinely do that ultimately make my job easier, things that are easily overlooked.
  • Dress Appropriately: I never wore a suit to an assignment, nor have I worn shorts and a T-Shirt to an indoor assignment. I have found chinos, penny loafers,  and a black polo shirt adequate for nearly all of the events I have photographed.  
  • Introduce Yourself: I make it a habit to introduce myself to anyone who looks responsible, and especially to those who are wearing name tags or carrying walkie-talkies. I do this so that I am recognized as a media photographer by as many people as possible.
  • Explain What You Are Doing: When I get past "security" and am introduced to the publicist (or someone serving in that capacity), I try to explain what I am looking for in a photo. Remember that this person may be directly accountable for everything that happens during the event, and would be justifiably uneasy when there is a photographer wondering about, looking for random photos to shoot. 
  • Talk To Your Subjects: It's much easier to get your subjects to cooperate when they know what you're doing, and why. If you see something interesting, introduce yourself and explain why you want to make the photograph. 
  • Refrain From Eating and Drinking: Many events may have a snack spread out for the invited guests, and I have sometimes been told to "help myself".  My pat answer is "No, but thank you your thoughtfulness", simply because the person making the offer may not, in fact, be authorized to do so. There is also the potential, however slight, that somebody will see me eating and assume that I just decided to "help myself". 
  • Make Yourself As Small As Possible: I go to great lengths to not interfere with the guests and their activities. Stay out of the way as much as you can. This includes keeping your equipment bag out of the main stream so people don't have to walk around it, or worse, fall over it.
  • Replace Anything You Move: If you move it, commit yourself to returning it to its original location. I have occasionally rearranged furniture when photographing groups of ten or more subjects. But I make sure that I replace everything immediately after the image is made. Always assume that everyone is watching, and that somebody will remember you unfavorably if you don't clean up after yourself.
  • "Thank you, I had a wonderful time, this was the easiest photo assignment I ever had, and I'll probably win a Pulitzer Prize for the photos I made today. You really helped make this my easiest assignment ever...": Is this pretty clear, or do I need to explain further? However small their contribution, let the right people know you appreciate what they did.

http://ourprerogative.wordpress.com/2008/11/07/fun-with-a-purpose/
Goofus With A Camera:
Remember Goofus and Gallant? They were (or are, for all I know) a regular feature in Highlights, a magazine that could only be found in doctor's offices, or so it seemed. Basically, G & G was an ongoing confrontation of social values featuring two young boys facing an identical social dilemma. Goofus always takes the easy way out, never thinking about the impact of his actions on others. Gallant, on the other hand, always takes the high road. Consider him the the male counterpart of Shirley Temple. 


My takeoff on this "bad kid, good kid" format resulted from an encounter with a photographer during one of my assignments for the San Mateo Daily Journal. I was sent to make a photograph that would illustrate the essence of a charity tour of a recently renovated Hillsborough estate which was opened exclusively for this event.
  • Goofus comes to the estate and assumes that he is free to photograph whatever and wherever he chooses. 
  • Gallant checks with the publicist to see if there are any restricted areas, and any subjects that should not be photographed.Restrictions on photography are not uncommon whenever historical locations are opened to the public.
  • Goofus opens up a tripod and puts in on the Italian amber marble floor, denying other guests access to the room where he's photographing and risking scratches to the floor and scuffs to the furniture.
  • Gallant doesn't use a tripod unless it has been cleared by the publicist well in advance, and then only on a "closed set" with no foot traffic. If permission is given, Gallant makes sure that his tripod does not leave any marks, especially when the floor is Italian amber marble, and is particularly careful when moving to prevent accidental damage to the surroundings.If he must put his equipment bag down, it will be out of the way, and preferably on a carpet or rug to eliminate the possibility of scuffing the floor.
  • Goofus directs his wife to sit on a decorative antique sofa so he can make a photograph of her.
  • Gallant never poses his subjects on furniture that might be more decorative than functional, especially in a private estate where public access is restricted. Instead, his subjects are pictured standing beside the furniture with pleased expressions on their faces.
  • Goofus uses direct, on-camera flash.
  • Gallant uses soft bounced light, and never uses an on-camera key light unless there is no other way to make a photo. He may use it as a fill, but very sparingly.
  • Goofus uses Canon equipment.
  • Gallant uses Nikon equipment.Heh heh.
  • Goofus uses the self timer and then  leaps to his wife's side on the decorative antique sofa so they can be photographed beside one another.
  • Gallant drops his jaw in disbelief.
  • Goofus is told in no uncertain terms that he must immediately stop making photographs.
  • Gallant continues shooting, finishing the shot in less than two minutes.
  • Goofus, without a trace of contrition, returns to ask Gallant why he gets to continue taking pictures.
  • Gallant replies "I'm with the press, and I was invited".
  • Goofus disappears into the crowd and is not seen again.
  • Gallant, his photo 'in the can", packs up his equipment and prepares to leave, wearing his smile of simian satisfaction.
While my secondary rant was aimed at his behavior, it can serve as a reminder of how we should behave when working on location.  All kidding aside, photographers should consider how their actions appear to others. Even though you may be invited, you are not a guest. And while you may not be paid for your services, you should still present yourself as a professional. And finally, always present your best work. When you adopt the "Why bother? I'm not getting paid for this" attitude, you will miss opportunities to demonstrate how capable your really are. If you allow yourself to be governed by how much (or how little) you were paid, many will assume your unwillingness to produce a quality product comes from your inability to create one.

Sunday, October 6, 2013

Podium Shots

Photo #1

I recently made this photo of Belva Davis, a true pioneer in Bay Area journalism. I am an unabashed fan of her work, and religiously watched her Friday "This Week In Northern California" on local public television. I always enjoyed listening to her speak, and thought it a special treat when she was one of the speakers at an event I was covering for the Journal. Let's get the technical stuff out of the way: The camera was a Nikon D7000, 70-200 2.8 Nikkor, 1/160 of a second at F 3.2, ISO 6400 equivalent. It took me over 150 shots, nearly a full card, to get an image that I was pleased with.

I make a lot of podium shots. Politicians, Motivational Speakers, Authors, I've done them all. Sometimes you'll find a real gem, a man or woman with a perfect smile, a good stage presence, and the wherewithal to pause occasionally and look up from his or her notes. But just as often, your subject will be the exact opposite. Podiums are a true gift because you don't always get exactly what you want. You just say, "Thank you", and move on.

I actually enjoy shooting podiums, as the offer challenges to both composition, and timing. Aside from the obvious, here are some things you'll need to consider.

Lighting: I seldom encounter a situation where the lighting was arranged by a real lighting professional, so white balance settings are "close" at best, and position haphazard at worst. If one is lucky, the Incandescent white balance preset will work well, or well enough to adjust properly in post production. Assuming that aspect is under control, I move on to other aspects of the photo.

Shooting Position: I prefer to photograph speakers from the subject's left side. I find that a photo will have greater impact if the subject faces the viewers left. Since viewers usually read from left to right, they will visually scan the image in the same manner and will meet  the subject's gaze "head on". A minor point to be sure, but one that gives the image some additional impact. 

Background: I usually don't get to stand up for these shots unless I am very far away. Most of these shots were taken while kneeling on the floor, close to the stage. I try to stay at least ten feet away and rely on a relatively long zoom lens to get these tight shots. The low shooting angle can sometimes work to your advantage, since you can include large portions of the background to add context to the photo. When I can, I move to a position where the background adds to the informational value of the photo.

Hands: The hands often add some action to the image, and I watch how the speaker uses them. You can usually get an idea of a person's speaking style in the first few minutes. In all these samples, the hands add visual interest to the photo, and because they are usually away from the body, they are more easily seen. If the subject is right handed, the gesture won't be lost against the body. Also, try to NOT cut any finger tips off!

Mouth: In the image of Ms. Davis (Photo #1), the edge of the mouth is clipped slightly. It is not unusual for the microphone to cut into some part of the subject's face, so be careful. Sometimes the upper lip will cast a shadow on the subject's teeth. To avoid this, wait until they are looking into the light before you shoot.

Eyes: Avoid cutting off the far eye. Either get both eyes, or just the near one. Shadows caused by deeply set eyes can also be a problem. Again, wait until they are looking up before you shoot. This can be difficult because many speakers never seem to look up from their notes.
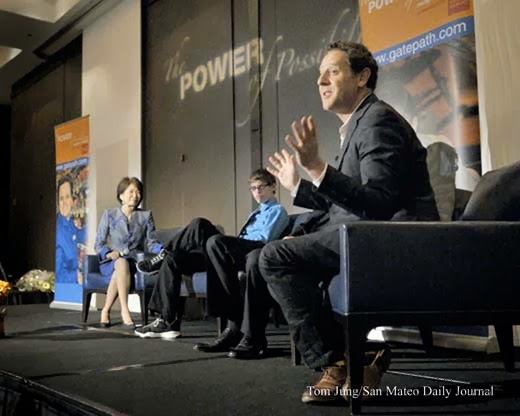
Photo #2
Photo #2 was made during a presentation by an independent film director who was discussing his recent film. The event was a fund-raising luncheon titled "The Power Of Possibilities". I made it a point of shooting with a wide angle lens from a low angle to include as much of the background as possible. Without the background, the image has no context. The rather harsh stage lighting was from the left, and the main subject faces directly into it. The hands are clearly delineated from the dark background, and the open fingers add some visual interest. Notice the single eye.
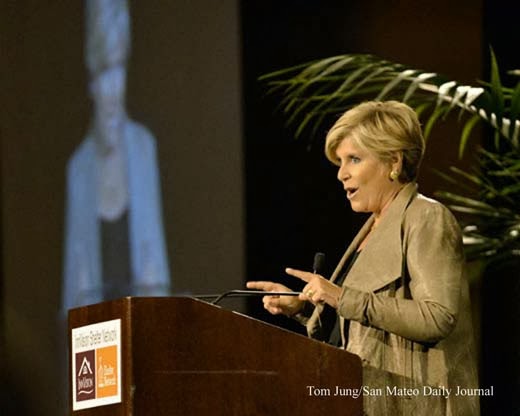
Photo #3
Photo #3 is a well-known motivational speaker. I was some distance from the podium and use a long lens to bring the background forward. Had there been more light I may have been able to use a smaller aperture to bring the projected image into clearer focus. Incidentally, the mixed light sources (incandescent for the speaker, "daylight" from the digital projector) give the image an odd look. However, the logo for the luncheon's hosts is clearly visible. The hands are well placed, clearly visible against the darker background, and in a forceful pose. Incidentally, this was the only shot where this "pointing" gesture was captured. Again, we have a photo that shows only one eye. One bit of advise: If you must color correct in post processing, make sure the skin tones are as natural as you can make them. The viewer can accept a surprising degree of discoloration so long as the skin tones are relatively true, or in the case, a tad on the warm side.

Photo #4
In Photo #4, the background helps to define the environment, just as it did in Photo #2. Again photographing from the subject's left, her eyes are focused on the audience, and her hands are clearly visible, separated as they are from the out-of-focus background. This open hand gesture adds to the impression that the speaker is ready to listen to input from the audience, which is precisely her intent. I probably could have increased the depth of field by shooting with a smaller aperture, but that would required an excessively long exposure time. When shooting indoors, you also risk the chance of subject movement, something Vibration Reduction won't prevent.
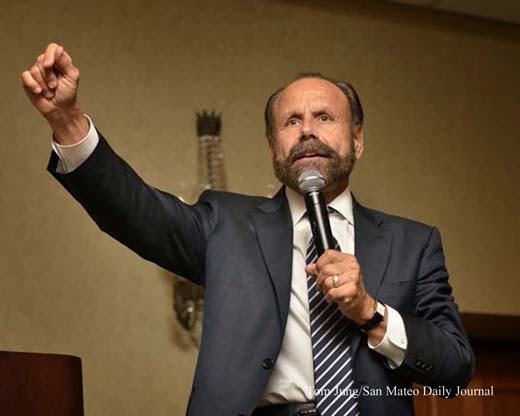
Photo #5
Photo #5 has all of the qualities of a good podium shot, in spite of the fact that the subject is standing in the middle of the room. All of the important facial features are clearly visible, and there is just a hint of teeth showing when he speaks. The arm is held up and away from the body, and his raised hand appears natural. Incidentally, this shot was taken with an on-camera flash aimed at the ceiling with a shield to prevent direct light from spilling onto his face. Shooting from a low angle eliminates most of the ground clutter, giving a clean image. The image was not submitted because the subject was not the keynote speaker.

Photo #6
Photo #6 is not particularly animated, but shows off the subject's winning smile. There is plenty of light on his teeth, and the microphone is held away from the mouth. As with Photo #5, bounce flash was used, and the shot made when the subject looked up. The background is completely without detail, but this might do as a photo for an article about him. This photo was not submitted, but included as an example of a technically good shot with little editorial value.

All of the images in this collection have some common qualities. They have animated poses, good detail and proper treatment of the hands and eyes. But remember that these images were chosen from dozens of potential candidates, many of which differed only slightly from the one that I ultimately submitted. You can't predict when you'll make the winning shot, but you can learn to recognize it when you're at your computer, reviewing the day's take.


Addendum: You may wonder why certain images, particularly Photos #2 and #4, while properly exposed, lack a degree of color accuracy. They were made using the light that was available. This is often a mish-mash of of incandescent and fluorescent light sources, a mixture that is results in a less than ideal color rendition. I was not able to take a white balance reading at the podium, so I chose one of the white balance presets, crossed my fingers, and hoped that I could correct it in post processing. Photos #5 and #6 were on-camera speedlight ceiling bounce, which explains the color accuracy of the image and soft quality of the light. Photo #1 was shot with north light from a bank of windows to the subject's right.