Sunday, May 26, 2013

The Sony R1 At Carnaval 2013

I attended Carnaval 2013 this year, perhaps out of habit, or out of fear that this would be the last Carnaval in San Francisco. Buzz had it that money was tight, and the city was reluctant to front a share of the money to put on the event. For a while, it was thought the event would not occur at all, but was given the "go" at the last minute.

Security: This year, the Boston Marathon bombing was very much on everyone's mind. When I first attended Carnaval about five years ago, officers gave my camera bag a quick examination before I was allowed to enter the staging area before the parade. Now, nobody would be admitted until just before the parade started, sometime around 10:00 am. I was told that the main entrance was at 24th Street, so I decide to wander over. When I arrived, I noticed some photographers milling around a table with an awning marked "Press". Since I had my San Mateo Daily Journal press pass with me, I introduced my self to the gentleman in charge, explained that I didn't know that there would be a press sign-up, and asked if I too could be issued a Press/Media pass. He asked to see my press pass, my Driver's License, and asked if I had a cell phone. Yes, sure, and yes. Right then and there I was given my Press Pass . I now had open access to the staging area, which was what I wanted from the start.

Walking about, it seemed as though there were fewer marching groups than before. The Guatemalan contingent did not attend this year due to a $1,600.00 participation fee. Missing too were the Low Riders and the Pirate Ship, Carnaval regulars in the past. Still, there was an excitement in the air, and groups were practicing their routines, adjusting their sound systems, and getting ready to march.


I decided to rely on my Sony R1 and a Nikon SB-800 for this assignment. I found out the the Sony would not communicate fully with the shoe-mounted SB-800, which in this instance was a blessing. The speedlight would trigger properly, but nothing else. This would allow me to synchronize the flash at all speeds up to 1/2000 of a second (the R1's top speed) without any exposure cutoff if the SB-800 was set to 1/4 power or lower. At 1/1000, I could take the SB-800 almost up to full power. I mounted one SB-800, set it to SU-4 mode in Aperture Exposure Mode on a monopod, and triggered it with a second SB-800 (in manual mode) mounted in the Sony's hot shoe. My base shutter/ aperture/ISO setting was 1/1000 of a second, F 5.6, ISO 200. In this shot, the exposure is very well balanced, since the shadow caused by the flash is barely visible on the ground. 


For this shot, I increased the exposure time by a factor of 4 (1/250 from the original 1/1000 of a second). This was provide a more appropriate exposure for the street which was deep in shadow. The sky, as expected, is over-exposed, but the flash, responding only to the aperture, properly exposed the waking couple. The image was just an experiment, so I get to take a "pass" on the odd composition.


Light On A Stick: The best reason for mounting one's flash on a monopod is the ability to raise your light well above the line of sight. This is particularly important when photographing from a low angle, which the R1 has a reticulated LCD panel that makes it easy to do. Let me give you an example of how importance height is. If you are photographing a subject that is 6 feet all and you have a light stand that is 6 feet tall, your flash will be at your subject's eye level. If you are trying to achieve a 3-dimensional look to the photo, you'll need to raise the light above the subject.

Now here's the problem. My monopod is about 4 feet long when extended. When I rest the support end on the pavement, the light is just 4 feet from the ground. But if my proverbial 6-foot tall woman walks onto the set, my light is coming from below her face, resulting in a strange, up-lit look. When making a shot like this, there are two options: 
  • You could rest the end  of you monopod on your shoulder to get the additional height, or,
  • Hand your monopod to somebody who is standing up straight.


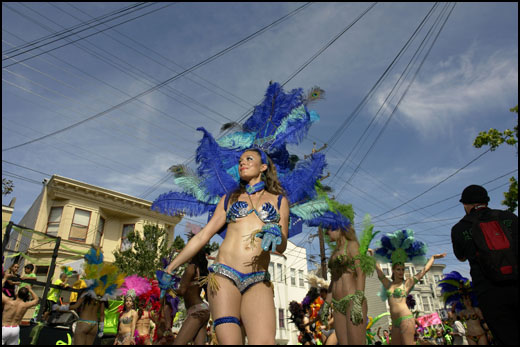
Because the main subject is actually in the shadow of the buildings behind me, the only light hitting her is coming from the speedlight. You'll know that you've achieved a proper height when you can see a shadow below your subject's nose or chin. Judging by the shadows on my subject, my light is well placed. Her torso is somewhat pale, but this is probably due to a lighter complexion, not necessarily a lighting issue. But for the most part, the balance between the speedlight output and the ambient light on the background buildings is spot on.


Better Lighting: I included this final shot to demonstrate the effects of a good light modifier. In this case, I shot the SB-800 through a Zumbrella to give a large, soft light source. It was quite a struggle to get the entire unit properly positioned since the slightest breeze would make it difficult to control. But good lighting is good lighting, and I think the result was well worth the effort if you can make it work. I usually don't take this route unless I'm indoors, or in a dead-still outdoor environment. I still make it a point to keep a Zumbrella with me when I photograph on location, but may opt to not use it when there is a chance that something could go wrong.

I'll be addressing specular highlights, a common problem when using speedlights, in a subsequent posting.

Sunday, May 19, 2013

Everything I Know About Shooting Groups


I frequently shoot groups for the Journal. I will admit that I am not great at it, but I have always felt it's the one thing that I'm most often called upon to do. It requires a minimum of creativity and a maximum of preparation, since the more people you have, the greater the chance that something is going to go wrong. Count on it, somebody will blink, look sideways, or just fail to follow instructions.


One personal observation: Well assembled and well photographed groups are pretty much taken for granted. But when something goes wrong, it really REALLY goes wrong!

Being Prepared: Looking back, I could say that the level of preparation directly effects the quality of the shot. It's pretty easy getting rattled when a dozen or so people are waiting for you to give the directions and make the magic happen. Once you get the technical stuff out of the way, you can concentrate on the arrangement and the expression. But get rattled, and things can easily slip away.

For this next shot, I thought I would be creative and find a location with a neat background. I had my requisite Zumbrella with twin speedlights on a light stand set and ready to go. My pre-test shots were properly exposed, so I thought I was ready. My equipment was pretty safe (after all, who wants to be seen carrying an umbrella/speedlight setup across a crowded hotel lobby), so I wandered off, looking for my contact and my subjects. 

To my dismay, another photographer had already started shooting groups, and most of the subjects were already posing for him. I scurried back to retrieve my lighting set-up and bring it to where my subjects were already waiting.

Because of the low ceiling I decided to remove the Zumbrella completely, and instead pointed the twin SB-800 speedlights at the wall-ceiling juncture just behind me. This would give me a good bounce surface with a hint of warmth. When I was ready to start shooting, some additional subjects "jumped in" at camera right, but because I was still thinking about the flash set-up, I didn't pay attention to where they were standing. 

That's Anna Quindlan, fifth from the left, by the way.


Bazinga! While the heights on the rightmost four subjects were reasonably even, they were farther from the camera than those on the left. If you look at the carpet, the camera-left subjects couldn't back up (there's a rail behind them), but I could have/should have had those on camera-right come a bit closet to me. This would have evened out their heights. This is more critical when using wide angle lenses because the perceived distance between the foreground and background is exaggerated.

Flop. My absolute "favorite" flop-shot was taken in 2010. 


When I chose an outside location, I didn't think that I would be working in such close quarters. And as luck would have it, the Commander wasn't reliably communicating with my remote flashes, so I quickly converted them to SU-4 at full manual setting and made some test shots. This is guaranteed to make both the photographer and his subjects even more nervous, and somewhat less attentive to details.

Its easy to see where I went wrong. The subjects were arranged at an angle because the sidewalk was narrow and I had a row of parked cars behind me. The two gentlemen on the right look so much larger than everybody else. The photo could have been salvaged had I moved my two tall subjects to camera left, further from the camera, where their heights might have be been less obvious.

Seated Subjects: This shot of a recent group highlighted something that is starting to come together. One problem is positioning the legs. I hit upon a suitable combination that seems to work. I would have gone to greater lengths to refine the pose, but Judge Labson-Freeman (back row, right), could only spare a minute, so I had to shoot faster than I normally would. As it was, I made three exposures in that single minute, and this shot was the best.


First The Good: I think that the first young lady's pose is the most graceful of those from the front row. For future use, I'll remember to follow this checklist:
  • Sit on the forward edge of the chair/sofa/bench.
  • Rotate so that your legs point slightly away from the camera. This keeps the legs from looking like stumps.
  • Cross the legs at the ankle, not the knee.
  • Cross the leg closest to the camera over the other.
One other thing to remember: When your subjects are sitting, do whatever you can to get some distance between you and the subjects. If you get too close, the kneecaps will appear larger than they should.

This is not a polished photo, but I now have a strategy for establishing a more pleasing arrangement of the foreground legs. Next I'll have to work on the feet. And a quick reminder: Never try this on a guy!


Now The Bad: Notice the second standing subject? He looks waaaay too wide. This can be fixed by placing a less wide subject in slightly in front of him. You can see how this placement made the third standing subject appear thinner. I would suggest that the only person who has both shoulders showing is either the most important, or the thinnest.

So there you have it. Everything I know about shooting groups. 

Sunday, May 12, 2013

Photo Shooting, Photo Shopping


The Dilemma: There have been volumes written about Photoshop's impact on the credibility of our digital images. Certainly, Photoshop has been loads of fun to play with, and can produce some amusing results as seen in this assignment I gave in one of my classes.

In are recent post, David Hobby reminisced about some of the many techniques photographers used during the pre-digital days to tweak their exposures under adverse conditions. For me, there is one paragraph that was particularly meaningful, and I quote:

"... the limitations of this physical darkroom process is also what set our ethical limits when Digital Photoshop arrived. If you could have done it with an enlarger (dodging, burning, tonal adjustments, etc.) it was ethical. If not (cloning out a Coke can on a table or a power line behind a head shot) it was not."

This reflected my own opinions concerning the line between an "enhanced" image and a "doctored" one. Mr. Hobby's Big Three Enhancements (Dodging, Burning, and Tonal Adjustments) are pretty self-explanatory, and in my mind are appropriate for insuring that significant detail is maintained in the highlight and shadow areas.
The Shot: This shot was taken at the San Mateo County Forensic Laboratory. My editor wanted a shot of the Laboratory Director, along with some staff members, taken in the lab. I wanted to provide a good sense of the lab environment with lots of high-tech detail. While this may not be as sexy as CSI Miami, this is the real deal, and these gentlemen are the scientific muscle behind law enforcement within the county. The details? Nikon D7000, ISO 200, Flash White Balance, and 2 SB-800s as Remotes shot through a Zumbrella at a height of 9 feet with a third shoe-mounted SB-800 serving as Commander. I was standing on an elevated platform, looking down. Exposure was 1/80 @ 5.6. The lens was a 11-17 Tokina, set to 13 mm. I normally crop much tighter, but decided to leave some space to correct the wide angle "stretch face" that was occurring near the corners. I purposely employed a loose crop so I'd have extra image space to work with.

When using Perspective correction, you are going to lose some real estate in the corners. For those who are making these corrections, you'll want to cut your loses and keep as much of the image as possible (and assuming that that the image is level) Try this:
  • Crop the image to an 8 X 12 aspect ratio, keeping as much of the image as possible. When using a DSLR with an APS-sized image, you wil find this aspect ratio a nearly perfect match, so you can potentially retain the entire image.
  • Turn on the Viewing Grid to "on".
  • Using the Perspective tool, draw the upper corners until the are re-positioned one-inch inbound on both the left and right sides.
  • Accept the changes. 
  • Change the Crop aspect ratio to 8 X 10, and crop.
Your image will now be a perfect 8 X 10 with a minimal loss of surface. 
 

Some additional cropping was used to minimize the effect of those distracting boxes on the left and right sides. While the converging lines of the back wall are reasonably parallel, the table is still "strained" due to the oblique angle at which the photo was taken. Looking on the bright side, who wouldn't want to work in laboratory with rhomboid-shaped work islands?

Conclusion: I contend that this use of Photoshop is still within the boundaries Mr. Hobby described, since the same effect could have been achieved in a conventional darkroom by tilting the easel (the frame that holds the printing paper) before the exposure is made. Had I been printing an identical negative to this sample, I would have adjusted the easel so that the top edge of the image was closer to the enlarging lens than the bottom. If you were lucky, a smaller aperture setting on the enlarging lens would provide the depth of field necessary to render top-to-bottom sharpness. I remember at least one enlarger that had a tilting lens board for use when this very type of correction was required. 

I hope this makes my case for using perspective adjustments for images that must be taken from angles where such visual distortions occur.

Sunday, May 5, 2013

Plane Of Focus


Here's a photo, taken at Carnaval in San Francisco, that should be consigned to the Recycle Bin. It could have been a great shot, if it wasn't so "blurry". But if you look closely, you can see that some parts of the image are quite sharp.


On closer examination, we find that there is a Plane of Focus where the details are sharply rendered, Unfortunately, it is position about four feet behind my two intended subjects. The image failure was due to improper focus, not a lack of depth of field.

Focusing Brackets: In the viewfinder of a typical DSLR you will see pairs of Focusing Brackets. The number will vary from three (Nikon D40) to 51 (Nikon D4). Individual pairs of brackets can be selected, giving the user to options to determine exactly where the plane of focus will be. Additionally, you can select which pair of brackets will be active, which greatly increases our control over the situation.

I typically opt to use the central pair of brackets, and shoot in the Single Servo mode. I choose the central pair because they are the most sensitive to variations in contrast, and are therefore the best choice for critical focusing. This means that when the shutter release is partially depressed, the lens will sample the scene, near to far, until sharp contrast is obtained within the selected brackets. Once this optimal contrast is determined, the camera locks in the lens at this point of critical focus. When the shutter release is pressed all the way and released, the camera records the image.


In this simulated look through the viewfinder, you can see the Focusing Brackets positioned on the Elmo hand puppet, which happens to be in the center of this composition. Because of Elmo's position was centered in the frame. I was able to simple depress the shutter release until the exposure was made.


Off Center Point Of Interest: The blind "compose and shoot" worked for the Elmo image, but what if the center of interest in not centered? This next example illustrates that very point.


If you examine the image, you'll see that the physical center is located beyond the glass walls of this terrarium. The solution would be to:
  • Recompose the image so that the focusing brackets and the center of interest coincide, 
  • Partially depress the shutter release to lock focus, 
  • Return to the original composition, and 
  • Fully depress the shutter release to make the exposure.


This is a simulation (rough) of the re-framing sequence in Bullets #1 and #2. When you return to your original composition, you will see that the focusing brackets are no longer on the center of interest. Since you locked in the focus at Bullet #2, your focus will not shift, provided your camera is set to Single Servo as I suggested earlier. At the moment the shot was taken (Bullet #3), the viewfinder probably looked something like this:


This works for single shots, so the sequence (Bullets #1 through #4) must be repeated for each subsequent shot. Or does it? 

AE-Lock, AF-Lock: Nikon DSLR cameras have a button conveniently located to the right of the eyepiece that is user-programmable and marked, "AE-L AF-L". (Click here for a detailed description). To address this problem, there are two settings that might be of interest:
  • AF Lock Only: If you select this mode, you first allow the camera to focus itself (using the focusing brackets of your choice) by partially depressing the shutter release. Once focus has been established (I program my cameras to "beep" softly when this happens), you hold the AE-L/AF-L button down and start photographing. The focus will not change until you release the AE-L/AF-L button.

  • AF ON: If you select this mode, the autofocus will be activated only when the AE-L/AF-L button is simply pressed. When you release it, the camera not change focus. Adjustments can be made by additional presses on the button
I personally prefer to leave mine set to AF Lock Only. I usually leave the camera set to Single Servo so that focus is taken, then immediately locked, so I can re-frame the image any way I choose.  In actual use, I would perform bullets #1 and #2, and once focus is locked I immediately hold down the AE-L/AF-L button. So long as my subject doesn't move, all of my subsequent images will be in focus, so long as I keep the button pressed.