Sunday, February 24, 2019

Hamilton in San Francisco

Real-Life Excitement on Opening Night - Click here
I was assigned to a press preview of the opening of "Hamilton" in San Francisco. I have never been to a press event scheduled at the SHN Orpheum Theater. I expected to see a mini-presentation of the play, or at least a song or two, but alas it was not to be. Perhaps the publicist felt that impressions of the show presented in words were more important than those done with images. As my editor (the wordsmith) was out of town, I was left with trying to capture some images to accompany her review (the photosmith). Or more likely, there could be some issues associated with recordings made during this briefing.

Luckily for me, the Orpheum is located at one of the the public transit exit points, so getting there was a six-minute metro ride to the theater's front door. Once inside and checked in, we were escorted to a single row of chairs facing the grand stairway that leads to the balcony. When I saw this, my heart fell. The existing light was limited to a few wall sconces and a chandelier that hung from the ceiling, so the stairway was essentially a dark cave that resisted all attempts at lighting. Of course, if I had free rein to light the venue, I'd have had speedlights everywhere, but that wasn't to be the case.

This photo was taken from a position just behind the row of chairs, and you can see a reviewer and a photographer chatting it up in the foreground. The shot was made with a flash and a Fong Light Sphere with the dome facing outward, as is recommended by the manufacturer. This wouldn't do much to improve the quality of light, but would spread the light more evenly. It was mounted on a short monopod which gave my light a slightly better, high overhead position. This was needed, as I was holding the camera at arms length above my head, assuming I'd need the height to eliminate photographers in the foreground.


Alphabetical Order By Height*:  As is the custom, actors in minor roles are introduced first, just as the runner-up is introduced before First Place. As they were coming down from the balcony, the minor players were in front, and the principles far in the back. Ironically, the actors of the greatest interest were positioned farthest from the camera. Still, I was confident that no other photographers would be making a better photo, since one other photographer and I were the only ones using flash, an absolute necessity under these conditions. I made the shot standing behind the line of chairs with my back to a post. As I mentioned, the camera was in the high overhead "Hail Mary" position , with the flash on a monopod held higher still for an improved light placement.

After a few minutes, the minor actors were dismissed and the principles moved to designated press stations where they could be interviewed. I found a group of journalists interviewing one of the actors. In this case, the tool of choice was the smart phone, and the two media outlets, V-Media and Joint Forces Journal, were busy asking questions and making video clips. It is apparent from my earlier efforts that conventional flash wasn't going to work, so I decided to concentrate on headshots and find an bounced alternative to direct lighting. I switched to a short telephoto lens, mounted the flash in the hotshoe, and started looking for actors in better shooting environments.


A Twist Of The Wrist: I found this discussion in the hallway just outside the mezzanine entrance. My first shot, left, was made with the flash pointed to my left, giving me a broad-lit shot and no details in the eyes. But when I rotated the head to my right and slightly behind me, I achieved a lovely butterfly lighting on a three-quarter portrait, giving me all the detail I could possibly want.

Final exposure adjustments made to improve on-line rendition
Bingo! I managed to find a "sweet spot" for my flash, and could now concentrate on expression. This young actor was especially animated, so I backed off to include some expressive hand gestures that might add to the photo. After I saw the results, I decided to re-shoot some of the earlier subjects, now confident that I could produce some images worthy of submission.

Final exposure adjustments made to improve on-line rendition
Reshoot: I went ahead and re-shot any actor whose images could be improved with this revised bounce light technique. I was careful to position my subjects in front of manageable backgrounds while positioning myself to maximize the effectiveness of the bounced flash. In this shot, I purposely included more background than necessary, should a rectangular photo be required.
Final exposure adjustments made to improve on-line rendition
Before And After: When I caught up with this actor, I positioned him in front of a suitable bounce surface and asked him to give me his best "big guy" look. For the second shot, I asked him to convince me that my kids would like to schedule a play date with him. I must have found his soft spot, because this is a million dollar smile, adjusted for inflation.

Final exposure adjustments made to improve on-line rendition
Emotional Focus Again: At the very last moment, my subject leaned into the camera, effectively moving out of the plane of focus. Just check the buttons on the far lapel. But it's a wonderful photo of this Hamilton actor, and while I love the shot, I could never submit it for publication. It's probably the best image in my reject bucket.

*This is a non-sequitur teachers sometimes used on students when  they were being told to queue up.

Postscript June 7, 2019. One of the photos ran in the Journal. Other photos appeared online in the SHNSF Newsletter.

Read the entire article  by clicking here.

Sunday, February 17, 2019

Making A Birthday Collage

Unnamed Birthday Guest with Red Nose
Happy Seventieth! Boy, time flies when you're having fun. A dear friend was celebrating  her 70th Birthday with a party held in her condo's recreation room. For as long as I've  known her, she has kept a supply of red noses to wear whenever the situation called for a bit of levity. After all, who can be grumpy when confronted with somebody with a red nose? My plan was to create a composite image of all of her guests, each wearing a red nose. The post processing would be pretty straight forward, since I've done this sort of thing before. The goal was to set up a shooting area which would give me consistent results with a minimum amount of disruption to the party and the guests in attendance.

Subject 1.5' from background
Shooting distance 4'.
To standardize the images, I brought a collapsible textured background which I could tape to any handy wall. Since this was an on-going project, I needed to leave my setup in place so I could shoot candid photos when I wasn't playing portrait artist. I found a small alcove between the two restrooms, and by positioning the background on the far wall, people could get in and out of the facilities without too much trouble. I had some grand ideas about using a shoot-through umbrella, but the light stand was out of the question in these tight quarters. I settled on a camera-mounted  Gary Fong Light Sphere, and while not the most artistic light source, it was certainly good enough for the photos. The lens was a 56mm 1.2 Fujifilm lens mounted on an X-T2 body. The flash was an Adorama Li-on Fuji-dedicated flash that allowed for TTL flash exposure. As an on-camera flash the unit worked well enough, and while heavy, was definitely more convenient to use than my Fujifilm EF-X500.

Wall Fill: One happy outcome from my alcove selection was the natural fill provided by the two walls on the left and right. In this super enlargement, you can see the unnaturally straight borders on my subject's iris. You can see that there was plenty of detail in the shadows. Note too that the shadow edges aren't super-soft, as one would expect from a Light Sphere.

The Birthday Girl Herself!
Here's the Birthday Girl herself, just as the party was starting to wind down. As the guests started to leave, I couldn't help but notice that everybody was smiling, and thankful for their lives made fuller by living, loving, and laughing with such a wonderful friend.

Love, Mazel tov and L'Chaim!


February 25, 2019 Update: Here's the finished product. If you ever try to create a collage like this, be sure to save an unflattened PSD version so you can make any last minute adjustments should new photos become available, or somebody REALLY doesn't want to look like W.C. Fields.

Sunday, February 10, 2019

Emotional Focus


Sam Puc': Sandy Puc' (rhymes with "butch")  is a portrait photographer working out of  Colorado. She was on the lecture circuit several years back, and I attended her seminars whenever time permitted. While an outstanding photographer and a truly gifted teacher, she is known for her commitment to community service, often donating her photographic services to worthy charities. In my mind, she will always be remembered as the founding photographer of NILMDTS, a network of dedicated photographers who provide comfort to families facing imminent tragedy.  If memory serves, she was nominated for Woman Of The Year for her efforts.

Purchase yours here
She had a wonderful way of working with children of all ages, and an uncanny way of coaxing smiles and laughter from the most taciturn of subjects. One of her favorite props was a rubber chicken which she used to great effect on pre-adolescent subjects who arrived with a "whatever" attitude towards the sitting. Another was her "biggest bowl of candy in the world", which was indeed large, but was used as both a motivator and a reward for the munchkin crowd.

She identified a concept that I really resonated with me, and one that is the subject of today's post. The concept is Emotional  Focus. Sam acknowledged that there are times when a photo may not be technically perfect, but can still tell a story or elicit an emotional response.

Let's take a look at two cropped portions of this image. You can see that when viewed closely, my main subject's head is definitely not as sharp as it could be. The two spectators in the background are much sharper, a clear indication that the camera was not properly focused when the shot was made.

Run And Gun Photography: Making grab shots like this are bound to yield shots where the plane of focus is not properly placed. But in this sample, the main subject was acceptably sharp. Nobody I asked detected the problem when the final shot was viewed in the paper, and very few noticed it when viewed on a computer screen. Taken as a whole, it's a simple image of a youngster viewing the contents of a van as he l walks from the front to the rear. In the end, the photo is Emotionally Focused, which outweighs the technical shortcoming of the main subject being slightly soft.

Exposure Notes: The photo was made with a Fuji X-T2 with a 10-24mm F 4.0 zoom lens. The lighting is provided by a Fuji dedicated Adorama Li-On flash held in my left hand high above and behind my head. I used a Gary Fong Light Sphere to produce a more "bulb in the ceiling" look. I moved it as far from my subject as possible to minimize both the underexposure caused by light fall-off behind the main subject, and the overexposure of objects in the immediate foreground. When working with wide angle lenses at short distances, every inch counts!

1/32 second, F 4.0, ISO 400, hand-held flash held at arm's length high and above, camera left
Addendum: This photo was apparently the only Lunar New Year photo available to the Journal, and was run, front page, despite the obvious blur caused by the long exposure time, camera shake, and subject motion. I offered the photo as a "last resort" image, available for use if no other photos were submitted. While I had other, sharper images, I felt this was the best combination of color, context, and exposure. Apparently, there was enough merit to the photo to justify its selection. Again, Emotional Focus.

Sunday, February 3, 2019

The Effects Of Ambient Lighting On Flash Exposures


I was asked to make some quick photographs of members of the Leadership Circle at a recent gala celebrating the 25th Anniversary of the San Mateo Public Library Foundation. As with any event where food is served, one needs to get these photos done as quickly as possible to minimize the inconvenience to the guests and the servers. The venue is unusual because the north wall is all glass, allowing natural north-light to flood the tables closet to the wall. This wall of natural light will present a color balance problem when attempting to create as natural looking an image as possible.

These photos were made using a speedlight with a Full CTO gel mounted over the flash tube and the Incandescent white balance preset used in the camera. Let's see how this influences the color rendition of the foreground subjects and the background.

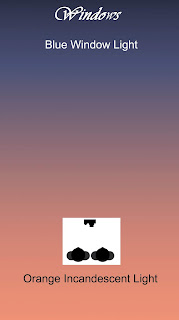
When photographing subjects at the north end (top of illustration), the ambient is mostly from the blue sky passing through the windows. This natural light easily overpowers the ceiling-mounted, incandescent accent lights.

Subjects photographed at the south end of the room (bottom of illustration) are lit only by the ambient incandescent lighting because the window light decreases to the point where they won't influence the overall color of the light. The ambient now matches the gelled flash and the Incandescent white balance preset.

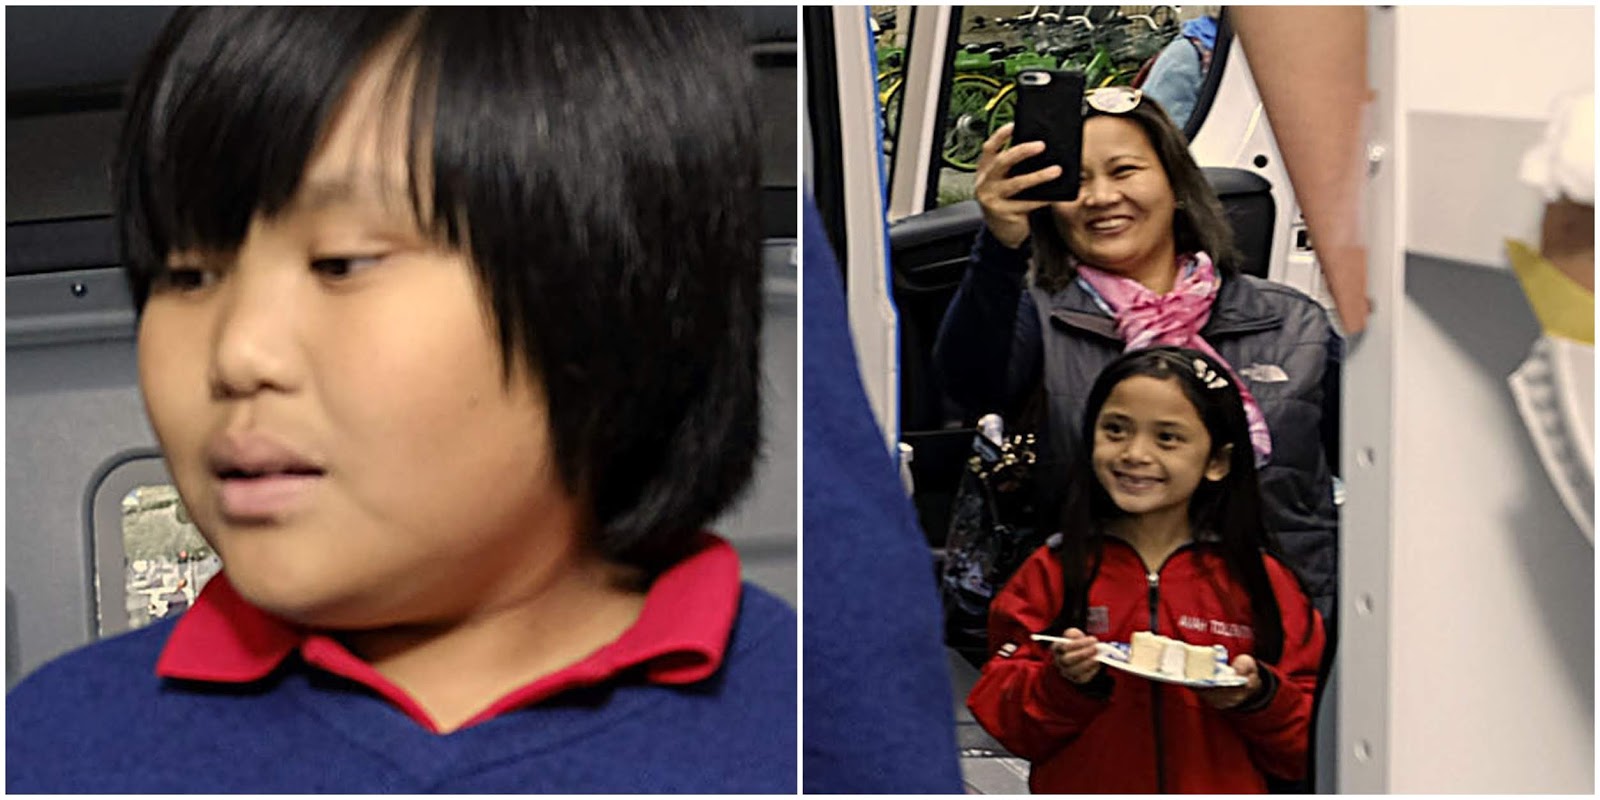
The three images that make up the  triptych below are three versions of the same image, taken with the same aperture setting but different exposure times. It's pretty clear that the exposure time used in the leftmost image was the longest, since the background appears brighter than the one at the right.

1/64 second, F 4.5, ISO 800                  1/125 second, F 4.5, ISO 800                  1/250 second, F 4.5, ISO 800
At first glance, you can see that the longer exposure time adds detail to the background. Unfortunately, those longer exposure times allow the natural window light to influence both the color and the brightness of my foreground subjects.

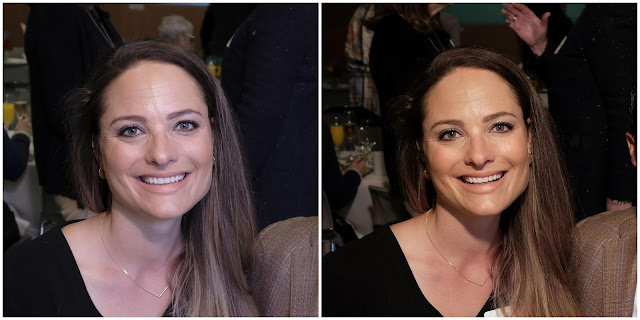
1/64 second                                                                                         1/250 second
When left and right images are compared, you can clearly see the effects of the window behind me. On the left, the shadow beneath my subject's chin is nearly as bright as the highlights on the cheeks and forehead. Also, the abundant cold window light mixed with the CTO gelled flash to render the skin tones on the cool side and a bit overexposed. The shot on the right shows prominent shadow areas and a warmer, more pleasing color rendition. By reducing the exposure time, the flash, temperature matched to the Incandescent white balance preset, provides the dominant light source.

1/32 second, F 4.5, ISO 800
This shot is typical of the ones made on subjects farther away from the window and less influenced by the ambient north light. The subject's coloration is much truer to what one might expect, and the longer exposure allowed for more detail in the background.

It's interesting to note that there is some evidence of the window light coming from behind me. That tiny spot of blue on my right subject's eyeglasses frame is a window reflection, the blue color emphasized by the camera's Incandescent white balance preset.

The takeaway from this post is that in lighting, one needs to recognize when something is amiss, and to come up with a revised lighting solution to eliminate, or at least minimize, the negative effects. Most photographers will admit that in the end, an acceptable rendition of your subject's fleshtones is all that really matters, and that some mismatches in background rendition can be easily dismissed by the viewer.

Equipment Notes: I used an Adorama Zoom Li-on R2 Flash that may become a permanent passenger in my Fuji kit. While I own a Fujifilm EF X500 flash and the dedicated power supply, I never really warmed up to it, primarily because there didn't seem to be a reasonably priced, dedicated flash controller for off-camera, TTL use. So far as I could tell, I would have to purchase two - one as a remote and another as the flash, and having gone through all that my fleet of  Nikon iTTL speedights (a dozen SB-800s and four SB-900s), I was reluctant to pour more money into a TTL lighting system for the Fuji. The Adorama Flashpoint family of compatible shoe-mounted and ultra-compact monolites  share a common radio controller, so getting into the system is relatively inexpensive, especially when compared to what I paid to stay with the Nikon brand. I have complete faith in my Nikon speedlights, but I couldn't making a similar cash outlay just for the Fuji system. Since I could trigger if from one of R2 shoe-mounted controllers, I attached a Gary Fong Light Sphere and mounted the flash on a monopod for better placement of the flash.

Here's a potential problem that can occur when you use the monopod to position your flash. It is possible to raise it too high, as I almost did here. You can see that the shadow cast by the nose touches my subject's upper lip (see arrow). Had I raised the flash even higher, the shadow would have darkened the teeth, something that should be avoided.

I was fortunate that my subject's facial topography was such that I got suitable catchlights in her eyes, and that the teeth were evenly lit.  Very satisfactory for a shot that was done in 15 seconds.