Monday, December 28, 2020

It Came Upon A Midnight Clear -The Gingerbread Monolith

12/25/20: Read the original article by clicking here.
December 25, 2020 will always be remembered by San Franciscans as the day we were visited by aliens (purported) with a taste for gingerbread (confirmed). Mysteriously, a monolith appeared on the hills of the Corona Heights Park. Apparently the original Christmas post went viral, and soon everyone had seen, or made plans to see, this tribute from outside our planetary bubble.

I woke on Boxing Day (December 26) to a text message about the artifact, and after eating a hearty breakfast, set forth to see it for myself.

1/400 second, F 8.0, ISO 200, flash assisted.
On my ascent, I was met by legions of walkers who had already examined what was left of the monolith, each more than willing to blame animals for defiling the monument. When I finally arrived, I confirmed the carnage without assigning blame. It appears that somebody double-dog dared this woman to touch the artifact and then step away without laughing. She lost. Or so I imagined.

1/400 second, F 8.0, ISO 200, flash assisted.
Soon dozens of visitors came to view the ruins, and more than one dog sniffed at the soggy gingerbread remains, wondering to themselves, "Is my human watching?". It appeared the monolith was made from plywood to support the gingerbread siding. And I can easily imagine animals chowing down on the makeshift gingerbread house, sharing in the joy Hansel and Gretel must have felt when they nibbled on the witch's house.

After the dog walkers and energetic climbers had visited the structure, families with young children started to arrive. It's hard to tell their reactions, covered as they were with masks. I am sure this will be a moment long remembered, although I suspect that seeing the structure in all of its glory would have been truly awe-inspiring. One could only imagine the artwork the monolith would have inspired if regular school resumed in January. Le Sigh.

The Kit: This morning, I indulged myself and used my X100T in the auto-focus mode. Oh the joy! I also brought a flash, a Flashpoint Zoom Mini, aka Godox TT350 Mini Thinklite flash. I also carried a generic flash cable for Canon cameras. My understanding is that the Fuji's pin contacts were located in the same locations as the Canon's, and that the cables were SUPPOSED to work. Unfortunately, I have yet to find a Canon configured cable that provided proper synchronization, so I only use the cable when prepared to shoot in the fully manual mode. For these shots, i simply used the flash on-camera with satisfactory results. 

Sunday, December 20, 2020

The Backyard Birder

   For a compilation of the morning walk images, click here.

This photo was made just hours before California entered its newest lockdown. It will accompany an article about Backyard Birding, an activity one can enjoy by yourself while maintaining on-line contact with fellow birders. For the record, I wore my mask at all times, and my subject removed hers only when the photo was being made. The location was my subject's back yard.  I used a short telephoto lens, so we were farther apart than you might think.

The photo was lit from both camera left and camera right. If you look at the shadow cast below my subject's chin, you can see that it's triangular in shape a clue that two lighting sources were involved. The light from camera right comes from morning sunlight passing through a translucent umbrella, while the light from camera left comes from a flash and a shoot-through umbrella.

For this assignment, I remembered to bring my Westcott 7' translucent umbrella which was used to soften the direct morning sunlight. This both decreased the intensity and improved the quality of the light on my subject's left, providing some separation from the dark background. You notice the bit of light on my subject's sweatshirt. I was smart to request that we used the subject's own backyard which would offer protection of any breezes that might upset my six-foot bumbershoot.

My key lighting would be a speedlight and Zumbrella combination mounted on a lightstand slightly forward and to the left of my shooting position. This gave me the large, round catchlights and provided a soft front lighting on my subject. The flash output was nearly at full power, so I adjusted the aperture slightly to get a proper exposure. As it turned out, the brightness was nearly identical to the filtered sunlight coming from behind, giving me an image that should reproduce well when it hits the paper.

For the shot, I used a Fuji X-T2 with a 16-55 2.8 lens at 55mm. Light was from an older Flashpoint speedlight triggered by an older dedicated radio controller.

You can see the size of the umbrella, and you can image how large a shadow it would cast. The umbrella was positioned to provide a soft light on side of the hanging birdhouse, as you see here. These shots were made without the key light, so the front of the birdhouse is rendered darker than in the final photo.

"Is That A Real Bird??" my editor asked. Yes, it was. At first, the birds kept their distances, wondering what to make of all the unfamiliar activity. After a few warm-up shots, the birds, knowing the feeders had just been filled, tentatively started to take their seats at the buffet. We both stood motionless, hoping that one would land on the feeder on the left. One brave soul obviously did, and I was able to grab one good shot (top of post) before s/he flew off. A second bird arrived moments later, but was too dark to be recognizable.

After Action Report: There are some things I wish I could have changed. The positions of the sun and the birdhouse feeder dictated the location of the umbrella and where my subject would be placed, so I adjusted the key light position accordingly. I might have elevated the key to a higher position to achieve slightly better facial modeling, but overall, there's plenty of detail in the image. Other than that, I was very satisfied with the outcome.

Sunday, December 13, 2020

Umbrellas As Diffusers

   For a compilation of the morning walk images, click here.

Flash illumination in open shade.
It's been a while since I submitted an outdoor shot. Now, in the midst of the Pandemic, I suspect outdoors will be the norm, rather than the exception. As such, dealing with the presence of sunlight will become an issue. 

The Shot: I was sent to photograph a mixed media artist who creates living, three dimensional "tapestries" using a variety of materials and living plants. Since Pandemic guidelines restrict indoor events, the exhibit was installed in the courtyard of the local arboretum society. 

I was confident that I could find a suitable background that was fully in the shade, one where flash lighting would be appropriate and easy to pull off. However, I thought that if I found a suitable background, front-lit by a bright morning sun, I could use a Zumbrella* shoot-through umbrella to shade my subject, and then direct a flash at his face. At least it would be worth a try.

1/640 second, F 14, ISO 200.
I was disappointed when I examined may preliminary lighting setup. My subject is standing in the shadow created by my Zumbrella mounted on a lightstand.  If you compare my subject's hands and face, you can see the exposure difference (See white lines). Unless I could properly restrict the supplementary lighting, my flash would spill additional light onto the hands and the tapestry, burning them beyond recognition. Since I hadn't brought barn doors, a snoot, or any way to contain the light, I decided to look for a different lighting approach. But while my subject was in place, I decided to make a quick head shot, something he might want to use in a future publication. I repositioned the Zumbrella to my left to even the lighting between my subject and the tapestry to his right.

 Fuji 56mm F 1.2 lens, 1/640th second, F 8.0, ISO 200
This shoot-through lighting setup was both even and complimentary. If you look at the right edge of the frame, you can see where a bit of sunlight snuck past the umbrella and landed on his shoulder. Notice that the dappled light in the background helped to define my subject's shoulder line.  

1/200 second, F 4.5,ISO 400, Flashpoint X R2 flash through a Zumbrella
The final image was a conventional flash shot. I selected a different tapestry located in some open shade so that the flash would equally affect the subject and the artwork. The only bit of advice I'd give to other shooters is to find something for your subject to do with their hands. Pockets and belt loops work well if you want to portray your subject as the "Oh Shucks" kid living next door, or as James Dean in Rebel Without A Cause.

As I prepared to upload the photo, I noticed something. My subject's dark coat got lost in the background shadows. I could have improved the photo by simply asking my subject to remove his jacket, assuming he wouldn't be too cold. Of course, the light sweater might have blended into the tapestry behind him, so I could have lost either way. Careful positioning could have solved that, however.

A mistake made. But if you discover a new approach to a reoccurring problem, it's a pretty good day.

*Zumbrella: A shoot-through folding umbrella created by Divid Ziser. According to Mr. Ziser, the fabric was the same as those used in soft boxes, which allowed more light to pass through it, decreasing the flash output by only one stop.

Sunday, December 6, 2020

My First Date With The Fuji X-S10

  For a compilation of the morning walk images, click here.

Order yours here.
As a photographer, I am a serious hobbyist, not a professional. As such, the equipment I purchase cannot be deducted as a business expense, so I will acquire new equipment only if there is some feature that can have a positive effect on the quality of my images. I've been very happy with my odd collection of Fuji bodies, starting from my X-E1s through my X-Pros and ending with my X-T bodies, which I consider my first line cameras for most of my assignments.

I had read the early reports on the new X-S10 body, and was immediately drawn to two important features: The fully reticulated LCD panel and the In Body Image Stabilization (IBIS). The latter feature really got my attention because my primary business lens is a 16-55 F 2.8 zoom that lacks image stabilization. I reasoned that if I mounted it on an X-S10 body, I could actually enjoy IS with my three business lenses. That would be a definite upgrade.

I asked my friends at Fireside Camera about the expected delivery date, and they promised to call me when one came in. Low and behold, their first one was delivered about a week ago, and within a day of their phone call, I was in the store examining my new purchase. It had a different feel, due in part to the changes in the body configuration made to accommodate the image stabilization hardware, but I felt that, over time, I could get used to it. Before I left the store, I was warned that the camera controls were designed for an enthusiast and not for the control freak my other Fujis had allowed me to become. I believed that once I selected the control settings I preferred, all would fall into place. I was wrong.

When you update to a new piece of hardware, you notice what is missing, rather than the features that have been added. This is logical, since you can't miss what you never had. Some of things I missed immediately were the lack of an external Focus Mode Select Button, the haphazard (to me) placement of key controls, and most importantly, the "shutter speed dial" that was now an "mode select dial". Gone were the individual shutter speeds engraved on the dial. Instead, there was a selection of exposure modes (Manual, Aperture Priority, Shutter Priority, etc.), very similar to the settings found on a digital single lens reflex.
Fuji X-S10 (top) vs Fuji X-T4. Not 100% to scale, but close.

Here is a comparison of the X-S10 (top) and the X-T4 (bottom) top plates. You can see that all of the exposure controls of the T4 are clearly marked, while those of the X-S10 are not. When a lens is mounted, the X-T4 (lower image) will tell you everything you need to know about the current exposure settings (ISO, shutter speed, and exposure compensation, if applied) and the locations of the dials remains consistent across the professional and "prosumer" platforms. If numbers don't scare you, you can easily identify your desired settings. In the case of the X-S10, those unmarked command dials have different functions depending on which mode you select. In fact, the function of the X-S10 resembles an entry level DSLR, which may have been intentional. 

Still, the cost is a major factor (MSRP X-S100 = $1000, X-T4 $1,700) when all I really wanted was the IBIS. I understand the video capabilities are well above any of my other digital cameras, but until I actually need them, the purchase was an investment that has yet to  provided any major dividends. 

Familiarity Breeds Contempt: Truer words were never spoken, especially when it comes to something as straightforward a camera. Heck, it was a Fuji, and after working with them almost exclusively for several years, I felt confident in my ability to wing it in the field. So when an indoor assignment came due, I decided to bring the X-S10. After all, it's a Fuji. What could possibly go wrong?


Ooops! Big mistake here. While I was preparing to make this shot, I started making adjustments as I normally would, but because of the unfamiliar layout, I started changing shooting modes rather than adjusting exposure times. I somehow wound up in one of the programmed modes, which restricted my access to some critical controls.  I proceeded to adjust the exposure the only way I could: flash output adjustment. After a half-dozen shots and some well-disguised nervous babble, I thought I had an acceptable shot. Glancing at the LCD, I could see that my images were indeed suitable for publication, so with a show of practiced self-confidence, concluded the session and thanked my subjects. As I walked back to my car, I repeatedly previewed my image, almost afraid it would mysteriously vanish at the will of my petulant camera. Luckily for me, the hadn't. When the photo was properly captioned and sent to my editor, I started to breath again, calming my nerves with a double ration of ice cream.

Stress Test: Call it what you will, but taking a new camera on an assignment will really challenge your notion of how well you know your equipment. I admit to being out of practice since the assignments stopped coming during the pandemic, and should have taken more time to familiarize myself with the new X-S10. Still, I got my image stabilization and my fully reticulated LCD panel at a reasonable cost, with my pride being the only casualty of my embarrassing lack of familiarity.

Sunday, November 29, 2020

Fact, Truth, And Filoli At Night


"Archeology is the search for fact, not truth. If it's truth you're interested in, Dr. Tyree's philosophy class is right down the hall..." 

Indiana Jones, from "The Last Crusade".

It's odd that this quote, taken from a movie, could help me come to grips with an ethical problem I have with a photo I made for the Journal. You see, since the advent of Photoshop, photographers have been forced to adhere to high ethical and professional standards. As such, we are tasked to make images that are a reflection of what was actually before us, and that the viewers of our photos can be assured that what was pictured actually happened. Photojournalism, like golf, has but one golden rule: Tell It Like It Is.

David Hobby, formerly of the Baltimore Sun and creator of Strobist.com, has contributed more to understanding the proper use of flash than anyone else, save Joe McNally of the Nikon Tribe. As a former photojournalist, Mr. Hobby was acutely aware of photography's power to misinform since the advent of the digital camera and post-production applications such as Photoshop. During the transition to digital, he made a simple rule that addresses truthfulness in imaging. In essence, he stated that if you limited yourself to darkroom techniques available to the black and white film photographer, you would remain within the limits of ethical documentary imaging.

Being a practicing black and white processor and printer since the early 1970's, I've taken this to heart. Since film was the only medium available, everybody was anxious to improve their images during the printing process. Dodging and burning, the standard darkroom techniques, have their Photoshop counterparts in the 21st century. Perspective control? We learned to tilt our easels (frames that kept our photo paper flat) to correct converging lines, But in all cases, the negative was essentially incorruptible, a moment in time forever preserved in a microscopic cluster of silver crystals suspended in emulsion.

Advanced technologies, both in the equipment and in post production processing, have radically pushed the boundaries between accuracy and truth. Affordable lenses, high ISO sensitivities, and Photoshop magic have managed to alter our acceptance of what is real and factual. An article written by Ed Elliot and posted on his blog  catalogued, in great detail, the many ways our images can persuade, intentionally or not, the viewer into drawing a conclusion that may be factual, but not entirely truthful. I present a case in point.

Filoli: The world famous Filoli Gardens and Estate were preparing to debut their winter decorations for the holidays. A press-only event had been scheduled to give us a chance to speak with the staff, take in the sights, and go forth to write our stories. My first job was one make a photo to accompany a story about the floral coordinator of the estate - a environmental headshot if you will. The second was to make a shot illustrating some of the lighting and to encourage  attendance in the event.


Shot #1: I decided to make the shot in the Gift Shop, choosing a majestic tree as my background. My editor had a better idea - Why not place her in front of fully decked with ornaments and standing beside a mountain of gifts? Her solution was brilliant, and this shot was quickly made with an on-camera flash bounced off the ceiling and built-in bounce card raised for some additional sparkle.

There are some important qualifications about this photo that need to be made. First, it is obviously not a candid because the subject is looking straight at me. Second, she was in the gift shop at our request, since it was raining outside and the message of "Christmas" was as important as her job as Horticulture Manager. And finally, there was some "crime scene manipulation". I moved a stuffed horse to the left so that the "S" in "Santa" was clearly visible. All in all, it's not a tour de force in artificial lighting, but it got the job done within the looser constraints of community photography. Fact, yes. Truth, meah...

1/8 second, F 5.6, ISO 3200, Cloudy white balance

Shot #2: I'm  conflicted with this one. It was meant to illustrate what a person might actually see if they joined the nightly tour. These trees, plus the lights draped about their limbs, formed a natural bower leading to the main entrance to the mansion.  When I encountered one of the publicists rejoining the docents inside, I thought there might be a photo here, so I framed the shot and asked her to walk toward me from the house until a suitable balance between the subject and the background was achieved. By selecting a shutter speed of 1/8 second, I was able to get the detail in the trees and the cobblestone walkway. I had my subject look up slightly so she could be lit from above. I did use a tiny bit of fill flash, directed up to prevent burning out the immediate foreground. 

1/15 second, F 5.6, ISO 3200
Nice photo Tom, so what's the problem? In reality, only an owl could have seen as much detail as you see here. Through the miracle of high ISO settings, I've presented the viewer with a scene no human could have seen unaided. 

If you look at the sample on the right, you'll get a better idea of how the scene actually appear. Here, the individual lights are properly exposed (no highlight blowout), but there is little detail in the midtones, and none whatsoever in the shadow areas. Clearly the exposure boost of a full stop completely transformed the image and made it printable, if in theory, less accurate.

In short, it all comes down the conflict between fact and truth. The technology gives me an effortless means of recording the facts, down to the smallest detail. But truth, the final interpretation made by the viewer, can still be manipulated to promote an idea. Luckily for me, the community photography venue allows for promotion of a social agenda, one that allows me to always present the bright side of truth.

Wednesday, November 25, 2020

San Rafael Sidetrip

  For a compilation of the morning walk images, click here.


Seewood Photo In San Rafael: I took a drive to Seawood Photo in San Rafael, one of the few remaining camera stores that speak Film. I have a black Nikon FE2 that has been in my family for many years. It belonged to my Uncle Bob, then was used by both my Father and my Sister. After a while, it came back to me, and even though I have no intention of using it, I can't stand to have something that isn't fully operation.  It turns out that Seawood can replace the camera's foam rubber strips that serve as a vibration dampener for the reflex mirror and as a trap to prevent light leaks into the camera's film chamber. The years of storage caused the strips to decompose, so it will be nice to get it function properly.


For whatever reason, San Rafael is alive with color when the leaves start to fall. I suppose that some specific microclimates allow certain trees to flourish, bringing their fall display of colors when the season turns to winter. This random collection of leaves found on the street reminds me of an assortment of sautéed peppers served in a fine restaurant. Restaurant dining. I SO miss it!


Thinking Pink: I'm not sure what this pink parking meter does, but I believe it accepts spare change for distribution to local charities. I think it's a very nice place to deposit unwanted small change, knowing that it will help the community.


Good Start: I think this bicycle in a car-top rack might make an interesting photo if there were more leaf-laden trees in the background and that errant utility pole hadn't been so prominent in the background. Woulda, coulda, shoulda.


The Mission: I never photographed Mission San Rafael Arcangel until today. Somehow, the clarity of the day and the brilliance of the mission made it a must-do. I never realized how imposing a structure it was.

It was a good day to be out, and nice to be taking photos again. 

Monday, November 9, 2020

San Francisco Opera Costume Sale

 For a compilation of the morning walk images, click here.


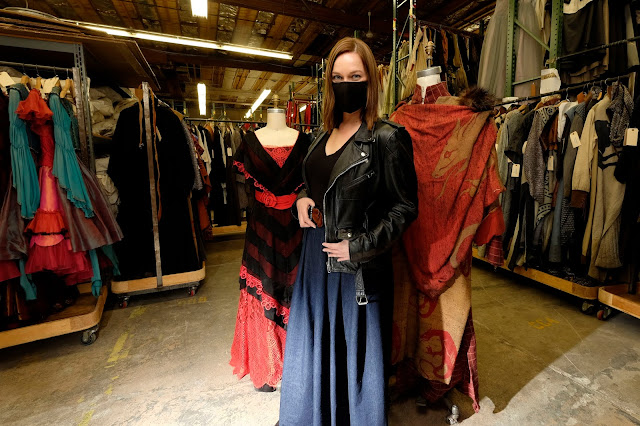
Opera Costume Warehouse: Covid 19 will leave its mark on every face I photograph for a long time to come. Since the shot was indoors, protocol dictated masks at all times, and in the interest of demonstrating the staff's willingness to following prescribed safety protocols, the mask stayed put.

There is room for debate concerning the relative size of the three visual elements. On the one hand, the photo must call attention to the number of costumes available for sale (more than 500). On the other  hand, it's about the young costume manager who happens to be a San Mateo resident. In retrospect, I could have experimented with the placement of the mannequins and the subsequent placement of my young subject. As usual, the placement is a compromise, since I had limited time, and my subject had her job to do.

Lighting: The key light was provided by a speedlight mounted about 8 feet off the ground,  and slightly to my left. It was modified with a Zumbrella shoot-through umbrella. As a note of caution, I was using a radio-triggered speedlight which started to act up at the last moment. After several unsuccessful attempts to trigger the flash (it was function tested that very morning, so I knew it worked), I swapped it out for Old Reliable, a Nikon SB-800 set to SU-4 (optical remote) mode. A second flash, hotshoe mounted and directed towards the wall behind me, served as an on-camera optical trigger. 

Floor Bounce Fill: I needed a bit of fill to add a bit of detail to my subject's dark skirt. Normally, fill light would be delivered from a position very near the optical axis of the lens. Some photographers, most notably David Hobby, employ a ring light to provide shadowless, on-axis fill light. Unfortunately, this technique usually produces a glare spot on the lenses of spectacle-wearing subjects.

An alternative fill technique involves bouncing the flash off the floor in front of the subject. No real name for this technique I learned about it in one of Joe McNally's instructional videos. I've used this technique before, but only in a controlled studio environment

Since I was using my flashes as optical remotes, it was easy to add a second SB-800 and configure it to the SU-4 mode. I then directed a nearby spectator to aim a second flash towards the floor in front of my subject. 

Fill light accidentally directed at the subject's feet
You can see in this first attempt that the fill light was actually pointed at my subject's feet, which allowed direct light to flood the lower portion of the frame. I had my assistant re-position the flash until it pointed straight down at the floor in front of the light stand. 

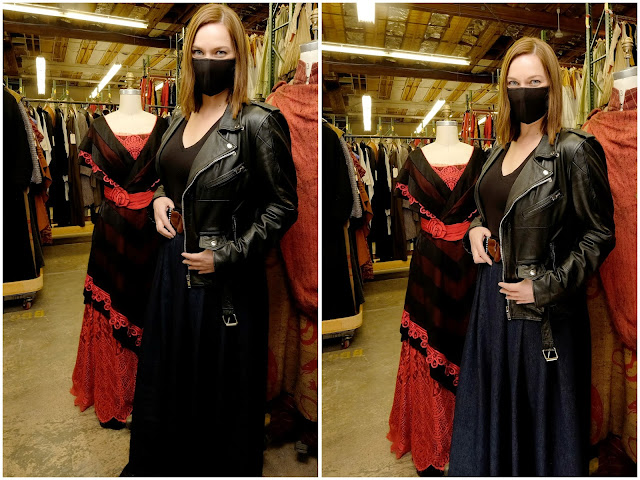
Without Floor Bounced Fill                                             With Floor Bounced Fill

The left photo in this pair* was made without the floor-bounced fill, the second after. If you look closely, you can see the additional detail in the skirt in the right hand photo, along with increased detail in the chrome buckle and additional highlights on my subject's jacket. It may be difficult to see, but trust me, the level of shadow detail is greatly increased. For the most part, there are no obvious traces of that second fill light. However, the best is yet to come.

The floor bounce provides a large lighting surface that is large and not particularly bright. It is strong enough to provide a highlight on any curved reflective surface, including the jacket buckle and my subject's eyes. It's not an intense highlight, but it is bright enough to add some sparkle to the iris.

I showed the the final image to several friends and they all commented on how pretty my subject's eyes were. That second highlight, created by the floor-bounced fill, add something very subtle, but very complimentary.

*For comparison, both images were copied onto a single blank file in Elements and all of the layers flattened. This ensured the any exposure (Levels Command) adjustments would be applied equally to both images. 

Sunday, November 1, 2020

Primer On Manually Focusing Non- Fuji Lenses

For a compilation of the morning walk images, click here.
From the start, my manual focusing experience has been limited to the X-E Bodies (1 and 2) and the X-Pro Bodies (1 and 2). For right now, I'm reserving my X-T bodies for Auto-Focus Zoom Lens applications, and keeping manual focus exploration restricted to recreational shooting.

Before you begin shooting, adjust your camera body to the following settings:
  • Set Body To Shoot Without Lens: Using your menu, be sure that the Shoot Without Lens function is set to "On". I found this option a little harder to find in the X-Pro2 menu structure.
  • Set Exposure Control to Aperture Priority: This is done by rotating the shutter speed dial to the "A" setting. Exposure will be based on the light passing through the shooting aperture you select.
  • Set Focus Mode To Manual: The switch is located at the front of the camera body. This will activate Focus Peaking and viewfinder magnification.
Camera Body Layout: So far as ease of use is concerned, the X-Pro bodies I've used have a slight advantage over the E-series bodies. Simply put, the big difference I've experienced is the placement of the Preview Button.

X-E body (above left) and X-Pro2 body (above right).  Red Arrows show Playback Button.

On the X-Pro bodies, the placement of the Playback Button (red arrows) is on the right side of the LCD Monitor, and can be accessed easily with the right thumb. It is much easier to review your images with the X-Pro body when you hold the camera with your left hand.


Magnified Viewing and Manual Focus Assist Modes: Pressing the center of the Command Dial (blue arrow) magnifies the view in the electronic viewfinder or on the LCD Monitor display. Once in the magnified view mode, rotating the Command Dial will toggle between 4X and 6X magnification. This is extremely useful for establishing critical focus. 

A single, prolonged press on the Command Wheel allows you to select the desired Manual Focus Assist Mode (Standard, Focus Peaking, or Digital Split Image when available)

Focus Frame Selection: Digital SLR cameras have always had multiple focusing frames, a real boon to photographers when their compositions emphasized regions not in the center of the frame. This valuable feature, as applied to the Fuji camera bodies, can be extremely helpful when focusing manually. Check your instruction manual for the section that covers Focus Frame Selection.

Old School/New School: Old school photographers would insist that the focus point (small brackets indicating where focus is determined) be positioned in the center of the screen. It also coincided with the location of the whatever optical focusing aids (either micro prism or a split image rangefinder) built into a film-fueled SLR camera body. Photographers were forced to compose the frame with the main subject  (I'll call it the Focal Point) in the center, focus on the subject, then re-compose the image to reflect the intended layout. This focus-reframe-shoot sequence was how things were done in the film days, and many photographers, myself included, continued the practice into the auto-focusing, digital era. 

I've placed a Fuji X-Pro1 on a tripod to help illustrate the steps I take when focusing manually. behind it, a second camera, focused on the LCD, was used to simulate what the photographer would actually see. A quick apology for the poor quality of the images, since the difficulty associated with photographing the display of a digital camera using another digital camera should not be underestimated.


Compose The Image: Using the viewfinder, I'll do the forward/backward, left/right, and up/down positioning dance until I get the desired composition. The red arrow shows the default position in the center of the viewfinder.  


Position The Focus Frame: The focal point will probably not be perfectly centered if you're following the guidelines suggested by the Rule Of Thirds. Using your four selector buttons, position the Focus Frame over your point of focus, and tap the shutter release button to lock the position in place. Hitting the "OK" button will return the Focus Frame to the center. Check your manual to see how this is done. BTW: The Focus Frame turns green when you're in the re-position mode.


Magnify The Viewing Image: Press the Command Dial to enlarge the viewfinder image, then rotate the command dial to choose either the 4X or 6X magnification options. Fuji cameras with eye-level viewing options allow you to use your forehead for additional support while focusing. The sample shown here is 4X.

Focus The Lens, And Shoot: Since your composition has already been established, you're free to focus on your subject with the knowledge that when you make your exposure, critical focus and the desired framing will have already been established. I suggest that you experiment with both the Standard and the Focus Peaking modes to see which you prefer.
I also suggest that you focus both in front of, and behind, your desired point of focus, as you really need to see how the camera's display, viewfinder or rear LCD, renders critical focus. When you're happy with what you see, press the shutter release, and your shot is made.

Review The Image: The coolest part of this whole process is that when you magnify the image in the Review mode, it zooms in on the position where the focus frame was at the moment the image is made. You'll have to try this out for yourself.

This sounds like a lot of work, and if you've never used a film camera without auto-focus, you may be asking yourself why one would even bother. Truth is, now that I must focus manually, I tend to think more about the technical aspects of the photo, and have a greater sense of accomplishment when everything, the exposure, the composition, and the shutter release, all work together. I definite believe the quality of my images has improved significantly, and this should always be a personal goal no matter what the endeavor.

Sunday, October 25, 2020

For Want Of A Pencil Eraser

For a compilation of the morning walk images, click here.

Read the article here.
My Kingdom For A Pencil: If you're like me, you need a pencil every now and then, but in this digital age, they are increasingly difficult to find in one's home. My Dad always kept one in his signature felt beany, but he was a man of action: A carpenter, a plumber, and all-around handyman. I, on the other hand, do most of my repairs with the backspace key and the delete button.

For years, I've used pencil erasers to remove the green oxidation that occurs when batteries leak during storage. The green corrosion is often found deep within the battery compartments, areas where a pencil's eraser might easily reach. Having found a bit of corrosion in the battery compartment of my SB700 flash, I went looking for a pencil eraser to facilitate its removal. Alas, in this digital age no pencil was to be found, so improvisation would be the key to my ultimate success.

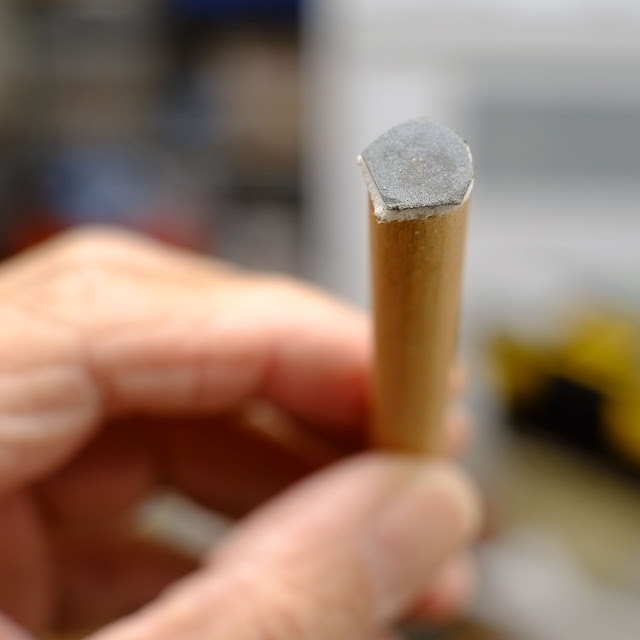
After giving the problem some thought, I went to a local hardware store and bought some double-sided mounting tabs. Luckily, they came pre-cut in convenient 1" squares which would be than enough for what I had in mind. Next, I rummaged through my collection of silicon carbide (dark grey) abrasive papers and found a scrap of  600 grit paper. Next, I located a bit of 3/8" wooden dowel. I cut off a 3" section and carefully squared off the end. 

Next came the simple part. I used a pair of scissors to cut off a 1/2 square of the mounting tab and attached it to the dowel. Using a knife, I cut a bit of the 600 grit abrasive paper and stuck it on the tab. Finally, I trimmed away the excess tab and abrasive paper. 

If and when you decide to make your own contact cleaner, don't use scissors to do the trimming. You may have heard that you can sharpen scissors by simply cutting a sheet of abrasive paper. I suspect it does the exact opposite. I've never felt inclined to waste both abrasive paper and a pair of scissors to prove, or disprove, this bit of folksy advise.

You can see from the slight depression that this improvised cleaner made full contact.

You can see the finished product here. Using my fingertips, I twisted the dowel in the battery compartment while applying downward pressure to the corroded contact. When the cleaning was finished, I used some canned compressed air to blow away any abrasive particles left in the battery chamber. The procedure successfully cleaned the battery contacts, so my SB700 is now as good as it ever was. I found that the soft nature of the adhesive tab could easily adapt to the contours of the raised dimple often found on the contacts, making my selection of the adhesive tab a win-win for everybody.

Cheap and easy, I now have a lifetime supply of battery contact cleaners for just a few bucks. Neat.


Sunday, October 18, 2020

Wide Angle Close Ups - The Opteka 15mm Macro Lens

For a compilation of the morning walk images, click here.


Stranger In A Strange Land: I had planned on postponing my take on the Opteka 15mm F 4.0 wide angle, manual focus, Nikon mount, macro lens until later in the month, but an opportunity just popped up today, and with my enthusiasm thus whipped to a fever pitch, I was compelled to write about it immediately. Unlike my past musings, this post will be a collection of loosely related,  "get to the point" paragraphs.

The Subject: I found this Walking Stick clinging to my green Recyclable bin. I don't see them that often, which is a testament to their ability to hide in plain sight. I felt this would make a interesting subject, so I grabbed my X-E2 on which I installed a Photodiox Nikon G to Fuji adapter.  I carefully moved the insect to a remaining branch on the camellia bush I cut down earlier this year, and went to work.

The Lens: The Opteka 15mm lens ($109 on Amazon) is the fraternal twin of the more expensive Venus Optics Laowa macro lens  (about $499 at B&H) with similar specifications. The former lacks the tilt/shift feature of the latter, and as such, sells for less than one-third the cost. Both offer the user a wide angle macro capability for when you want you close-up photos to include wide swaths of recognizable backgrounds.

The lens feels like its build quality was not foremost in the designer's mind. The focusing is not particularly smooth when compared to the 7artisans lenses. The big draw for the lens is the unique nature of the lens itself: It will focus to 1:1* when used with a full-frame DSLR body. Unfortunately, to achieve this reproduction ratio, the subject must almost touch the front element of the lens. The seriously restricts your lighting options. 

Lighting: I used an manually adjusted shoe-mounted speedlight with a Gary Fong Light Sphere. The head was tilted to 45 degrees to maximize the relative size of the light source. Test shots showed that the background was too dark, which is understandable, since the shoe-mounted speedlight was less than a foot away, while the background was nearly three times the distance. Think Inverse-Square Law. To remedy this, I added a second remote speedlight with an early iteration of the Gary Fong Power Grid. This concentrated the light into a "spot" that I could re-position as needed.


This shot shows the walking stick with its front legs extended forward. The photo was made from above the insect, so the background is the ivy that covers the ground in front of my home. I'm sure that if the background was less abstract and more recognizable, the visual impact of a close-focusing macro lens would have been more apparent.


Since this Walking Stick was about 4" long, I decided to switch to my favorite lens, the 25mm F 1.8 from 7artisans. Using the same aperture settings, this image shows the relationship between the focal length of the lens and the appearance of the background. The working distance between the film sensor and the subject is much shorter when using the 15mm lens, but the distance to the background is, for all intents and purposes, the same for both the 15mm and the 25mm. The shot made with the longer lens renders ivy leaves larger and less district. 

I will submit another post when I find a situation where the visual impact of this close-focusing wide angle lens is visually more interesting. For the moment, I was just pleased to have a chance to solve the lighting problems associated with using flash at very short working distances. 

*If you're wondering, a 1:1 Reproduction Ratio means that it is capable of filling a standard 35mm negative with a subject an inch long and one and a half inches wide. When used on a crop sensor body like the Fuji X cameras, the reproduction ratio is 2;1 or twice life size.

Sunday, October 11, 2020

It's In The Genes

For a compilation of the morning walk images, click here.

Filena Jung, (baby) Dick Moy Jr., Charlotte (Jung) Moy, Sam Jung, Marie Jung, (baby) Adelia Moy, Dick Moy, (grandpa) Thomas Jung, (grandma) Sue Lan Jung, and someone I don't recognize, (possibly) my Uncle Frank).

In my last post, I described a quick and dirty scanning technique I've been using to view the cache of 3.25" x 4.25" sheet film negatives I uncovered in our garage workshop. To this point, most had been negatives from which prints had already been made, so I was relatively familiar with the subjects. However, as I dug deeper into the pile, I began to find negatives that I've never seen, and more frequently, of people I didn't recognize, As this little project progressed, I've become more and more thankful that digital imaging evolved to the point where the recovery of these little gems is now quick and simple.

This family photo was probably taken before 1947 based on the absence of my sister (born 1947), and the approximate ages of Dick Jr. (born 1943) and Adelia (born 1942). I recognize neither the location or the identity of the gentleman sitting at the far right, although there is something vaguely familiar about his face. However, you  can see my father wearing his trademark felt "beany". Photos that include my Father are extremely rare, since he was normally behind the camera, and not in front of it. I suspect that the Speed Graphic used to make this photo was mounted on a tripod (there is another  negative with an identical composition) so the camera was probably triggered with a self-timer.


Theatricals: Among the undiscovered gems was this series of a Chinese actor portraying a traditional noble. The costume is quite elaborate, and I suspect I would have been just as excited with this assignment as my Father probably was. I have no idea where or when the sequence of photos was made, but the white curtain background indicate this was definitely not a candid photo opportunity.


I funny how these images so closely parallel some of my photographic projects. Working with costumes has been of particular interest to me, and thinking back on all of my favorite photos, they often include a nod to fashion photography and contemporary portraiture. I'm humbled to think about how much my Father was able to do with his Speed Graphic, some flashbulbs, and when working indoors, a few photofloods and a spotlight or two. His imagery was inspired by the photographic trends of the moment, tempered by the limitations set by cameras, light sources, and film.

I made this photo of Rebecca in the early 1970's, my best guess since film didn't record the shooting date as digital cameras do. I had access to a wider variety of lighting options, which included several Spiratone flashes aimed at a seamless white paper background and a Braun flash bounced from a reflective umbrella I made by lining an old umbrella with crumped aluminum foil. The camera was an old Hasselblad 1000F, whose Zeiss lens was showing some signs of physical deterioration. 12-exposure rolls of film were wet processed the old fashion way. As a student on a limited budget, 5 rolls of film, a maximum yield of 60 exposures, was considered an extravagance. The film was then processed in my two plastic Ansco film processing tanks. I could only do one roll per tank per session because the film spools had to be bone dry to properly load the film without any damage, so overnight drying was required.  Still, the photo is one of my photographic benchmarks for posing and lighting, the high-water mark of my abilities at the time. 
Obviously time, experience, and resources have had a marked effect on the outcome, but after seeing my Father's theatrical photos, there appears to be more to inheritance than meets the eye.