Tuesday, December 24, 2019

Bethleham A. D. 2019

1/15 second, F 4.5, ISO 6400

Bethlehem A.D. I've photographed this event since 2013. Since then, I've used the event to experiment with a variety of different lighting techniques. I arranged to make my photos during the dress rehearsal, one day before the actual performance. This allowed me to use flashes mounted on lightstands, something I couldn't do if dozens of visitors were milling around the many attractions. Remote triggering with the R2 series of Adorama flashes helps out too.

The traditional dance group performed a series of dances typical to the period, and unfortunately for me, they tend to dance in circles while facing inward. I have a great collection of my subject's backs, so I tried to catch the "face out" photos whenever I could get them. For lighting, I used a Godox AD200 with a round head with two grid filters attached. I wanted to keep most of the light in the upper two-thirds of the frame to minimize overexposing the lower half of my subjects. When shooting at the short working distances needed to minimize background clutter, overexposure can be a problem. In this photo, my subject was in perfect alignment with the narrow flash beam, drawing the viewer directly to my subject's face.

I noticed that whenever I changed my shooting position, the location of my "spot of light" also shifted slightly. In this shot, the zone of illumination was well centered on my foreground dancers. As long as I tried to keep my subject between the two spot-lit palm trees in the background, the lighting and the composition would all fall together. The trick was waiting for the subjects to face the camera (sort of), and because I was dragging shutter (longer than normal exposure times), I hoped that my subjects wouldn't be too blurred. Rear curtain synchronization helped in this regard. But it's tricky trying to anticipate what your subjects will be doing 1/15th of a second after the exposure starts.


Suggesting Available Light Sources: One trick I learned from Joe McNally: Include the suggestion of a light source in the photo. In this case, the multiple lights in the background suggest that there will be multiple shadows, leading the viewer to conclude that only available light was used. It is presumed that if natural (sunlight) is used, there would be only one shadow, unless your life's orbit centers in Tatooine. Based on both the shadows and the warm background lighting, it's pretty clear that all of the light is artificial, and the multiple shadows expected.

And The Winner Was...: I chose this shot in spite of the empty space between the left and right subjects. The shawl on the right side dancer added something to the historical context I wanted for the photo.

Shooting during the rehearsal gave me a lot of flexibility in lighting and shooting, something I would never have had if I photographed during the actual event. With the dozens of flash exposures I took just to capture this image, I'm glad that if I had to annoy anybody, it would be the performers who had been warned that I was coming.


Who Blinked? When the Dance Coordinator asked if I would make a group photo, I was happy to do so, but asked for five minutes to get set up. Since I could more easily control a static subject, I took a little more time refining the lighting. I had a shoot-through umbrella rolled up in my camera bag, so I decided to use it to soften the lighting a bit. And since I was using flash at night, I told them to close their eyes while I made my exposure adjustments. It looks like almost everybody got the message.


Once the exposure was dialed in, I had the dancers in the front row grab a tambourine so they would have something to do with their hands. It's funny that the shot with the closed eyes is slightly better composed than my final effort.

As the year comes to a close, I offer a season wish for happiness and good fortune for the coming year. As Kinky Friedman said, "May you be blessed by the God of your choice!"

Monday, December 16, 2019

HOGs

1/500 second,  F 11.0, ISO 400
'Tis The Season: "The Golden Gate Chapter #3923 of the Harley Owners Group (H.O.G.) gave Santa a helping hand during its 30th Annual Toy Run on Saturday, December 14. Members from around the bay area brought toys to the San Mateo Medical Center for distribution that morning." San Mateo Daily Journal, Monday December 16 Edition.

In many ways, I've been planning this photo for several years. For the record, the visual elements I sought to capture included:

  • A blue sky background, with some fluffy clouds,
  • Flash fill to balance a slightly underexposed sky, and 
  • Presents being passed about.
The overall exposure isn't perfect, as some detail was lost in the deep shadows of the SUV at camera right. Just the same, the presents in hand are clearly visible, so the activity was made clear. There are some limitations when a single bare flash is used to fill the shadows of relatively reflectively subjects, and those limitations will be addressed here.

To The Good: 
  • The light was held aloft on a short, 18" monopod, while the camera, a Fuji X70, held at arm's length about one foot off the ground. This put the effective distance between the lens axis and the flash at about four feet, placing the light slightly above my subject's eye level. Notice that there is the hint of a shadow under everyone's chin, and that the lower half of the photo is not overexposed.
  •  The camera' s  28mm (equivalent) wide angle lens allowed me to get close to my subjects. Distortion was held to a minimum by positioning the camera at a nearly perpendicular alignment with the subjects.
  • The flash was triggered with a cable and not a radio commander. This eliminated any possible light fall-off due to slight latency (delay) introduce by nearly all radio triggers. Incidentally, this was not a TTL shot - The flash output was chosen manually.
To The Bad:
  • Much detail was lost in the black jackets due to the nature of bare flash. There is an old adage: Detail in the highlights is determined by the shadows, while detail in the shadows is determined by the highlights. Small flashes and speedlights, used bare, produce relatively small, spectacular highlights which aren't large enough to give details to in the shadows. Shiny, highly reflectively objects like the Santa suit need large light sources to be rendered properly, and in this photo, the highlights produced by the single flash aren't enough big enough to render the true color of the suit properly.
  • The 28mm lens provides a wide field of view, and unfortunately most flashes can't light the frame evenly from edge to edge. The subject at the far right is at the twilight edge of the flash (I used a round-headed Godox), and was underexposed accordingly. If Sissy was with me, I would have had her mount the flash on a longer monopod, and stand a few feet behind me. This would result in a broader flash angle. I would have had to trigger the flash with a radio remote, since a suitable flash cable would be too hard to deal with. And I would have reduced the effective flash output in half, or worse.
All in all, this was a pretty good result from a photographer working alone. Just keeping a flash held at the end of a monopod properly aligned was challenging. Feathering the flash more towards camera right might have helped my rightmost subject, and if Cissie were there, I surely would have. But she wasn't, and I didn't.

1/125 second, F 3.6, ISO 1600
Change Of Venue: Once the presents had been brought indoors, I upped my ISO and started to shoot. Camera mounted flash, bounced high and behind me. One nice thing: Exposure isn't critical because bounced flash is low in contrast with a great deal of shadow detail. Some minor post production can be counted on to save underexposed images, This was meant to be a sketch photo made to fine-tune the exposure. The subject's expressions aren't good enough to make the photo a contender for publication, but I sent it along to the hospital, just in case somebody liked it.

1/125 second, F 5.0, ISO 1600
Who Gets The Props? There were a lot of things going on -Santa was greeting children, a photographer was photographing, and finally, lining up for gifts. This shot was meant to be a shout-out to the staff and volunteers at the hospital.

To The Good:

  • There is a strong center of interest. All faces are looking at the gift, and the outstretched arms add to the emphasis
  • The rapt expression of my third subject.
  • The profile view of the child. I've found that families can be very sensitive to accepting charity, so I make ever attempt to appear more interested in the givers than the receivers.

To The Not-So-Good

  • There is no Christmas reference in the photo.

That might be why the image wasn't published by the paper.


Out Of A Jam: I needed to identify the young woman on the left. I thought I had put her business card in my camera bag, but couldn't find it when I looked for it. Undaunted, I noticed that her ID badge was barely visible in this image, so I decided to zoom in close to see if her name was visible.

There is something to be said about sharp lenses and high resolution cameras. This ultra-tight crop gave me the information I needed.

I've spoken to a number of photographers about equipment, and what I considered the minimum requirements for editorial photography. Truly, this level of resolution wouldn't be needed for the usual "picket fence" and "face and a place" photos I'm usually asked to make. But in this case, the higher level of performance helped me out of an embarrassing fumble on my part.

Sunday, November 17, 2019

Grids For The Godox Round Head Flash

Four Of A Kind: As is my habit, I often go overboard when I buy light modifiers. In my quest to achieve a round, smooth-edged highlight, I purchased a total of four dedicated grid disks for my Godox V1. I was disappointed by the results I got when I used a single grid, and concluded that by stacking them, I could produce a tight, concentrated beam. The strategically placed magnets on the Godox grid's bezel made stacking very convenient, and increase the potential for creating a variety of special effects.
To get an idea of the effect of stacking, I mounted a Godox V1 flash on a D70s body with a 19-35 Tamron lens set to 19mm. I then photographed a blank ceiling from a distance of about five feet. This sequence was shot with one mounted grid (upper left), followed by a second grid (upper right), until I reached a total of four grids (lower right). No effort was made to adjust the exposure because I was only interested in seeing the shape of the highlight and the quality of the shadow edge. It is not as tightly focused provided by a fresnel lens, it is nonetheless a very smooth and symmetric highlight, a useful capability to have tucked into a lighting equipment bag.

I ran a quick series of selfies using a camera-mounted bounce flash as my key light and the gridded Godox flash to produce a hard round highlight on the background. I set the Godox to trigger optically, and placed it on a light stand about four feet from the wall. As before, the shots were fired with the least restrictive configuration (one grid) on the upper left to the most restrictive (four grids) in the lower right.

If you're wondering about the apparent size of the highlight, you need to remember that the flash to background distance is shorter in the selfie sequence than that of the ceiling shots. I imagine that when I start using these grids in the field, there will be a lot of adjustments to the location and the size of the highlight before I get the desired results. I anticipate a lot of both chimping and head-scratching if I am to get the subtle splashes of light I can see in my mind's camera.

Sunday, November 10, 2019

Halloween At The Carolands

1/8 second, F 5.6, ISO 6400
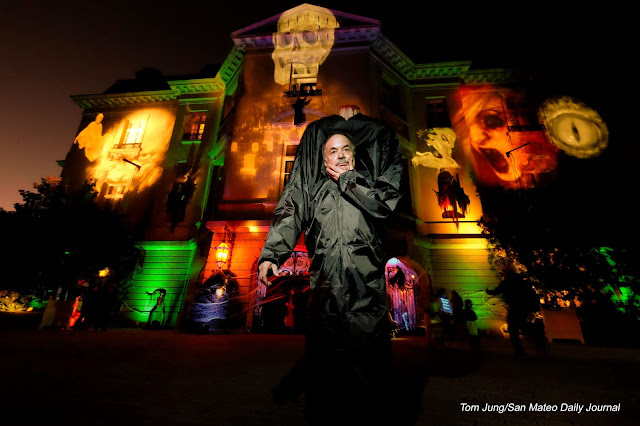
Boo! A Hillsborough Halloween party, complete with a "haunted" mansion, was the final stop for many neighborhood trick-or-treaters. There were zombies, chain saw murderers, and a variety of ghastly tableaus. But the highlight of the evening was the light show created by Alegra Entertainment and Events. A variety of ghostly images were projected onto the walls of the mansion, and they just got scarier as the evening grew darker. Since I had to submit the photo before 8:00 pm, I had to make my photo as quickly as I could.


1/180, F 5.6, ISO 200. Lens F.L. 10mm (15 full frame equivalent)
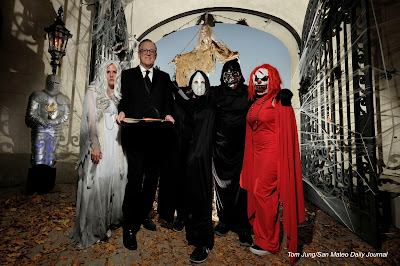
Knowing that I might have to leave before it got dark, I made a quick group shot of some of the event's hosts in full costume. I wanted to make the shot before the youngsters started to arrive. Unfortunately, the evening sky was still quite quite bright, and  with my camera's minimum flash sync speed of 1/180, my flashes didn't have enough power to allow my using a smaller aperture.  Sure, I could have darkened the sky by stopping down to F 8.0, but there wasn't enough flash output to make it work. This was certainly a usable photo, but without a context to anchor the image. If I could have waited another hour, the photo might have worked. but as more guests started to arrive, postponement was not an option.

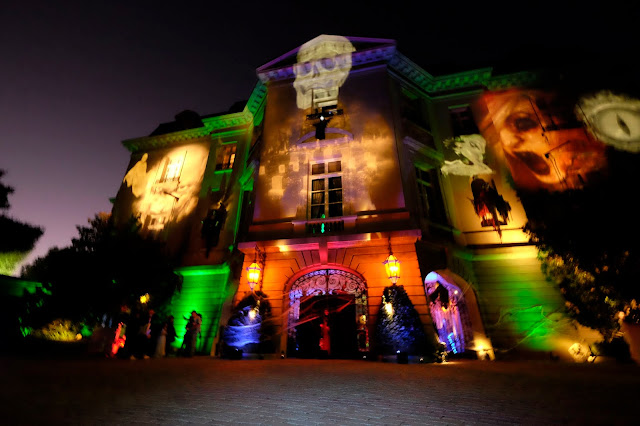
I shifted my attention to the covered carriage entrance, a feature  typical of mansions built in the early 1900s. Without the twilight sky as a background, I was free to boost the ISO values, which in turn effectively increased the effective power of my flashes. Because the ceiling was too tall for bouncing, I relied on a domed flash held aloft with a short monopod to provide some modeling of my subjects. I could also increase my exposure time to allow the ambient accents lights to "show their colors". Of course, those long exposure time resulted in some camera movement blur, but the portions of the image lit solely by the flash were much sharper. I doubt that anybody except another photographer would have noticed the blur. 
1/8 second, F 5.6, ISO 6400
The Bewitching Hour: Just as I was leaving, the projections were easily seen on of front of the mansion. I made this quick sketch photo to establish my ambient exposure. At this point, I considered the background properly exposed, and could now concentrate on making minor flash adjustments. That bright area in the foreground is the puddle of light created by my flash, which was aimed where I planned to place my subject.

The Shot: After refining my framing of the mansion I called my subject over and verbally directed him to a position near the center of the frame. From this shooting angle, it would have been difficult to include his feet unless he moved farther from the camera, something I wanted to avoid.  A tripod for the camera and a lightstand for the flash would have allowed me to refine the pose still further, but since I had neither, close enough was good enough, and I had my photo in six exposures. 

The photo at the top of the post is a variation on the image I actually submitted. I simply burned in the highlight created by the flash to draw the viewer's attention to my subject's face. 

Future Refinements: If I had the freedom to do so, I would have used the lightstand and the tripod. If I waited until all of the guests had left, I would have had the freedom to do so, provided I didn't hold the staff too much past their bedtime. If I could have submitted the image electronically while on location (reception was a bit spotty), I could have stayed longer to further refine the shot. I could have probably convinced the entire crew to stay for one final group photo, one which I'm sure would have been "killer"!


Addendum: I found this sample image well after the posting was written, and it adds an additional level of exposure control.


Rear Curtain Flash Synchronization: The technique is called Dragging Shutter, which is when you use longer shutter speeds to properly expose ambient-lit background. It helped to create this image. As one of the lighting staff rushed past me, I made this exposure. The shadow that appears in his wake was created by setting the camera's  flash synchronization to Rear Curtain. When so set, the flash fired just before the shutter closed. This lit my subject at the final moment of his movement across the frame.

When I looked more closely at the image, I liked the way the edge of the light fell off at the lower edge of the frame. It hides the hard shadow at my subject's feet, a sure indicator that I used a near-camera flash to achieve the effect. Had I used a light stand, I could have locked my flash position and had my subject move in and out of the light puddle. But as I said, using a light stand in so crowded an environment is an accident waiting to happen. If a future assignment allows me that luxury, I'll certainly remember that lighting the lower edge of the frame can be easily controlled.

Sunday, November 3, 2019

Upping My Game With Background Lighting

1/125 second, F 5.6, ISO 1600
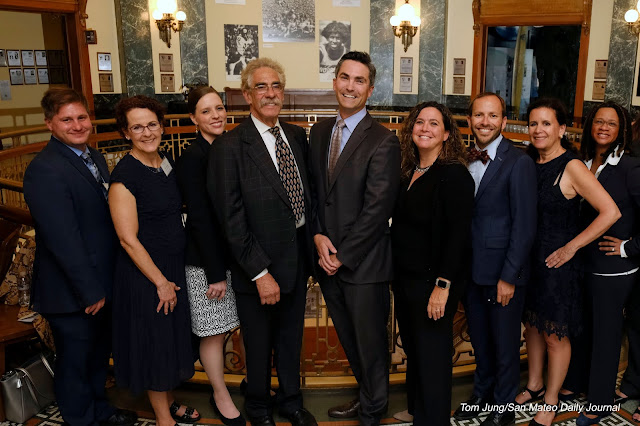
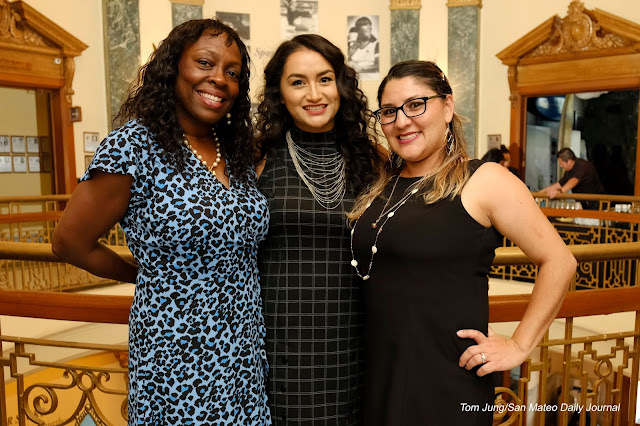
Trying Something Different: I've photographed members of San Mateo's legal community for several years, and frequently find myself in the historic Courthouse in Redwood City. The rotunda is especially photogenic, but at times difficult to light properly. In the past, I'd use a speedlight with a shoot-through Zumbrella* mounted on a light stand. But the last time I was there, I left the lightstand in the car and simply bounced a camera-mounted speedlight off of a large wall behind me. By using a high ISO, I was able to get a proper exposure with a Godox V1 flash. The wall bounce created a lighting surface many times larger than the one created by a shoot-through umbrella or a softbox. Notice that the shadow edges are extremely soft, and that the highlights on my subject's foreheads are very broad.

Next, I needed to balance the background with the bounce-lit foreground. I clamped a second V1 flash on the balustrade and aimed it towards the wall behind my subjects. I own one Nikon and one Fuji version, and when the shoe mounted Fuji version was used as a commander, it can communicate with the Nikon unit, so long as the group and channel settings on both units match. This cuts costs and increases compatibility when you work with two different platforms, as I do.

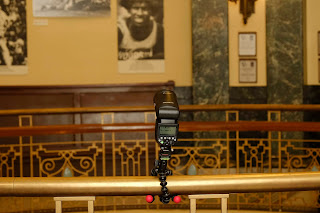
Because of the distance across the rotunda, the flash output was at nearly full power. You can see the Gorillapod I used to attach the flash on the rail. The flash was held in place with a cold shoe mounted on the 'pod's 1/4 x 20 tripod screw. When the flash was properly aligned, gave me the results I wanted. It turns out that stability of the arrangement was an issue. More on that later.


Because the flash to subject and flash to background distances remain fairly constant, some balancing of the two lights  may be required. Once the optimal output was determined, moving closer to my three subjects required no major exposure adjustments. While the photograph appears to have only one light source, careful examination will show that there are some indicators of my twin-flash lighting solution. If you look at the archway on the left side of the background, you will see a distinct vertical shadow, a sign that a second light was used. The shadow is also an reminder of how dark the background would have been if the a second flash was not used.


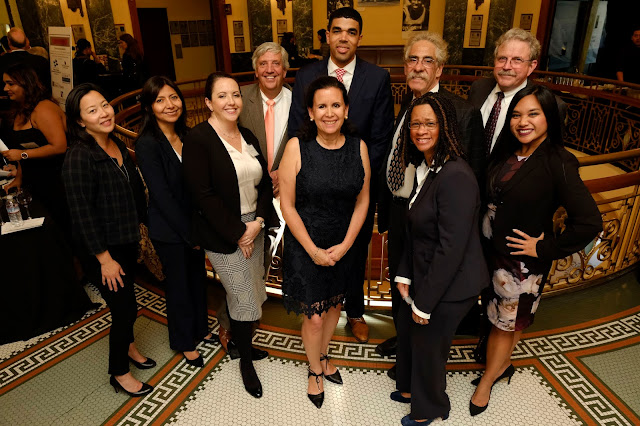
Bumps In The Road: As is my habit, I invited my host to gather as many group photos as she liked, simply because it wouldn't involve any additional effort once the lighting solution has been established. I noticed that this series of photos didn't look like the others because it appeared that my background light had failed to trigger. After this shot was made, I dismissed the group and discovered that the Gorillapod had rotated on the round railing and was now facing straight down, probably bumped by one of my subjects. If you look at the cropping on the right, you can see the highlights created by that wayward flash. In the future, I'll be sure that the 'pod legs have something else to grab onto for additional support. I also purchased a medium-sized lightweight photo clamp with a tiny ball head for mounting a 1/4 x 20 cold shoe. This should prove more secure.

The Takaway: There is an important takeaway from this assignment: A second flash can really improve the appearance of the final photo without too much additional work. When I attempt a similar shot in the future, I would start by determining the  background flash output and ISO combination necessary to produce a suitably exposed background at F 5.6. Next, I'll stand exactly where I plan to place my subjects and make selfies, adjusting the power output on the flash until I get a suitable selfie exposure.  Once this is done, I'll only need to adjust the exposure on my on-camera flash.

Radio Triggering Alternative: You may know that I've taken to using Godox flashes, primarily for their fast recycling times and built-in radio triggers. While convenient, they can be flummoxed when you cannot establish an unobstructed line-of-sight relationship between the controller and the remote. In the future, I may include a Nikon SB-800 speedlight to use an an optical trigger. Forgive my terrible mockup. I'd tape my snooted SB-800 (red bubble) set to the optical trigger (SU-4) mode on the other side of the rotunda. Both the flash head and the sensor would be rotated to face the backs of my subjects. Then I would  re-configure the Godox flash  on the balustrade to trigger with its built-in optical trigger. The on-camera Godox would be configured in the manual mode. In use, my on-camera flash would bounce off the back wall, providing enough light to trigger my background SB-800. When it flashes, the light will be directed across the rotunda towards the rail-mounted Godox, causing it to fire and illuminate the background. This execution is very convoluted, but necessary if the native radio triggers in the Godox units fail to communicate properly.

I bring this up because this kind of lighting can be obtained using almost any flash with manual output controls. An optical trigger can be attached to the existing flash hot shoe, or in the case of some select Nikon speedlights, the built in in SU-4 modes deployed.  I dare say that similar results can be had with very little cash output, a little imagination, and an appropriate amount of planning. 

*The Zumbrella is a proprietary shoot-through umbrella manufactured for, and sold through, David Ziser, a well-known Kentucky wedding photographer. The fabric was less opaque than the normal shoot-through umbrella, allowing more light to reach the subject.

Sunday, October 27, 2019

Minimal Location Lighting - Fall Rendezvous

1/320 second, F 5.6, ISO 500. Open Shade white balance preset. Focal length 75mm (112mm APS equivalent)

Rendezvous!  I had a chance to photograph the participants in a Fur Trade era Rendezvous held in Marin County. Most people are familiar with Civil War Reenactments, but "Rhondys" celebrate a period in American history that predates the War Between The States. It can be described as that period that started after Lewis and Clark's expedition and ended in the late 1830's when the demand for beaver pelts evaporated with the introduction of wool felt for making hats. These hearty souls, commonly called Mountain Men, would venture into the Rocky Mountains to trap beavers for their pelts, Once a year, they would come to the lowlands and meet with merchants at a "rendezvous" to trade the plews (processed beaver skins) for supplies (and liquor!). The event was an excuse to let off some "steam" and indulge in some rough and tumble play. 

Today, all sorts of people meet at club-sponsored rendezvous to celebrate the life style and self sufficiency of the Mountain Men.  Participants dress in period correct clothing, camp in period correct "primitive" tents, cook their meals over open fires (when it's safe to do so), and test their marksmanship skills, just as they did 150 years ago.

The plastic tool box sits beside the tree branch used to identify the mark where the subjects would stand.

The Setup: I decided to make some formal photos that the club might use for their web site. Since the fall leaves were in full color, I chose a fully-leafed maple tree as a background. The morning sun was streaming through the leaves so the background gave me a variety of bright yellows to work with. I found a suitable "mark" on the ground for my subjects to stand on, and then proceeded to set up a light stand to support a shoot-through umbrella. The flash happened to be a Godox with its built-in radio trigger. Any flash that could be fired off camera could have been used, but the fast recycling time would definitely speed things up. The flash was position about 7 feet from my subjects, the distance and exposure determined using the "selfie" method. The camera was a simple, 6 megapixel Nikon D70. I used both a 28-70 Tamron and a 70-300 Nikkor.

Focal Length: 140mm (210 APS equivalent)
For the photograph at the top of the post, I positioned my lady pioneer in the shade of a tree so that the dappled sunlight would create highlights on her shoulders. I instructed my subject to lift her chin until she could see the entire umbrella. This would prevent the brim of her hat from casting a shadow over her eyes. Just before shooting, I would re-direct her gaze towards the camera. Unfortunately, my subject tilted her head down at the last moment, casting a slight shadow on the eyes. Since this was the best smile of the series, it's the one I will post. 

This 3/4 length shot (right) was made by backing away from my subject and increasing the focal length to 140mm. This de-focused the background even more, making it more abstract. Since the distance from the subject to the flash remained the same,  no changes in exposure were necessary, providing I stayed with an aperture of 5.6. I was not using a constant aperture zoom lens, so extending the focal length always decreased the maximum working aperture. F 5.6 was a  valid setting for all of the lens focal lengths.

Posing Note: I wanted the end of the rifle barrel to be at the same level as my subject's eyes.  I used the plastic toolbox shown in the layout photo to support the weight of the rifle while elevating the muzzle to eye level. The box was outside of the frame and wouldn't appear in the final photo.

Focal Length 75mm (APS equivalent 105mm)
Gary Cooper: I couldn't help but think of Gary Cooper when this reenactor struck a stern, man-of-the-frontier pose. I shot from a low angle to give the illusion of height. The longer focal length of the lens minimized any foreshortening, so his hands appear in proper proportion to the subject's face.

Full Length Shot: By simply backing away from my subject, I could produce a  full length portrait. If you look closely, you can see that the illumination begins to fall off slightly below his waist. When "aiming" your shoot-through umbrella, try to point the shaft directly at your subject's face, not at the center of their body. You'll want the facial expression to be the visual center of attention, so make sure it's the brightest region in your photograph.

Final Notes: These photos were not made with my primary cameras. The Nikon D70  I used was removed from active service long ago. The appropriate APS lenses were relatively inexpensive when compared with the constant aperture zooms I normally use. But these lenses have proven themselves as sharp enough for most purposes. When using these older cameras, it is important that you frame your image as tightly as possible so you can use every last one of those precious pixels. I set my camera to create both a normal JPG and a RAW image simultaneously. This way I can fine tune my exposure in RAW when major exposure corrections are necessary, and use the JPG when it isn't.

It isn't necessary to spend a lot of money on a lithium battery powered flash if you need both power and fast recycle time. You can always use two flashes set to one-half power.  This will shorten your recycling time significantly. I described the home-make double flash mount here. You will also need a reliable trigger, and one suitable candidate is described here.

Monday, October 14, 2019

First Friday At CuriOdyssey


Getting To Know You: This ferret is one of the permanent guests at CuriOdyssey, a museum that provides natural history encounters with wildlife indigenous to the San Francisco Bay Area. Ferrets are illegal to own as pets in California and Hawaii, so this little cutie will live out its life in the confines of the museum.

View From On High: I was using a Fuji X-T2 with a 16-55mm 2.8 lens zoomed to its widest setting. I have been avoiding my 10-24 lens, in spite of its history as my go-to lens. Its zoom range can be something of a curse: When set to the 10mm setting, it can introduce extreme foreshortening, the exaggeration of the relative size of the nearest and farthest subjects in the frame.  Using a slightly longer lens forced me to increase my subject-to-camera working distance. For this shot, I held the camera in a high overhead "Hail Mary" position just to get everybody in the frame. I really appreciated the tilting LCD panel on the X-T2 because it made framing much more precise.


From  SLR Lounge 
What About Flash? I used a Godox Round Headed flash triggered with the dedicated on-camera remote. I decided to bring the dome diffuser, a grid, a rubber snoot, and a magnetic gel holder holding a Full CTO equivalent filter, all components included with the Godox accessory kit. As it turned out, the dome was the only modifier I used because it would spread the light over a broader area, giving me some leeway when it came to the flash's position relative to the subject. 

I also mounted the flash on a short monopod for more options for light placement. Because I was working in a crowd, the short monopod minimized the chance of hitting someone. That extra 18" of reach provided two lighting options. If I wanted better modeling (shaping with shadows), I could increase the flash-to-lens axis distance. I could also increase the distance between the subject and the flash to decrease the contrast between the near and distant subjects. This shot is something of a compromise between getting the flash high enough to provide some modeling and far enough away to achieve more even lighting on my two subjects. 

You can see the subtle differences between the near and far sister. You can see that my near subject's pink jacket is just a tad brighter than her sister's. A bit of highlight burning would have evened out the brightness, but I wouldn't have improved the image much.


The Shots I Won't Show You: It took 41 shots to get that particular photo. That might seem excessive, but capturing a photo that has all of the faces visible, all the eyes open, and enough detail to support the caption can often be a matter of luck. One blink, one grimace, or a shy ferret can instantly make the photo an "also ran". This shot might have made it, but from this angle, the background is a little too busy for my taste, and the ferret is a little hard to make out.

1/60 second, F 2.8, ISO 12800, White Balance Overcast preset. Flash with CTO gel.
Just Messing Around: With my money shot in the can, I was free to experiment with lighting solutions I could use when working a room as large as this one. The ceiling accent lights all pointed down at the exhibits on the floor, and the color temperature appeared to be close to conventional incandescent lighting. By leaving the camera's white balance preset on Overcast, the rendering was warm and artificial, exactly what you would expect from an available light shot.

If you're wondering, the orange fantasma was a kerchief launched with a stream of air provided by the clear plastic "cannon". In this shot, it's highlighted by the ceiling accent light that's visible in the background.


Godox Flash with a CTO gel, aimed at the ceiling
Despite this photo's natural appearance, it was flash-enhanced. I attached a CTO gel on the flash and proceeded to bounce the flash at full power off the right, dark wood ceilings. Needless to say, I lost a lot of light, but the high ISO setting and wide open aperture allowed me to brighten the shadows while maintaining the ambient light feeling. Because I used a radio trigger, I was free to place the flash on a nearby table. If the flash had been positioned nearer my subjects, that bit of bright white light shining through a gap in the flash head could have might some problems. It could have been sealed with a bit of gaffer tape if it had been noticeable.


My bounce surface, burnt to a white chrisp.
This shot shows the flash lighting up the ceiling. You can see that the bounce surface was huge, and the lighting was extremely soft. If you're wondering about the severe over-exposure, fear not, because the light that actually lights my subjects was much less intense.

My closing comment?  Don't be afraid to use higher ISO settings to help you normalize
harsh ambient key lighting. Also, you can never have too much power. Bouncing off of this high, dark ceiling wastes a LOT of light, and the more you have in reserve, the better.

Sunday, October 6, 2019

Installing CTO Gels On A Godox V1- Update

Buy yours here.
Dribs and Drabs: Well, the gels started to arrive. By Saturday, September 21, I have samples of all of the bits necessary to properly gel my Godox V1 Round Headed flash.

The Color Temperature Adjustment Kit: The Kit consists of a collection of round gels tinted to the accepted hues which included four levels (Full, Half, Quarter, and Eighth) of orange, green, blue, and something called "minus green", a magenta tint which I assume is the compliment to the green series.

I ordered one set from B&H Camera and one from Amazon, and the latter arrived first. I don't think the Chinese had fully embraced the concept of a licensed distributorship, based on the fact the Amazon delivery arrived with a Chinese return address.   Adorama chose to market the Godox product line under the Flashpoint name.


All you want are the two clear gel holders.
Mounting The Gels: You need to get a Flashpoint AK-R16 Gel Set to properly mount the gels. As I mentioned in an earlier post, the 4 gels (3 degrees of orange, one of green) are not true CTO gels, and might be suitable if all you need is to warm you flash's output. Using the round gels from the Color Temperature Adjustment Kit will provide more accurate color match. 

To mount the gels, start by installing one of the clear gel holders into the magnetic retaining ring. Just align the four nubs on the clear holder with the four slots in the back of the retaining ring, drop the holder in place, and while pinching the holder between your thumb and index finger, rotate the holder to lock it in place. Next drop the desired gel in place. Finally, install the second gel holder and lock it in place. I used a used dental explorer to push the tab into alignment. One could also drill a 1/16 " hole near the edge of the holder. You can now use a toothpick to help with the installation.

This approach requires the purchase of a Gel Set for every gel you want available for rapid deployment. This could become costly, but nowhere near as much as the similar Mag Mod filtration system. You could also get by with a single Gel Set and changing the gels in the field, a tedious process at best. But it you must go this route, don't forget to bring a toothpick.

Sunday, September 22, 2019

125th Birthday For San Mateo


The Shot I Was Sent To Get: The city of San Mateo turned 125 this week, and celebrated with three Thursday evenings of music, dance, and a proper homage to the Founding Fathers, and Mothers, of this wonderful city on the San Francisco Peninsula. Here Mayor Diane Papan (standing, center) along with some thespian Board Members, reenacted the early days of the city's creation. The stage skirt with its bright San Mateo banner, gave context to the photo, but inits inclusion forced a split composition and while adding some distracting text at the left and right side of the frame. Nevertheless, was exactly what the Editor In Chief wanted. And since the photo was made within the first ten minutes of the three-day celebration, I was free to make photos of the things I thought were interesting. These samples were taken from all three evenings, so if you're looking for continuity, you won't find any here.

Available Light: I appreciate the quality afforded the Fuji user when it comes to working with high ISO settings. Theoretically, its the lack of a low-pass filter is the reason. I much prefer the Fuji's performance to that of my older Nikon DSLRs. Working with the 50-140 2.8 Fuji lens, I was able to make some tight head shots from in front of, and behind, the stage.


In the above shot, the Mayor of San Mateo was working with a young San Mateo Trivia contestant. As an informal head shot, the composition has some desirable attributes. Both eyes are visible to the  camera and the mouth is not clipped by the microphone.

A less desirable shot can be seen at the right. Notice that the fingertips are clipped slightly. This wasn't the sign of poor cropping, but one of poor framing.  Since I couldn't get the composition adjusted in time, I would not normally include this image in a collection of favorite images. But it is a sample of an image that I would not normally submit for publication.
Shooting From Behind The  Stage: All during the three-day celebration, I wandered around the stage, trying to make a photo with more dramatic lighting. In both of these samples, the stage lighting provided both a rim light and a short lighting opportunities. In both cases you can see that the light skims over the near side of my subjects' faces, yet provides a splash of light on the ear. 

In these last two photos, I didn't correct for the obvious white balance mismatch. The effect gives the photo a more theatrical feel to the images. And by the way, these are shots you'll have to "chimp" to get the exposure where you want it.


Flash Augmentation In The Twilight Hour: I decided to practice mixing flash with the fading light of the late afternoon. Shooting in the twilight hour makes it much easier to balance ambient with flash, since the light levels are much lower. In the above shot, I held the flash at arm's length and aimed it directly at my main subjects. In the shot on the left, I purposely "skimmed" the light in an attempt to prevent severe overexposure of anything that was closer to me than my intended subject.  Here, I did my best to minimize the light hitting the headless dancer on the left of the frame. A minor amount of burning would bring the shirt to a brightness level closer to my main subject, the couple in the middle. As a technical matter, I was holding the camera about one foot off the ground, and held my flash high overhead using a short, 24" monopod.


In this shot, I re-framed the composition to place my female dance closer to the center and to include some of her "students" in the right side of the frame. Notice that the flash is just bright enough to cast a shadow beneath the chin of my Lady In Blue. I like the effect because it provides some subtle shaping of the facial features while providing some highlights I wouldn't be there if I relied on available light.

To avoid collisions, all of my shots were made for the edge of the designated dance floor. I decided to change things up and try for a shot that emphasized the dancers themselves. For this shot on the right I just "zoomed in", hoping to get a good facial expression on my dancer, something that would reflect the infectious mood the Salsa rhythms. Try as I did, I never got an expression of excitement  I was hoping for. 

I did manage to make a shot of this young lady learning how to waltz, and I was intrigued by her rapt expression. I don't exactly know what she was thinking at the time, but her partner appears to be a really lucky guy.