 |
| Photo #1 |
Each year
Jo Schuman Silver, producer of Steve Silver’s Beach Blanket Babylon, presents The
Steve Silver Foundation’s “Beach Blanket Babylon Scholarship for the Arts” to three
Bay Area high school seniors. Three winners, one each from the categories of Acting, Dance,
and Voice, receives a $10,000 scholarship, and would be selected from
three finalists by a panel of celebrity judges at the Club Fugazi, BBB’s long
time venue.
In an unusual Trifecta, three of the nine finalists were from the Journal's service area, and a writer was assigned to write a feature article on them. Great! Now I wouldn't have to write a caption. But there was the pressure of producing an image to accompany the piece. There would be no editor to pull my image should I blew the shot. The result was Photo #1. But I digress.
I really wanted to do something special with both the location and lighting . Since they were all "San Mateo" residents, I wanted it to have an urban flavor. I was hoping to get an "Uptown Funk" look, but was also aware that I hadn't budgeted funds to completely close off any prime visual real estate. Cissie and I scouted out possible locations in San Mateo, and found a promenade aptly named Main Street that was closed to automobile traffic. There was also a parking garage just behind our chosen location, so moving equipment onto the set was a snap.
Next came the lighting. I wanted to make the sky as dark as I could make it, so I would need lots of flash power. Also, I wanted an overall "cold" rendition of the street, and have my subjects lit normally so they would stand out from the background. For my main light, I used a Quantum X head, powered by a Norman 200B power pack, and bounced it from a 72" Westcott silver umbrella. To achieve a "cold" look on the background, I placed a Rosco 3407 Gel (aka Full CTO) over the flash head and set the White Balance on my Nikon D600 to 2940 degrees Kelvin, the closest I could get to the 2900 degree value suggested by the manufacturer. This gave me an accurate rendition of my subjects while giving me a cold(er) rendition of the ambient background light. But more on that later.
 |
B&H Photo. Click here.
|
To obtain a "performers on stage" look I used a Norman 2H 8" 15 Degree Telephoto Reflectorthat I purchased on e-Bay a few years back. You also need to install the special spacer between the flash tube and the head for maximum efficiency. Once mounted, it throws a cylinder of light bright enough to suggest a spotlight beam coming from behind. This light wouldn't be gelled so it would be rendered as blue.
I mounted the head on a light stand and set the power supply to full power. I triggered it using an Eilenchrome Skyport radio transmitter because it was too far away for an optical slave. I brought some Rosco Cine Foil to scrim (block) off the light spill that was hitting the tile wall to the left of the flash.
If you look closely at Photo #1, you can see the legs of the light stand besides peeking out from behind my dancer's right thigh. I'll have more to say about light stands when photographing in public venues later in this post.
 |
| Photo #2 |
|
This warmup shot (Photo #2) is pretty much right from the camera, and it clearly shows the telephoto reflector at the moment of "ignition". At this point I'm still adjusting my main light. For the final shot, I added a hand held a Nikon SB-800 with the factory supplied Incandescent gel to add a tiny bit of light into the shadows. I used the SB-800's built-in SU-4 optical slave to set off the unit. The beam angle was set for a narrow spread and aimed directly at my subjects' faces to prevent a secondary shadows on the ground.
Monday Morning Quarterback: Everybody was pleased with the photo, including the publicist from BBB. However, the next time I make a shot like this, I'll add the following items to my To Do List:
- Alignment Of The Accent Light: When I did my initial setup, I had planned on having my subjects centered in the puddle of light. This clearly didn't happen, and I'll need to be more careful next time.
- Additional Gels: My use of the 3407 Gel did exactly what it was supposed to: provided a neutral/accurate match of the light source to the camera's white balance setting. Accurate yes, but pleasing? If you look at Photo #2, you can see that the skin tones are a bit on the cool side. The next time I make a shot like this, I'll add a 1/4 or 1/4 CTO gel on top of the 3407 to give my subjects healthier skin tones. Not an original idea, but a suggestion from David Hobby that I should have thought about.
Shooting In Public Venues: I was alerted to this potential problem by a post from Neil van Niekerk about his being stopped by police while photographing a model without a permit. While I am not aware if San Mateo is as rigid as Hoboken, it could have been a potential problem. Normally, I would have had Cissie hold the flash and umbrella on a painter pole, but considering the location and the time (9:00 am), I didn't think this would be a problem. This time both the key and the accent light were on light stands, and this could have been an issue. I was wearing my press pass, as I was on assignment for the paper.
 |
| Photo #3 |
I will be more aware of how my shoots are affecting the people around me. For me, the easiest thing is to "come up for air" and check to see if I'm holding anybody up. In this uncropped version of the lead photo (Photo #3), you can see one person (camera right) unsure of what to make of the situation, and in the background (camera left), a bicyclist waiting for a chance to get through without disturbing the shoot. Most people have been very forgiving in the past, but my advise is to never press you luck.
 |
| Photo #1 |
Opportunity Favors The Prepared Mind: I've been following Neil van Niekerk for quite some time. His approach to on-camera flash allow for some very creative lighting techniques suited for a photographer who is working alone. His technique takes advantage of the state-of-the-art digital single lens reflex (DSLR) camera technology to stretch the limits of bounced flash. He utilizes high ISO settings, narrow-beamed on-camera accessory speedlights, and bounce surfaces he finds on location.
I've adopted Mr. van Niekerk's techniques with great success indoors, but never applied it outdoors for lack of a suitable bounce surface. In retrospect, I guess I wasn't looking hard enough.
 |
| Photo #2 |
Grad Night: Every year I photograph the San Mateo Adult School's Graduation Ceremony. The reasoning it twofold: I need to make a record shot of the graduating class for our 'I Love Me Wall", and to hopefully make an image interesting enough to be published in the community section of the Daily Journal. I had just finished the shooting the handshakes and moved out to the courtyard to make some photos of the graduates before they turned in their gowns and went home. In the interest of speed, I decided to use may handshake setup, A D7000 with a 18-200mm zoom lens with an SB-900 and SD-8a battery pack for light. My first shots had the bare flash pointing directly at my subjects. As I roamed around the lobby, I made a few shots, not of which were particularly well lit. All I can say is the rig was simple to use, something like a gigantic point-and-shoot. This first shot (Photo #2) was pretty typical of shots made with direct, hard lighting with the flash positioned high above the lens axis.
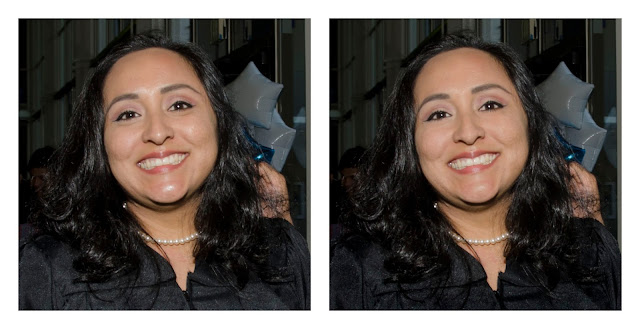
Speed Retouching: Direct flash photos often require retouching to make the images more attractive. I have streamlined my work flow to address both the highlights on my subject's forehead and nose, and the darkened rings below their eyes. Check out this comparison (Photo #3) of a cropped portion of the sample image.
 |
| Photo #3 |
I used my "Holy Trinity" of retouching. These three steps are applied in the following order:
- Clone Tool: Set to Lighten, 25%. Sample the light area of the cheek as your source point and "paint" over the darkened regions below the eyes.
- Brush Tool: Set to Darken, 20%. Sample the side of the nose as your source point and paint the highlights on the nose, forehead, chin, and cheeks.
- Burn Tool: Set to Shadows, 20%. The graduation gown is then "burned" to bring its color closer to a true black.
By using three separate tools, you don't have to spend time choosing between options. It takes less time to change from the Clone Tool to the Brush Tool than to re-set the Clone Tool to address the darker and lighter regions of the face.
 |
| Photo #4 |
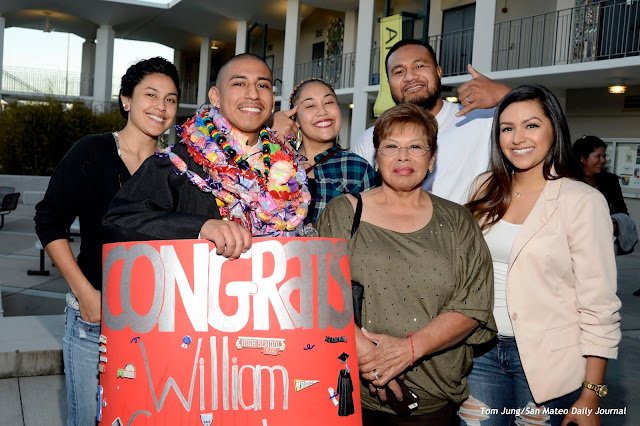
I roamed the courtyard, looking for family groups to photograph. I performed the three-part adjustments to every face in this family group (Photo #4), giving me a reasonably good party portrait. Obviously, the glare from the silver letters on the congratulatory banner reflect the harsh qualities direct flash can have. Thankfully, the high over axis flash position provided by the flash bracket helped give the image some three-dimensionality.
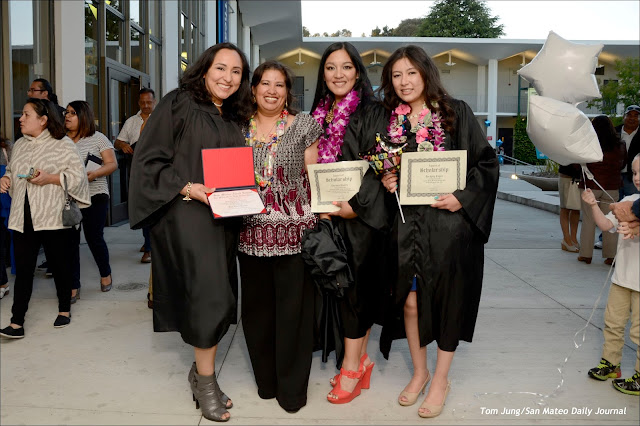
Ah HAH! Shortly after this shot was made, I noticed that second floor walkway surrounding the inner courtyard walls. It occurred to me that this could become a "ceiling" that I could use to bounce my flash. This, and the light colored walls, gave me a large bounce surface that I could use to produce a more even light. I changed my tactic: Instead of going to my subjects, I invited them to join me by the wall where I could photograph them. This trio of young graduates clearly shows the improvement of bounced flash over direct flash. And while I still used the "Holy Trinity" of retouching, I could usually skip the highlight adjustment.
I thought this trio of excited graduates would make a great photo for submission to the paper. After positioning them in the "sweet spot" in front of my improvised bounce surfaces, I made a simple smile shot. A reproduction of Photo #1 can be seen at the left.
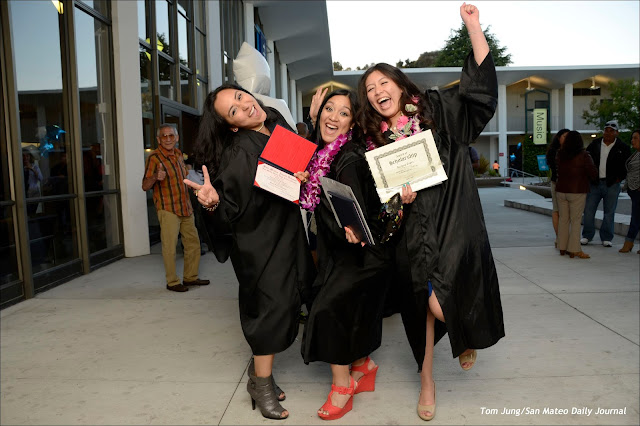
Wardrobe Notes: Louisiana photographer Kirk Volclain, in a video from PhotoVision, made an interesting point: Shoes can be a very important part of a young woman's wardrobe. For this reason, I always try to include a full-length photo that includes the shoes. In this case, it was a bit of a challenge, because even my lens set to 18mm, I still had my back pressed against the wall behind me.
 |
| Photo #5 |
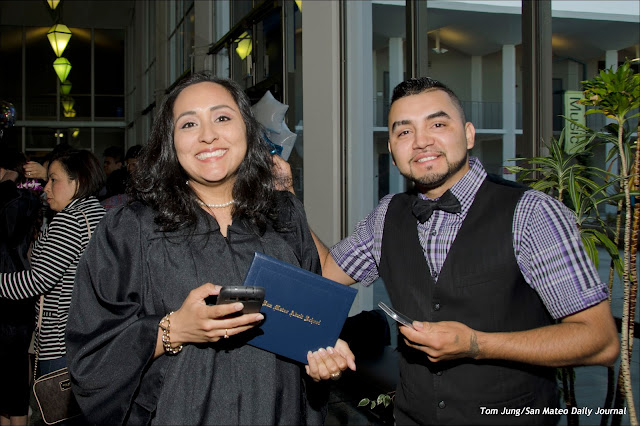
As always, I asked if they wanted to make a fun shot for using on their social media sites. The resulting photos can be a lot of fun to make once the subjects understand that I want them to have something fun to remember the event by (Photo #5).
 |
| Photo #6 |
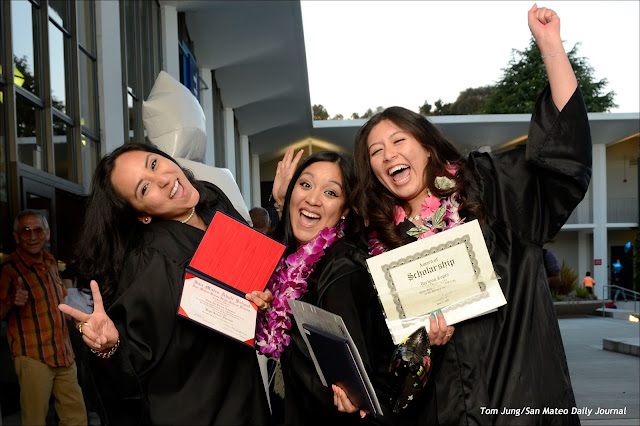
I felt this was a suitable image for the Journal, but I decided to crop it tighter (Photo #6), since I had no way of knowing how it would be presented. If the photo was reproduced in a small format, most of the detail seen in my original composition would be lost. So I re-cropped the image to emphasize the faces and the certificates, a wise decision when you consider the hard copy was only 1.75" x 3.25" in size, and black and white to boot. The photo ran in the June 22, 2015 issue on page 19.


