Tuesday, January 2, 2018

Bethlehem 2017 AD

Photo #1 1/8 second, F 5.6, ISO 500, Daylight Balance
This (Photo #1) is the image the Journal decided to publish for Bethlehem 2017 AD.The shot was probably chosen because there was a child present, providing more of a family friendly spin on the event. There are some technical reasons why I liked the photo. The two flash lighting allowed me to have highlights on the census taker, the scroll, and the quill pen, while an on-camera flash provided the fill lighting that would keep the details in the foreground. I didn't like the fact that the spill from the flash severely overexposed the woman in the background, but under the circumstances, that couldn't be helped. I admit it's easy to get into the "could have, would have, should have" mindset, but we don't get to make photos in a vacuum, and factors beyond our control are bound to interfere with the vision every photographer tries to create the moment before the shutter is released. The shot was good enough to submit, although I had some reservations about the overall exposure. Interestingly enough, there are no blocked highlights, and the image should have turned out better than it did.

Photo #3
Filtration: For the assignment, I had full CTO gels on both the key and fill speedlights. Two Nikon SB-800s were used, adjusted manually. The camera was a Fuji T2 with a 10-24 F 4.0 lens. Triggering was accomplished using the the SU-4 (optically triggered) mode. The photo of the mule (Photo #3) was made just for fun. folding LCD panel allowed me to make a low-angle shot between the fence slats without having to actually lie on the ground. Incidentally, the palm tree in the background was lit by a halogen spotlight placed there by the event sponsors.

I often use the Full CTOs to give the shots a warm, candle-light look. In this case, it didn't quite work, possibly because the mule's natural color (the white blaze on her face) was rendered too warm to be believable. I experimented in trying to correct the color balance in post production, but was really happy with the results. One problem with filtration - If the saturation of a any of the primary colors (red, green blue) goes "over the top", you can never recover a attractive relationship between these three primary colors.
 
Photo #4
Photo #4 was my personal favorite, but not something I could submit for publication. The goats in their pen are not easily recognized when seen from the rear - a small gesture of curiosity or affection by one of them could have made the photo, but alas, it was not to be. My costumed subject had a wonderful expression, but I didn't feel it was enough to carry the photo, especially when presented small in black and white, as my photos often are.

I was pleased with the two-light setup I used that evening. That bright fireball near the left edge of the photo is actually the key light, held aloft with by Cissie with a monopod. If you look at the highlight on the fence, you can see that the beam angle has been narrowed to form a spot of light centered on my subject's face. From the position at camera left, the speedlight provides a classic Rembrandt lighting, while the on-camera fill speedlight, feathered up slightly to prevent foreground overexposure, provides the necessary fill.


This is Jay, a photographer working with the event who I met last year. He too uses a Fuji XT2, but opted for the 16-55 2.8 as his main lens, one I passed on because it was too bulky and not wide enough for my taste We were experimenting with flashes, and I made this photo using my two speedlights and his flash, a Phottix I think, triggered in the optical slave mode. Since it wasn't equipped with a gel, its light is rendered impossibly blue when the camera is set to the Incandescent white balance preset.

I had considered trying to get a one of the rabbis to stand in front of the shadow cast by the menorah, but there wasn't time, space, or  (long) lens enough to make the shot come together.  I'll file this idea away for next year, and may experiment with the concept well before then.

Sunday, December 24, 2017

Land Of One Thousand Santas

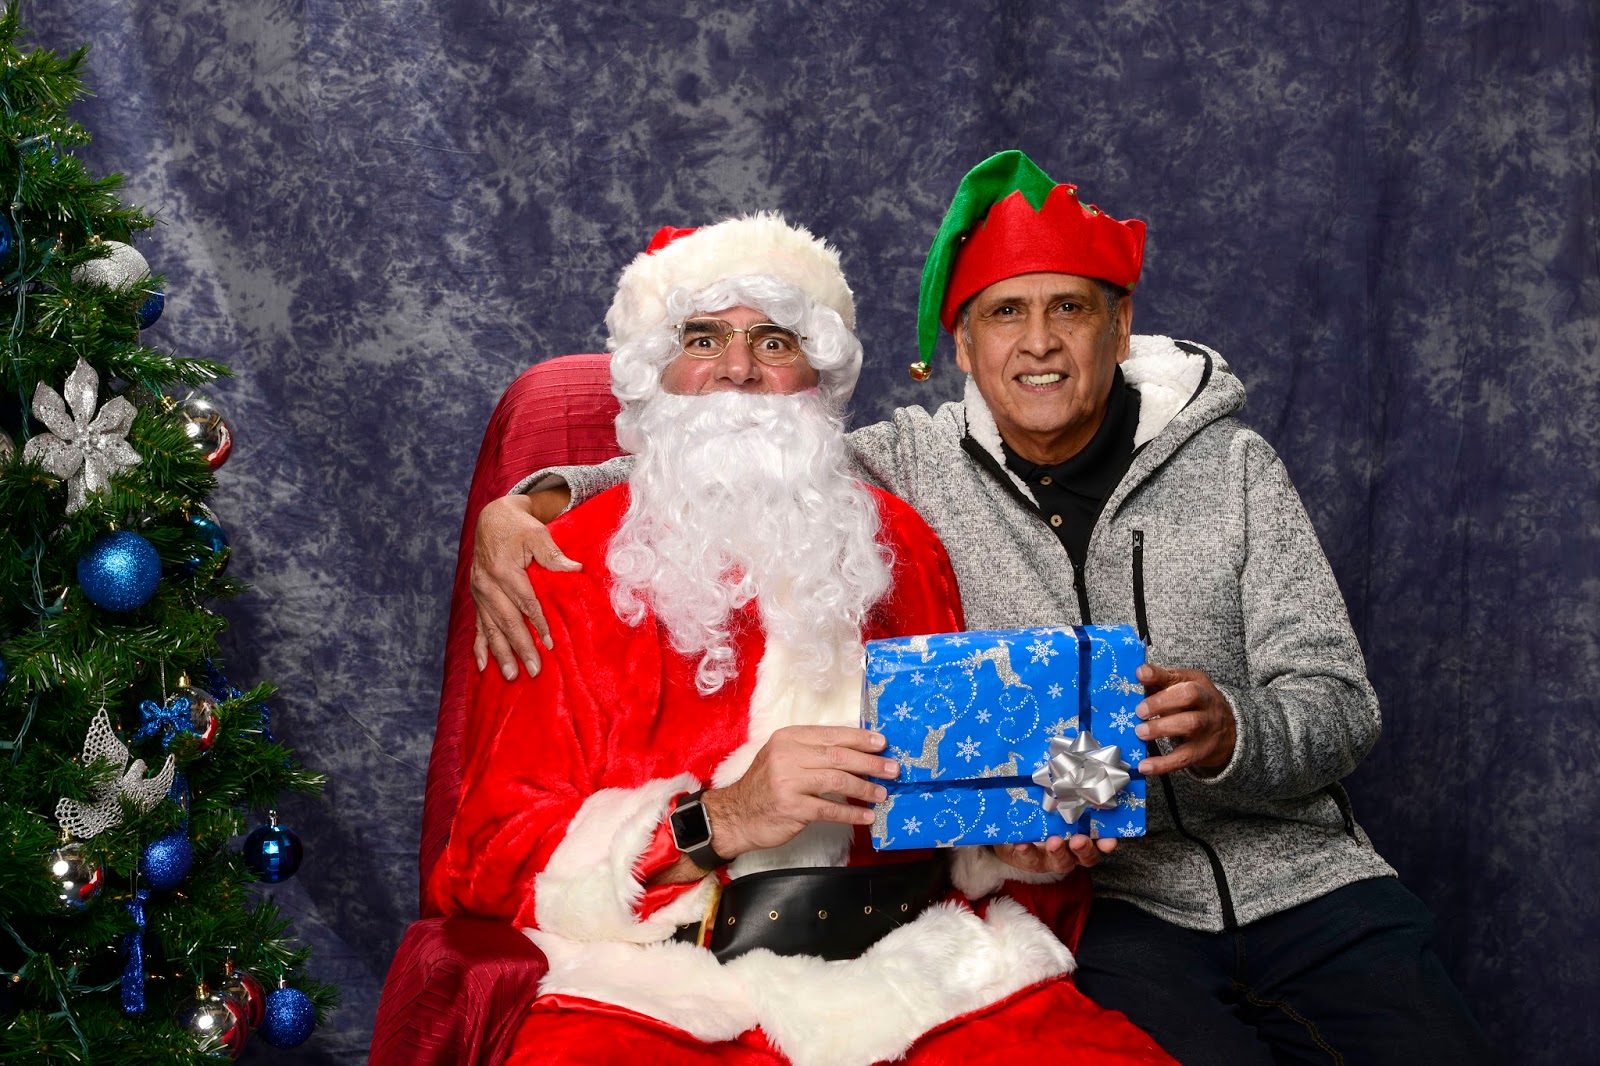
290 Santas, Actually. This year, the Santa Scene was different. In the past, only raffle winners were photographed with Santa. This usually meant the number of shots was limited to about 20, plus those who came by to get a selfie shot at the end of the session. But this year, any student wishing a photo could get one, so long as they came when their classroom was scheduled. The increased volume of subjects presented new challenges, and new procedures, just to keep the line moving.

Nerd Stuff: The Equipment was pretty much my go to setup:
  • Camera: Nikon D600 with 24-70 2.8 Nikkor lens
  • Settings: ISO: 100, F 16, 1/160 exposure.
  • Main Light: Norman 800 D powerpack with a single head, 1/2 power output.
  • Light Modifier: Flash bounced into a Westcott 72" satin umbrella. I used two light stands: One for the umbrella and one for the Norman head.
  • Highlights: Lastolite EZ Box on a light stand aimed down at the backs of the subjects. Flash was a Flashpoint Li-On flash in the manual slave mode.
  • Fill Light: On the floor, an SB-900 shot through a Zumbrella.
  • Camera mounted on a tripod to insure consistent framing.
Catchlights: You can see that the huge umbrella gives a huge, non-specular highlight when used at relatively short distances. This is particularly important when working with a wide variety of complexions, as I did here. And it gives you catchlights you can see from Colma.

What's New? Because of the volume, I needed to make these photos as quickly as possible. My subjects were seated on an adjustable posing stool set to the approximate height of Santa's lap. Because it had wheels, it tended to wander whenever my subject approached it from an angle. To solve this, and some other posing problems, I had an assistant do the following:
  • When a subject came started to sit, my assistant would use her foot to prevent the chair from rolling backwards.
  • My assistant then position the subject's left hand on the faux gift that Santa was "presenting". By pre-arrangement, both of Santa's hands could be seen presenting the gift.
  • The subject's right hand was then placed on Santa' shoulder, which tighten up the composition.
  • As soon as I started to count "one, two, three", my assistant would step out of the frame.
  • When the shot was made (It's hard to not notice the "pop" of an 800 watt-second flash), my assistant had the subject wait until I decided that the photo was a keeper. Once again, the stool was kept from rolling as the subject left the set.
Glasses: I had a Morning Santa and an Evening Santa, and neither of them wore glasses. I let them wear my special "glassless glasses", a pair of frames from which the lenses had been removed. If I did this more often I might try to find some "granny" frames, but for the day I used the pair I kept on hand for photographing my boss. I reasoned that with so many photos being made, one less worry was a welcomed subtraction.

Glare: On eliminating glare, David Hobby tells a wonderful story about a photographer in China who as a box of 40 pairs of glasses frames minus the lenses.  When he gets ready to shoot a large group, he asks everyone to pocket their own specs and choose a pair of frames from the box. To quote Mr. Hobby: "That's a line you want to be in the front of."

Special Circumstances: Working in a multi-cultural environment, there are bound to be differences between how physical contact between people is viewed. Obviously, anybody who showed any hesitation about touching a stranger wasn't going to be forced into doing so. It was my belief that if all hands were visible there wouldn't be any questions about what was going on.

Work Flow: With this many photos, editing becomes a major chore. Even if I stay within my personal goal of five minutes per photo, it means that 1,450 minutes would be devoted to my normal retouches unless I did something to streamline the process. Added to this was the second catchlight created by my fill light. Editing them all out would create a lot of additional work, and after stumbling over the first few images, I settled on the following sequence of edits that included the catchlight edit.
  • Cropping: The first step is to crop the image to my standard, 8" x 12" x300 dpi. This yields an image that is much easier to handle than the 24 megapixel files (compressed) JPG files created by the Nikon.
  • Levels: I'll use Levels to adjust the midtone values, if necessary. In this session, the midtone value was raised from 1.0 to 1.2. By adjusting the midtone exposure in post (processing), I prevent the highlights from burning out, as they have if I increased my exposure settings. 
  • Clone Lighten: The next step is to lighten the contours below the eye. I normally set my clone tool to Lighten and 30% Opacity. After setting the source point to a suitable area on the highlighted cheek, I make one quick swipe for each eye. 
  • Brush Tool: I set this to Darken and 30% Opacity. By setting my source point to a midtone value, I can "paint" out the specular highlights on the nose, forehead, and cheeks. I start with the smallest highlight (tip of nose), then move to the two cheek highlights, and end with the forehead, always going from smallest to largest, changing the brush size as I go. On my next photo, I'll start with the largest highlight (forehead) and end with the nose. This saves a few seconds, which can start to add up after a few dozen such edits. 
  • Spot Healing Brush Tool: I set the brush size to match the secondary catchlight in the eye. One click and it's gone.
  • Whitening Teeth (optional): If the subjects teeth are noticeable stained, I decrease and/or brighten the yellow channel. In a nutshell, you select the teeth, and desaturate and lighten the yellow channel to get a more pleasing color. Don't overdo the desaturation part - you need a tiny bit of yellow or it won't look real.
  • Blemishes (optional): It there was a blemish that was not a permanent facial feature, I might use the Spot Healing Brush to eliminate it.
  • Save The File: When completed, I'd save the file with the added suffix "8x12x300" to both remind me that the image had be adjusted, and that it had a 1.5 aspect ratio.
Cell Phones: Frankly, cell phone selfies slow down the process. But I changed my mind when I realized that these selfies could be sent to friends and family immediately, while my images, while technically superior, wouldn't be available ditgitally for several days, or several weeks in print form. In spite of what I might choose to think, a selfie delivered in a timely fashion might be far more valuable to a family thousands of miles away that a technically superior image that wasn't available immediately. Quality should justify the wait, but for a photo of a loved one sitting next to Santa, this may not be true.

Groups: I got several requests for groups, and my standard answer was "Come back at XX:XX pm."  There just isn't enough time to rearrange the set, and "come back later" is not the same as saying "No".
This Santa Session was probably my best yet, allowing me to hone my technical skills to the point where I might seek employment as a Mall Photographer.