Sunday, October 4, 2020

Simple Negative Scanning


While cleaning out some shelves in our corner workshop I came across a collection of my father's old sheet film negatives . I was curious about the images they held, but was not curious enough to schedule a session at the Harvey Milk Photo Center to process some contact prints. Too much time, too much work. What I wanted was a relatively simple procedure to make a  "print"  from these of reasonable quality. If your goal is a museum-quality print, these instructions just won't do. But for family gatherings and such, I think it will be fine. 

Photograph The Negative: I decided to step outdoors and use a handy Fuji X100S. Since these were black and white negatives, I wasn't concerned about the white balance, so I just used normal default, the Cloudy preset. I held the negative overhead and used the blue sky as my background. I held the 3.25" x 4.25"  negative reasonably close to the camera so I could extract as much detail as possible. Close-up photography often exaggerates the effects of barrel distortion, so I planned to use only the center part of the negative and to eliminate any long, straight lines from the composition. I suggest that you set both your aperture and shutter speed manually. Adjust the exposure until you can barely see some detail in the densest parts of the negative. 

Caution: This simplified procedure works best with large negatives. Making a copy from a standard 35mm negative will require greater care and precision!

Post Production Magic: The process involves four basic steps. While the sequence is not particularly important, you might want to proceed as follows:


Create A Digital Positive: First, convert the negative to a positive. Think of this as a black and white slide.

Choose Filter > Adjustments > Invert


Convert To Monochrome: Next, convert the image to monochrome. 

Enhance > Adjust Color > Remove Color

Cropping: At this point, I like to crop the image as tightly as possible. I avoid including any straight lines that might be "curved" due to under-corrected distance distortion. You can see in subsequent samples that I purposely cropped out the archway between the shooter and the subjects.


Levels: Now adjust the Levels.

Enhance > Adjust Lighting > Levels

The photo (above) needs to have the contrast increased. As it stands, the image lacks contrast, so we'll need to alter the histogram to achieve a true black and a true white.
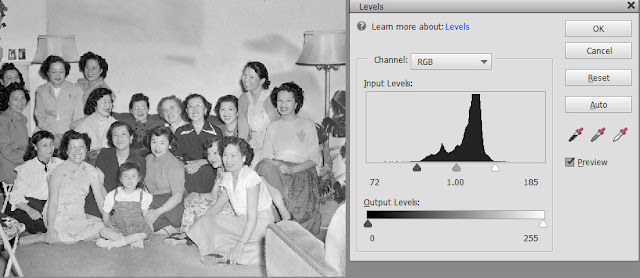

Here, I dragged the Black Point (left black triangle) and the White Point (right white triangle) to the left and right boundaries of the histogram, respectively. You will be able to see the effects of these adjustments in real time. 

When you have established the Black and White Points, drag the Mid Point to the left or right to get your preferred middle greys.


This is how the final image turned out. Again, it's a quick and easy way to obtain a usable black and white from a negative without a lot off fuss and bother. The little girl seated in the front row is my sister, and our Mother sits to her right.

One final note: I can't explain the blotchy appearance of the wall in the background. However, it is not uncommon for large negatives to show signs of uneven development. The chemicals deplete faster when they contact the denser regions of the negative, so during processing, the film must be gently agitated to keep the solution fresh and uniform. 


These three photos of Bill and Edith Wong's wedding haven't been viewed for more than a half century. For the amount of effort involved, these images are perfectly acceptable, perhaps even worthy of a suitable frame. 

Sunday, September 27, 2020

Old Tricks, New Dog

For a compilation of the morning walk images, click here.

Fuji X100S, 23mm F 2.0 lens. Incandescent WB setting, CTO bounce flash.

I wanted to mix things up a bit because sunrise came later in the morning and I'd have a better chance of finding some sunrise backgrounds to use with some flash-enhanced photography. As is always the case, that which you don't prepare for will get in your way when push comes to shove.

I decided to bring a Fuji X100S so that I could have access to a wider range of flash-synchronized shutter speeds. I also wanted to experiment with using the incandescent white balance preset in the hopes of obtaining some rich, blue skies.

CTO gel haphazardly attached to the faceplate of the flash.

It took some precious minutes to locate a suitable flash. I grabbed a Flashpoint Zoom Mini from my compact camera bag, pealed a used full CTO gel from my refrigerator door, then used some tape "stitches" to attach it to the flash. This accomplished, I slipped the flash in my pocket, along with some spare batteries, and headed out. As a consequences of the delays, the sky was beginning to brighten up, and my hopes of a dark, moody sky disappeared.

At first, I had some difficulty getting a sharply focused selfie. This normally isn't a problem, unless you're confronting the "fly" in the auto-focus ointment: backlighting. Auto focus systems rely on locating a zone of high contrast within the AF sensor boundaries. I found that it stumbles when confronting compositions where the background is significantly brighter than one's foreground subject. These are often the exact conditions you encounter whenever you both want, and need, supplementary flash illumination.

I solved this using the same technique I employed for making selfies with my manually focused lenses using the neck strap as a convenient distance marker.


This unimaginative photo shows me stretching the neck strap with my thumb to establish a repeatable camera-to-subject distance. Then I pressed the AFL/AEL button to lock that specific distance. I cover the reasoning behind the process here

Rather than my attempting to explain the application of the AFL/AEL button, I will refer you to Neil van Niekerk's excellent post of viewing and focusing options for the Fuji X100S. Here is a portion of that post.

"...Instead of twiddling the dial until the image snaps in focus, you can just press the AFL/ AEL button. (The red arrow in the diagram.) The focus is activated, and the camera auto-focuses for you … while you see the enlarged view. Perfect. This gives you instant accurate focus. And if you feel you can tweak it to focus a bit sharper, or that you’d rather focus on another part of your subject, then you turn the focus ring. The Spot-Focus method works very much like using Back-Button Focus on a DSLR. By letting go of the AFL/AEL button, the focus is now locked since the camera is in manual focus mode after all..."

The photo at the top of the post was lit by bouncing the flash, gel and all, off the side of a shingled home in my neighborhood.  White Balance was set to 3700K, so he results were technically warmer by about 500K. I dare say the colors are accurate enough for most purposes.


I made another selfie using the same focusing technique, but with two differences: First, I set the white balance to my usual Cloudy preset. From a color perspective, my skin tones resemble those of Luke Skywaker staring into the Tatooine sunset. Second, I used the flash's built-in bounce card to elevate the light source slightly farther from the lens axis. The result is a photo that's an improvement over a conventional, shoe-mounted flash exposure. This may be a fun photo, but one major shortcoming is pretty obvious: the disparity between the light on my face and the light on the background objects. If I'm being lit by the setting (or rising) sun, shouldn't there be light on the building behind me?

We'll explore that shortly!