Sunday, October 11, 2020

It's In The Genes

For a compilation of the morning walk images, click here.

Filena Jung, (baby) Dick Moy Jr., Charlotte (Jung) Moy, Sam Jung, Marie Jung, (baby) Adelia Moy, Dick Moy, (grandpa) Thomas Jung, (grandma) Sue Lan Jung, and someone I don't recognize, (possibly) my Uncle Frank).

In my last post, I described a quick and dirty scanning technique I've been using to view the cache of 3.25" x 4.25" sheet film negatives I uncovered in our garage workshop. To this point, most had been negatives from which prints had already been made, so I was relatively familiar with the subjects. However, as I dug deeper into the pile, I began to find negatives that I've never seen, and more frequently, of people I didn't recognize, As this little project progressed, I've become more and more thankful that digital imaging evolved to the point where the recovery of these little gems is now quick and simple.

This family photo was probably taken before 1947 based on the absence of my sister (born 1947), and the approximate ages of Dick Jr. (born 1943) and Adelia (born 1942). I recognize neither the location or the identity of the gentleman sitting at the far right, although there is something vaguely familiar about his face. However, you  can see my father wearing his trademark felt "beany". Photos that include my Father are extremely rare, since he was normally behind the camera, and not in front of it. I suspect that the Speed Graphic used to make this photo was mounted on a tripod (there is another  negative with an identical composition) so the camera was probably triggered with a self-timer.


Theatricals: Among the undiscovered gems was this series of a Chinese actor portraying a traditional noble. The costume is quite elaborate, and I suspect I would have been just as excited with this assignment as my Father probably was. I have no idea where or when the sequence of photos was made, but the white curtain background indicate this was definitely not a candid photo opportunity.


I funny how these images so closely parallel some of my photographic projects. Working with costumes has been of particular interest to me, and thinking back on all of my favorite photos, they often include a nod to fashion photography and contemporary portraiture. I'm humbled to think about how much my Father was able to do with his Speed Graphic, some flashbulbs, and when working indoors, a few photofloods and a spotlight or two. His imagery was inspired by the photographic trends of the moment, tempered by the limitations set by cameras, light sources, and film.

I made this photo of Rebecca in the early 1970's, my best guess since film didn't record the shooting date as digital cameras do. I had access to a wider variety of lighting options, which included several Spiratone flashes aimed at a seamless white paper background and a Braun flash bounced from a reflective umbrella I made by lining an old umbrella with crumped aluminum foil. The camera was an old Hasselblad 1000F, whose Zeiss lens was showing some signs of physical deterioration. 12-exposure rolls of film were wet processed the old fashion way. As a student on a limited budget, 5 rolls of film, a maximum yield of 60 exposures, was considered an extravagance. The film was then processed in my two plastic Ansco film processing tanks. I could only do one roll per tank per session because the film spools had to be bone dry to properly load the film without any damage, so overnight drying was required.  Still, the photo is one of my photographic benchmarks for posing and lighting, the high-water mark of my abilities at the time. 
Obviously time, experience, and resources have had a marked effect on the outcome, but after seeing my Father's theatrical photos, there appears to be more to inheritance than meets the eye.

Sunday, October 4, 2020

Simple Negative Scanning


While cleaning out some shelves in our corner workshop I came across a collection of my father's old sheet film negatives . I was curious about the images they held, but was not curious enough to schedule a session at the Harvey Milk Photo Center to process some contact prints. Too much time, too much work. What I wanted was a relatively simple procedure to make a  "print"  from these of reasonable quality. If your goal is a museum-quality print, these instructions just won't do. But for family gatherings and such, I think it will be fine. 

Photograph The Negative: I decided to step outdoors and use a handy Fuji X100S. Since these were black and white negatives, I wasn't concerned about the white balance, so I just used normal default, the Cloudy preset. I held the negative overhead and used the blue sky as my background. I held the 3.25" x 4.25"  negative reasonably close to the camera so I could extract as much detail as possible. Close-up photography often exaggerates the effects of barrel distortion, so I planned to use only the center part of the negative and to eliminate any long, straight lines from the composition. I suggest that you set both your aperture and shutter speed manually. Adjust the exposure until you can barely see some detail in the densest parts of the negative. 

Caution: This simplified procedure works best with large negatives. Making a copy from a standard 35mm negative will require greater care and precision!

Post Production Magic: The process involves four basic steps. While the sequence is not particularly important, you might want to proceed as follows:


Create A Digital Positive: First, convert the negative to a positive. Think of this as a black and white slide.

Choose Filter > Adjustments > Invert


Convert To Monochrome: Next, convert the image to monochrome. 

Enhance > Adjust Color > Remove Color

Cropping: At this point, I like to crop the image as tightly as possible. I avoid including any straight lines that might be "curved" due to under-corrected distance distortion. You can see in subsequent samples that I purposely cropped out the archway between the shooter and the subjects.


Levels: Now adjust the Levels.

Enhance > Adjust Lighting > Levels

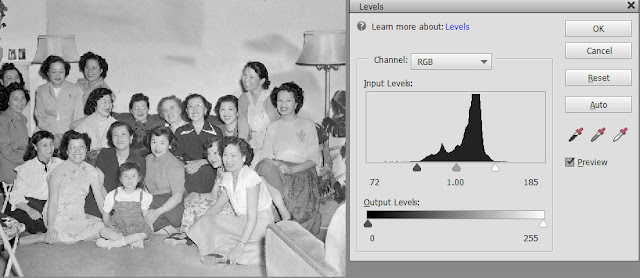
The photo (above) needs to have the contrast increased. As it stands, the image lacks contrast, so we'll need to alter the histogram to achieve a true black and a true white.


Here, I dragged the Black Point (left black triangle) and the White Point (right white triangle) to the left and right boundaries of the histogram, respectively. You will be able to see the effects of these adjustments in real time. 

When you have established the Black and White Points, drag the Mid Point to the left or right to get your preferred middle greys.


This is how the final image turned out. Again, it's a quick and easy way to obtain a usable black and white from a negative without a lot off fuss and bother. The little girl seated in the front row is my sister, and our Mother sits to her right.

One final note: I can't explain the blotchy appearance of the wall in the background. However, it is not uncommon for large negatives to show signs of uneven development. The chemicals deplete faster when they contact the denser regions of the negative, so during processing, the film must be gently agitated to keep the solution fresh and uniform. 


These three photos of Bill and Edith Wong's wedding haven't been viewed for more than a half century. For the amount of effort involved, these images are perfectly acceptable, perhaps even worthy of a suitable frame.