Sunday, November 20, 2011
Non TTL Flash Automation
While TTL (through the lens) flash metering is the current norm, it wasn't always the case. Certainly within my memory, flash photography was part science, part alchemy, and a goodly portion of plain, old fashioned luck.
TTL flash works on the assumption that if a sensor could measure the amount of light hitting the film plane in real time, it could be turned off when there was enough to give a proper exposure. If you look closely at the bottom of the mirror box, you can sometimes see the actual sensor pointed directly at the CCD/CMOS sensor where the film used to be. Since the sensor in the camera must control the output of the flash, flashes and camera bodies must be designed to work together to determine proper exposure. The sensor must also make allowances for the camera's current ISO setting.
In a non-TTl flash, the sensor is mounted in the body of the flash, pointing directly at the subject. When triggered, a pulse of light is directed toward the subject. This pulse would continue until light sufficient for a proper exposure had been reflected back to the sensor, at which point any excess power would be dumped back for use during the next photo. This resulted in faster recycle times when the subject to flash distance was relatively short.
If you're looking for a relatively inexpensive non-TTL Nikon speedlight, my first choice would be the SB-24, since it is the oldest and therefore least expensive to acquire. I checked eBay and saw several in the $60.00-$80.00 range. But once upon a time, there were much less expensive and easier to find, as this posting by David Hobby so attests. But compared to the build quality that $100.00 gets you these days, the SB-24 still a good deal. The second on the hit parade is the SB-26, whose claim to fame is the built in slave. The SB-25, SB-28, and the SB-80 are also good choices, though more expensive. Avoid the SB-50.
External PC Connectors. The SB-24 and SB-26, along with nearly all high-end Nikon speedlights, have a supplementary PC connector built into the side of the flash body. You can connect a wireless radio triggering unit using a microphone to Nikon Locking PC cable on higher end triggers. Low end radio triggers will use the hot shoe.
Variable Angle Output: The Nikon SB-24 had a built-in zoom feature that handled lenses for 24mm to 85mm. The SB-26 had a sliding wide angle plate that would increase the coverage for a 20mm lens. All of these angle modifiers, whether built in or add on, leave much to be desired when it comes to concentrating the flash output for the purposes of accenting a small, specific region, which we'll in a later post.
The Control Panel: If you look on the front view of the flash, the Nikon sensor is very visible. It must always point directly at the subject, and whatever it sees will be the basis for how much light is delivered for that particular exposure.
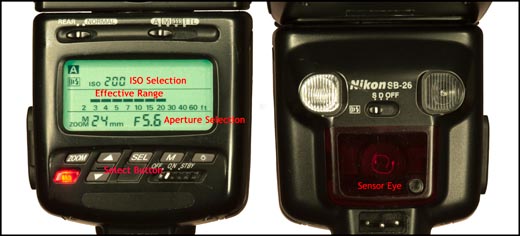
If you look at the LCD on the back view of this SB-26 flash, you'll see that it has been set to A (Aperture Automation), the ISO Selection set to 200, and the Aperture set to 5.6. The effective range, as calculated by the flash, is from 2.5 to 20 feet.
What About The TTL Setting? Warning, warning, Will Robinson. The TTL on the early SB speedlights (SB-24, 25, 26, 28) setting does NOT work with any Nikon digital SLR, but surprisingly, works on the Fuji S2. Nikon went to the DX series of speedlights to be compatible with the D100 and D1/D1X/D1S camera bodies. So for all intents and purposes, ignore the TTL setting.
Changing The Settings: Now comes the setting. If you hold the SEL button, the current aperture sitting blink, indicating that you may now change the selected aperture. Now by pressing the up and down arrow buttons, you can select smaller or larger apertures in one-stop increments, respectively. Push the SELagain and you can change the ISO settings, up or down, in 1/3 stop increments. One final press on the SEL button locks the settings. The flash will hold its settngs so long as it is installed and removed from the camera's how shoe when the power is off.
And You Call That Magic? Actually I do, and here's why. The flow of light is now controlled by the flash and is completely independent of the camera. So if you're using an appropriate Nikon (like the D70) and attached a suitable speedlight with a neutralized syncrhonization cord, you can now achieve a level of flash automation even when the shutter speed is set to 1/2000 of a second. In fact, even faster shutter speeds are possible if the duration of the flash is shorter than the shutter speed. I consider the 1/2000 setting as maximum as I have been able to utilize nearly all of the light produced by a speedlight in the A mode.
Future postings will show how a flash so configured and so connected can produce results that will amaze and astound.
Sunday, November 13, 2011
Light Modifiers For Shoe Mounted Speedlights
Gary Fong’s Lightspheres, often referred to as “tupperware”, are the first add-on modifiers that comes to mind. It was my first on-camera light modifier, and I do not hesitate to recommend it. They are as close to fool-proof as can get. I must admit that Mr. Fong is a great salesman, and the large number of photographers using the Domes is testament to their popularity. In use, the flash head is rotated to the vertical position, raising the mounted dome as high above the lens axis as is possible without a flash bracket. This additional height all but eliminates red eye at most shooting distances. And because the Lightsphere sits high atop the flash body, it won't interfere with the lightsensor should you use the flash in the non-TTL automatic mode.
Now the bad news. The dome scatters the flash output a full 360 degrees on the horizontal, which wastes a lot of light unless you’re in a small room with light colored walls that will bounce the light back onto the subject. (I know of one photograher who lined the backside of his lightsphere with duct tape in an attempt to redirect the rearward bound light). You’ll need to shoot with relatively high ISOs, which won't degrade your images as much as it once did. The decreased light output makes moderate wide angle lenses with relative open apertures the platform of choice.
This photo of papa Scott and young Hunter Tingley was done at ISO 400, 1/80 of a second, F 5.6, using a Lightsphere. The lens was set to 24mm, which gave me enough distance to get some great catch lights. Notice that the shadows are softened somewhat by the large relative size of the Lightsphere. Easy peasy. Just point, compose, and shoot. If I had to make the shot again, I'd have upped the ISO to 800 and shot at 1/160 of a second, since there is the tiniest bit of blur.
Considering the aforementioned shortcomings, why not just mount your speedlight on a flash bracket which would raise the flash well above the lens axis? For one thing, the apparent size of the Lightsphere. When viewed from the subject's perspective, the Lightsphere has an effective area of more than three times that of the unadorned flash tube. This distributes the light over a much larger area resulting in highlights that are not so "hot" and smoother midtones. The catchlights are bigger, and the glare from shiny surfaces are not so specular.The saturation of colors is decreased somewhat, but the result is often more pleasing to the eye. Lastly, brackets add one more step to the set-up and take-down process.
Which Lightsphere should you select? There are currently two models, and in my opinion they are both are superior to the original versions which were fitted to specific flash head sizes. The Lightsphere Universal can be attached to almost any flash head up to the Nikon SB-900, which must have the largest head of any current production speedlight. It uses a Velcro cinch strap and a rubber “traction band” to hold it securely in place. The Lightsphere Collapsible cannot be attached to a head as large as the SB-900 but attaches easily to just about everything else. It is held in place by a series of flanges that hold the flash head securely in place. Think Chinese finger trap. Incidentally, a filter set can be purchased that fits inside of the Collapsible version, but the colors don't seem to match any of the camera's built in white balance presets. If you use the filters, be prepared to take the time to make a custom white balance setting.
June 19, 2015 Update: Gary Fong has introduced a new collapsible Lightsphere top melded to a Lightsphere Universal bottom half. This allows compact storage and the ability to mount on the larger head of the SB-900/SB910. This is the way to go!
If you want to see Gary Fong in action, the following link will bring up a number of his You Tube instructional videos. Certainly, this man is not camera shy! Click here.
June 19, 2015 Update: Gary Fong has introduced a new collapsible Lightsphere top melded to a Lightsphere Universal bottom half. This allows compact storage and the ability to mount on the larger head of the SB-900/SB910. This is the way to go!
If you want to see Gary Fong in action, the following link will bring up a number of his You Tube instructional videos. Certainly, this man is not camera shy! Click here.
In short, the Gary Fong Lightspheres are a good place to start if you plan on photographing indoor events. It is foolproof to install and easy to use, but the light it produces, while not particularly creative, is consistent and reliable. For best results, you should set your camera at a high ISO with a shutter/aperture combination that will yield a one-stop underexposure of the ambient light. I prefer to set the shutter and aperture manually and allow the camera's TTL speedlight metering to take care of the rest. For the record, I usually program the flash to over-expose by 2/3 of a stop. Watch out for off-color ambient light sources. You may wish to filter your flash for a better match.
Yes Virginia, that is a genuine Fuji S2 with a Nikon SB-900 Speedlight sporting a Gary Fong Lightsphere Universal, 1/2 cloud opacity. The photo was made with a Nikon D90, 13 seconds, F8, at an ISO equivalent of 100. The SB-900 on the camera was set to SU-4 mode to act as a simple slave and set to 1/128 power. Some additional facial tissue was stuffed inside the Lightsphere to cut the output even further. A second SB-900 with a Lumiquest LTP mini-softbox was fired,hand held, 5 times during the extended exposure (twice on the left and right edges, and once along the lens axis). It was quite a hustle using the open flash button while repositioning the hand-held flash for each burst of light.
Subscribe to:
Posts (Atom)


