Monday, September 12, 2016

The Wisnom Family Meets the Fuji X-100S


There is one thing that the Fuji X100 series do extremely well - They give the photographer a fighting chance when forced to photograph in broad daylight. Its leaf shutter allows flash synchronization speeds limited only by the physical limitations of the flash. I won't go into the ugly details, but David Hobby gives a great explanation in this earlier post. The Reader's Digest Version? Leaf shutter exposure times may be briefer than the discharge curve of your flash, resulting in clipping, or a reduction of light output at the back end of the pop. Additionally, using a radio flash trigger introduces an additional delay, which may be actually cause the flash to fire just as the shutter blades are closing, reducing the effective output of the flash, or in extreme cases, initiating the light pulse after the blades are nearly closed.

The Particulars: Knowing that I'd be dealing with direct sunlight somewhere in the photo, I brought my Fuji X-100S with my WCL-X100 Wide Angle Conversion Lens already bolted in place. I had my full Nikon kit ready - all 26 pounds of it. For lighting, I used a Lastolite Ezybox and and Adorama Zoom Li-on flash with its dedicated radio trigger. While researching for this post, I discovered that Adorama has apparently updated the Li-On flashes to enable TTL control, and seem to have abandoned the manual adjustable radio remote. I'm not surprised by this sudden change, but it leaves me to conclude that everything is disposable whenever a newer technology can be infused with little or no cost. Granted, TTL control is being adopted to more and bigger flashes, so these manually controlled units will be considered "quaint" in a few more years. But I digress.

Overall, I'm very happy with the results. But well past the point of a re-shoot, I discovered three errors I would have caught if I had used my Hoodman Loupe, as I've recommended for so many years. Before you continue, can you spot them? If not, let us proceed.
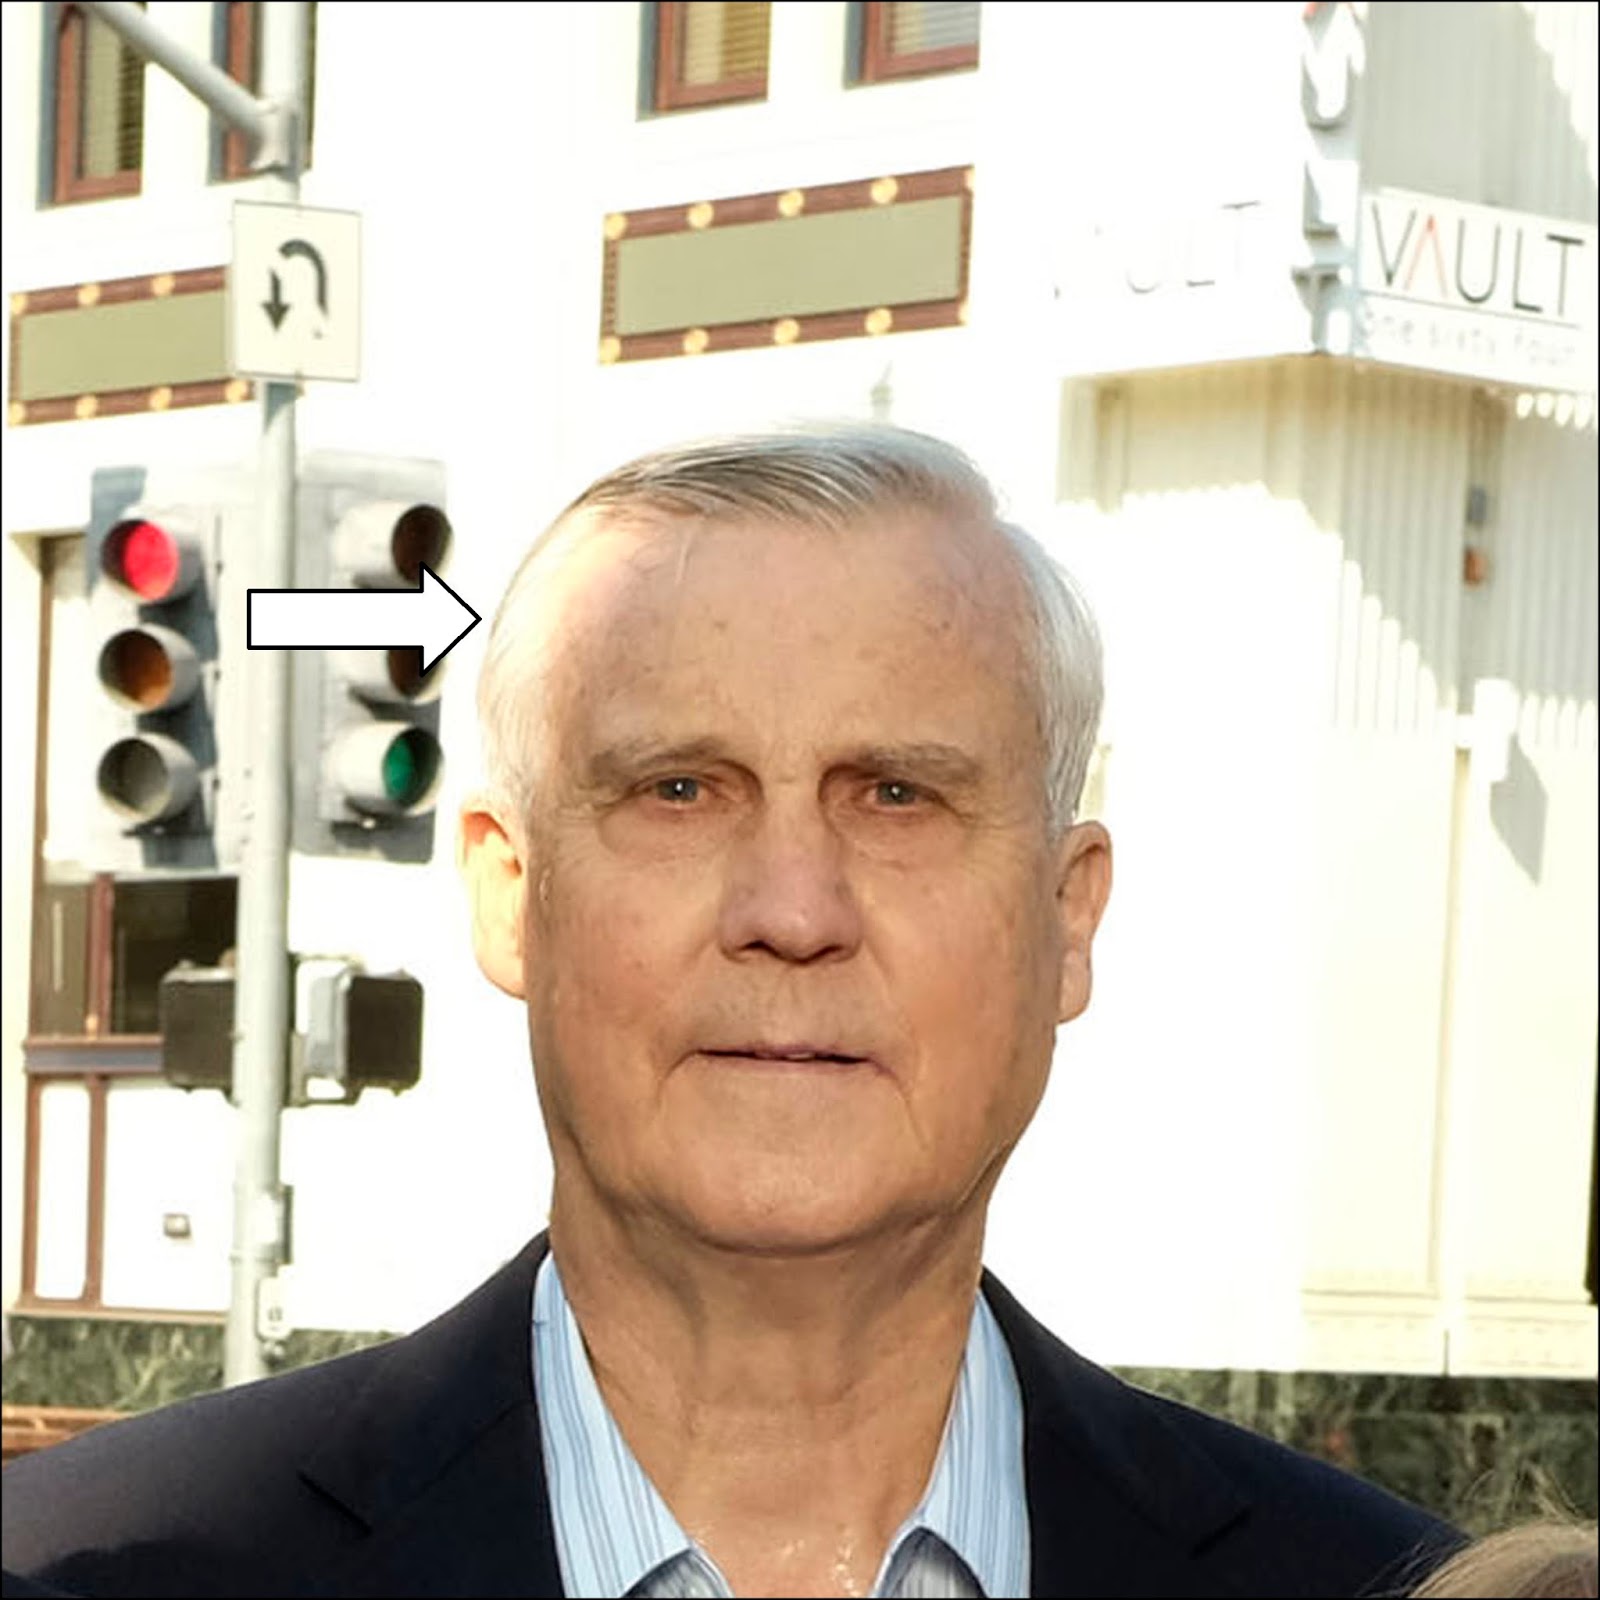
Boo-Boo #1: Subject In Direct Sunlight. During the initial posing, I made sure that everybody was standing completely in the shadow of the building behind me. In this case, my tallest subject wandered back slightly, and as a result, got a blast of direct sunlight on the side of his head.

As I mentioned, quickly "chimping" with the Hoodman Loupe would have revealed this hotspot, which I could have eliminated by having my subject step, or lean, forward. Neither Cissie nor I noticed it, admittedly because we were both so pleased with how well the shoot was going.

Now by all accounts, the 24" x 24" Ezy Box is a little small for the application. There's an old rule of thumb that suggest the ideal light-to-subject distance is equal to the diagonal length of the softbox, which in this case is about 34", or about 3'. My actual sight-to-subject was considerably longer (closer to 7'), giving me a slightly harder shadow than I would have liked. Still, there are nice big catchlights, and the skin around the eyes is well-rendered.


Boo-Boo #2: Reflection In The Photograph. If look look at my enlarged sample, you can see the reflection of the softbox in the upper right hand corner of the framed photograph. I was probably overlooked because of its relatively small size and its location at the upper right hand corner of the surrounding mat.

The fix is simple, but obviously forgotten in the moment. By tipping the top edge of the photograph forward, the reflect is re-directed down, in front of the subject, making it invisible to the camera.

Boo-Boo #3: What's With The ISO? Upon returning from a shoot, digital photographers should "zero out" their cameras, which for me means:
  • A fresh battery in the camera*,
  • A newly formatted card in the slot, 
  • The exposure counter set to zero,
  • An ISO setting of 200,
  • A White Balance setting of Cloudy Bright,
  • An Auto Focus setting of Single Servo, with the central focusing bracket selected,and
  • All lenses, flashes, and accessories back in their places, and all snaps and buckles secured.
Perhaps I was fiddling with the camera between assignments, and forgot to perform this Ritual of the Returning Photographer. On the other hand the shutter/aperture/ISO combination may have been inevitable. Follow me as I reverse engineer the image. If I reduced the ISO to 400;
  1. I could have reduced the background brightness by one stop without changing the exposure duration or the aperture size.
  2. I would have also decreased the flash effectiveness by a factor of one-half. Since I was shooting at full power, I would need to reduce my flash-to-subject distance by about 30%.
  3. Because the light from a soft boxes has a distinct edge, the subjects at the outer edges my have received less light than they really needed.
So far as I can see, the only possible solution would have been some additional flash power. Unfortunately, I know of no easily carried softbox that can handle two speedlights, although there may well be one out there. I wouldn't consider the Westcott Apollo softbox easy to transport, due to it size, but I've used it with two speedlights. However, if I could have reduced the number of subjects and move the light closer, I could have better balanced the flash-lit foreground and the sun-lit background. I could have easily used two speedlights with my DIY dual flash mount and a shoot-through Zumbrella, but I have no idea what my output gain might be. Oh well, it's the subject for another experiment.

To The Good: Finally, something unequivocally positive about the photo. In order to get a better view of the building in the background, I held the camera a foot above eye level, relying on the LCD panel for framing. It was little dark, but the technique gave me the final image at the top of the page. In fact, the top of the camera was actually touching the lower edge of the softbox. This gave a soft, front-on lighting and a flattering, raised chin pose for all of my subjects. Definitely, something to remember when working with mirrorless cameras, or even with Live Preview in my Nikon bodies.

*This switch-up is particularly important for Fuji users, since their batteries are notoriously short-lived. DSLRs give considerably more shots per battery.

Sunday, August 28, 2016

I Stand Corrected - The Built In Bounce Card DOES Work!


Well, I got it handed to me royally, and was saved by the grace of a small piece of plastic hiding inside the head of my SB-900. The assignment was to get some candid photos of teachers, administrator, and support staff in a combination retreat and pep rally that was to prepare everybody for the upcoming fall semester.

At first, I thought I could get away with available light. While I had some Fuji cameras with me, I didn't have a short telephoto to bring me closer to students working on the other side of a table. I shifted by to a Nikon D600 and my 70-200 2.8 because it gave me the focal length and the vibration reduction that I needed. I still wasn't getting the contrast that I wanted when shooting nearly wide open, and the ambient lighting wasn't giving me much contrast.

Sample #1: ISO 1600, 1/60 second, F 4.5, 70-200mm 2.8 at 70mm
This shot (Sample #1) was typical. Lighting in these venues is pretty standard: Artificial light from above, combined with windows, gives a strange mixture of colors. 1/60 of a second was pretty much the norm (I was shooting at aperture priority), and unless my subject and I were perfectly still, I got some blurring caused by subject movement or camera movement, or both. I needed some help, and fast. 

Built In Bounce Card (BIBC): My savior was the built-in bounce card that is found in nearly all modern flashes/speedlights. Nikon has had them in their speedlights since the SB-25 (introduced in 1992). This was probably in response to a growing number of photographers who could now use automated exposure systems to properly expose bounce-lit photographs*. Savvy photographers started attaching 3" x 5" note card with rubber bands, sometimes bending them at angles to achieve a bit more light on the subject. I've run into an number of photographers who used the BIBC. I see them being used by other media photographer, usually by shooters who don't rely on speedlights as a primary light source. From my personal observation, those photographers that do have gone to the Gary Fong Light Cloud Dome, or some other variant.

Click here to watch a part of the National Geographic Video.
White House Press Photographer Pete Sousa can be seen using one in this screen capture from National Geographic's "The President’s Photographer". Here you can see the BIBC in action if you check 3:23. Note: If you follow the link at beneath the image, you'll be taken to a You Tube version of the documentary that is NOT narrated by Morgan Freeman. Don't know why.

Okay, it was good enough for Pete, it was good enough for me. I had never used the BIBC, and had considered it a fill flash at best. Because of it size, only a tiny fraction of the outbound light would be directed forward, with most of the flash output going straight up to hopefully bound off of a neutrally colored ceiling. It did get the light away from the lens axis, decreasing the chance of red-eyed subjects. But it's still ceiling bounced flash, not the best source of light. Here goes nothing.

ISO 1600, 1/200, F2.8

ISO 1600, 1/200, F 4.5

ISO 1600, 1/200, F 5.6

I was very pleased with how the BIBC performed, as low-tech as it was. All it really did was make the ceiling bounced light look better by providing show shadow fill. Period. 'But I'm thankful that I could use 1/200 of a second and small apertures for the shots, which nearly eliminated most subject movement while providing a suitable depth of field.


This tight crop of the last image shows that the BIBC pretty much does what it's supposed to do: Provide some fill in the shadows created by the ceiling bounce. The card itself is just large enough to create a visible catchlight and provides a decent amount of fill.

I won't pat myself on the back just yet. Those windows in the background are tinted, which allowed a fairly close balance between the outside/background and the inside flash-lit foreground. A full-blast outdoor background would have detracted from the overall feeling of the photos, and I'm thankful for that tinting.

*Vivitar was not the first automatic flash, but may have been the first to have a modular sensor that was stationary, and a flash head could be elevated to provide forward facing bounce flash. And the 283 was affordable for most hobbyists. It may well have allowed photographers to embrace bounce flash because it could automatically determine the amount of light necessary for a proper exposure, something that was normally done with some simple measurements, some educated guesswork, and a lot of luck.