Showing posts sorted by relevance for query camera bag. Sort by date Show all posts

Sunday, August 18, 2024

Pelican Case Deployment (Finally)

For more years than I can accurately count, I carried my lighting equipment in a rolling sports equipment bag. In it I managed to stuff numerous light stands, speedlights, umbrellas, stand adapters, and a variety of clamps and flash modifiers. At the time, my light modifiers consisted mainly of shoot through umbrellas and a collection of CC gels, and some gaffer tape to hold them in place. While most of these accessories were never used, it was comforting to know everything was just a zipper's pull away.

Buy yours here.
The years have taken their toll, and the rolling bag is starting to fray around the edges. I was going to  transfer everything to a Pelican case that was purchased at a camara show some years back. I remember making sure it would hold a compact light stand before I purchased it. For the record, it was a nearly-new Pelican IM 2500, used only once by a courier to transport some delicate equipment cross-country. It sat unused in my garage since the day of purchase.

Earlier Attempts: In 2022, I repacked my location flash kit into a Tenba camera bag. Using a partitioned Domke lens module, I was able to get four Flashpoint speedlights, safe and upright, into the bag. There was still room for extra batteries and magnetic gel and grid attachments. The system was built around the first generation Flashpoint radio triggers which provided on-camera output adjustments, but no off-camera TTL capabilities. These speedlights use a proprietary Lithium-Ion battery that gives me short recycle times even when pushing full-power pops.One problem: There was nor provision for carrying a light stand.

Rapid Deployment: My most recent assignment, a location portrait of a San Francisco Director at a small theater off Union Square, made me stop and think about what I carried, and why. On an earlier location portrait, I carried my camera bag over my shoulder, and both my rolling equipment bag AND my speedlight bag piled into a collapsible wagon. In truth, I only needed my "big" AD200 flash, and a light stand. for my key light, and a spare light stand for the accent light I pulled from my rolling equipment bag. In short, I carried way too much, and used way too little. This time I pared everything down to a bare minimum. My Domke camera bag would be slung over my shoulder, along with a tall light stand. Into the Pelican went 2 collapsible light stands, two umbrella brackets, two collapsable shoot-through umbrellas, a Glow 31x31" Quick Softbox, my AD200 flash, and a few loose gels thrown in as an afterthought. But I couldn't find my collection of grids and dedicated mounted gels, which forced me to improvise on the spot, wasting valuable time. In the end, the job was completed on time, but just barely. But it proved that bringing the Pelican case was a proper decision, as it was smaller and more maneuverable than the my soft equipment case. All I need to do is collect the missing bits and stow them safely.

Buy your here.
Lid Organization:  I learned that Pelican provides a variety of options for users who wish to explore the company's storage options. As purchased, my case was just an empty shell. But having gained some field experience, I knew I needed something not just for organization's sake, but something that would allow me to spend less time searching and more time shooting. I found this five-pouch insert on Amazon for half the cost of the nine-pouch version. Thrifty is as thrifty does. so I bought it immediately, and plan to have everything in it proper place for my next assignment.

When the project is completed I'll provide a postscript so we can see how it turned out. Just as an aside: I'm removing all Pelican stickers from the exterior of the case.

Krist and McNally Gag Real
Joe McNally and Bob Krist: Most of my earliest inspiration came from Joe McNally, a Nikon photographer who championed the Nikon Creative LIght System. Before I converted to the Fuji system, I relied on Nikon SB800 and SB900 speedlights with their TTL exposure control. He and travel  photographer Bob Krist put together a 2-DVD set describing, in detail, how the components of the CLS worked together to achieve full exposure control. One chapter of the DVD set features  a complete equipment list for Bob Krist's traveling studio. Rather than listing the contents of his kit, you can view the equipment portion by clicking here. I followed his suggestions, and can truthfully say that I already own everything contained in Bob's kit. All I need to do is put everything in one case.

Wednesday, December 29, 2021

Rethinking Location Lighting Part 1

After my recent experience at Bethlehem A.D. 2021, I started to re-think what I carry in my supplementary lighting bag. In the past, the speedlights, modifiers, and mounting bits and pieces were thrown into a partition-less Tenba bag, making it necessary to rummage through a jumble of lighting stuff, searching for the bits needed to assemble a proper lighting solution. Working at night with only a miner's lamp on my head doesn't make the task an easy one.

Buy your Domke bag here.
In years past I worked exclusively out of my big Domke F2 Bag where optional inserts with adjustable  dividers made it easier to store items in an upright position.  Then again, my approach to lighting consisted mainly of ceiling and wall bounce applications, and the only light modifier I carried was a Gary Fong Light Sphere. That second speedlight was just a backup

This catalog photo shows how I packed my equipment. With the partitions installed, you can see how easy it was to extract anything I needed.I would use the external pockets to hold two or more speedlights, while I kept the lenses and bodies in the padded interior. I still think the Domke is a great bag, but the weight of a full-blown system made me re-think my choosing Nikon DSLRs as my first-line, go to cameras. When I shifted to Fuji, much of the weight had been eliminated and my main carry bag got much smaller. But as my lighting solutions became more sophisticated, there were other carry issues to be addressed.

Initially, I relied heavily on the Nikon OEM CLS system, and employed the expensive (for the time) SB-800s and SB-900s for my primary flashes. When I started using Fujis, I tried to stay with the Fuji  OEM speedlights, but found them overpriced and underpowered, and I never felt that their TTL exposure metering was consistent enough for my purposes. Eventually I used my Nikon speedlights manually and relied on their native SU-4 (optical trigger) mode when multiple speedlights were needed.

Radio Triggered Flashes: As my conversion to Fuji is pretty much complete, I started to think about how much of my old equipment could be re-purposed to a mirrorless lifestyle.  The aforementioned Tenba bag has been my constant, though disorganized, companion for several years, having served as my primary Nikon camera bag in my pre-Domke years. In my re-imagination of the ultimate bag, organization of my speedlights was first in mind. I took an insert from a Think Tank Change Up camera pack, added some additional padded partitions, and voilĂ , my speedlights were now neatly arranged and easily accessible. And should I return to the Nikon world, the partitions will accommodate SB-800 and SB-900 speedlights without any additional adjustment.  

"Flash A" with settings taped in place.
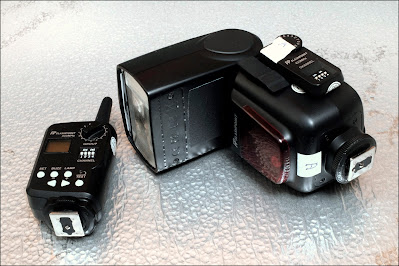
Currently, four now-discontinued first generation Adorama / Godox Li-On Zoom speedlights replaced the Nikon SB-800s. Their primary claim to fame was that one could assemble an on-camera, radio triggered and adjusted lighting system that could be used on any platform that employed a conventional hot shoe. If you look closely, you can see that the flash "foot" has only a center contact. This allows the controller to ignore all proprietary electrical contacts, making it a pretty universal setup. I programmed the 4 flashes into four different letter groups, Each has its group letter written on a piece of tape. In addition, they have their settings taped in place so they can't be accidentally changed. Also, once a flash is used, I return it with the hot shoe down to remind me that the batteries may be partially depleted. If you look closely, you can see that I've added a 2 gig Compact Flash card and an 8 gig SD card to the slots in the insert. I chose a small CF card because I have several older DSLRs that can't use a larger card. You never know when an assignment demands the unique talents of an aging Fuji S2 Pro, my first 12 Megapixel camera.

Dedicated Radio Flash Triggers: The Flash Point Radio Transmitter (to the left of the flash) will ride in the mesh compartment in the Tenba's lid. By keeping them above the other equipment, I can minimize any possible damage to their antennas. I normally carry three transmitters but load batteries in only one. I'll load a second if I need to use a second camera.

Buy yours here.
Batteries: The batteries were my next concern. Because of their density, they could potentially damage fragile electronic equipment if allowed to crash about. This battery carrier from The Container Store gives me space for some AA and AAA batteries, two lithium-ion batteries for the Flash Points, plus some other odds and ends. There's plenty of additional room for spare batteries for my Godox V1, my Fuji X-100s, and my other Fuji bodies. It also holds two spare plug-in receiver modules for the Flash Point flashes.

For the moment, this little box currently holds all of the loose "heavies" that I brought with me on my last assignment, and the contents could be easily changed if the situation warrants. Spare camera batteries are usually kept in the camera bag and not the flash bag, but misfortunes arrive when it's least expected. It's comforting to know that I have spares in two different places.


So far, everything I've listed in this post has been neatly stowed away. As you can see, there's still plenty of space in the area beside the speedlight cluster and the battery box. And I still have the three outside pockets to fill.

I think I'm on to something. In my next post I'll add more goodies.

Sunday, January 22, 2012

Field Expedient Sand Bag


Every now and then a sandbag can be very helpful. Let's say you're using a speed light on a portable portable light stand. You'll find the slightest breeze may cause the whole thing to topple over. What you need is some ballast to keep you light in place.

Obviously, carry a filled sandbag is not a viable option unless you have a strong and willing entourage following you about. I don't know about you, but I tend to find myself alone when I'm in the field, so I'm pretty much on  my own. But I've found an easy way to use my camera bag as ballast by carrying a simple accessory.

I normally carry a flashlight carrying ring snapped on the strap of my camera bag. I found it in a hardware store next to the Maglight flashlights. You may (or may not) know that for many years Maglites have been employed as batons by law enforcement personnel until the PR-24 became the standard issue for most departments. Now I'm been known to carry my monopod in exactly the same manner. But these carrying ring can also be used to turn your camera bag into a handy form of ballast.


Here's a close-up of the the ring hanging on one of the tension knobs of a typical light stand. For the purpose of the photo, the bag is hung much higher on the light stand that prudent, since any weight so high on the stand doesn't provide optimal ballast. The ring is not designed to hold much weight, but if you can allow the camera bag to rest partially on the ground, you'll be fine.

You may ask yourself why I don't just use the shoulder strap. Having the flashlight carrying ring gives me the flexibility to use a variety of attachment points that one might find on the bag such as the D rings or the carrying handle itself (as seen here).

Anyway, it's an inexpensive addition to you "kit" that just might come in handy. However, when I discussed this with a friend, reminded me that an inexpensive carabiner will do exactly the same thing.

For my Chinese readers, Gung Hay Fat Choy!

If you're wondering, those are droplets of rain that you see in the photos.

Tuesday, February 11, 2025

My Third Pancake

Photo Source: Click here.
I am a firm believer in having a complete backup system. Now wedding photography has become an incredibly high-stakes game, and in this litigious society, it is not unusual for photographers to be sued simply because the groom didn't look like Cary Grant, when in reality, he could pass for Ernest Borgnine in poor light. So posing and lighting aside, one better come ready with enough backup equipment to take the entire wedding should one's primary camera body go kaput. 

Photo Source: Click here.
I normally have two bodies with me, so that isn't where my angst resides. It's from the lenses. Normally I have two zoom lenses: a wide to normal and a normal to telephoto zoom. A compact compromise 
emergency lens could be Fuji's 27mm F 2.8 "pancake", which has a compromise focal length, and is extremely compact. I paid almost $450.00 for the lens, and it is my constant companion whenever I'm shooting assignments that warrant carrying the full two-body, two speedlight, two-lens kit. In a pinch, I can mount this pancake on either of my two bodies. For the record, my copy was the earlier version withuot an aperture ring, something that be added to the second, weather resistant version that was introduced in 2021.

Buy yours here.
Some time later, a manual-focus version was offered by Meike, which was a predictable purchase. I was in my cheap manual focus lens phase, and it gave me a lens with a compromise focal length at the price of dinner in a reasonably nice restaurant. It proved to be something of an inspiration, as the photos produced during its first day on the street were most satisfying. Nothing magic about the lens, mind you, but compact and  handy. It now lives permanently in my "mini" camera bag where all of my most compact lenses reside, neatly stacked to minimize bulk.

Photo Source: Click here.
Shopping For a New Purse: A while back I had the itch to create a compromise camera kit based on two Fuji X-Pro1 bodies and  two or three classic lenses. I stumbled upon a (now discontinued) Domke Director's Bag at a local camera store, and in spite of its high price, bought it without hesitation. I saw this as the perfect purse for those few times when I didn't want to be seen schlepping a mountain of equipment in an oversized camera bag. As of this writing I haven't filled the bag, but I can see there is ample space for everything I might need. With this much space, I can indulge my inner Fuji Fanboy self, stuffing in a Fuji X-500 flash and its accessory battery pack. I could probably stuff a Gary Fong Lightsphere while I'm at it. Ready to go with only one half the bulk. Need a group photo made? Hold my beer.

I decided that the 27mm lens would be just the lens to pack in this smaller bag. It small size would make it easy to store it mounted on a Fuji body, ready to grab and go. Sure, it's not as wide as I like, but it could also present an opportunity to produce more tightly cropped images without getting too close and personal. It might also be fun to live in a world where the backgrounds are not so cluttered by every distraction in the universe. 

 Get yours here.
I just so happened that I found this TTArtisan 27mm F 2.8 lens on eBay for about $30.00 less than its suggested selling price. Plus, it came with a no-name filter and a fabric carrying bag, so it represented real value. Cue the eye-roll.

The lens had one initial flaw: The autofocus can occasionally stop working. I've tried the lens on a variety of bodies, and it has failed occasionally on all of them*.

The TTArtisan lens comes with the unique lens hood that was first introduced by Fujifilm along with the current weather resistant (WR) version. I was fascinated by the hood, which resembled the eye of an African chameleon. Of course, I ordered two used hoods from KEH before I realized it came with its own hood, plus a unique lens cap that can fit either the lens bezel (39mm threads), or onto the hood itself. I never missed having a cap as the hood seemed more than adequate for keeping fingers from accidentally touching the front element.

I still have a  bit of fiddling to do before the Domke bag can have all the necessary kit stowed within its roomy pockets. I will also  need some properly sized dividers installed to keep my equipment neat and tidy. I'll bring everybody up to date when everything is in place. I guess we'll  all have to just wait and see.

*Addendum: February 13, 2025: I Googled the focusing problem and found that there was a firmware update that would improve focusing on the first generation Fuji X cameras. TTArtisans thoughtfully provide a USB port in the side of the lens cap (how clever!) to facilitate the file transfer. Since it's a backup for my most current bodies, the upgrade may not be needed. 

Sunday, March 12, 2023

Gary Fong's Classic Light Sphere


Guapo: This photo of "Guapo*" was made on my last assignment using a Gary Fong Lightsphere. Those who have followed my blog know that I was an early adopter, and that I still recommend it as you first, and possibly your last, flash modifier. It's simple to use, reliable, and durable. Since it was an exhibition, I assumed the quarters might be cramped, so a single, on-camera flash was the best choice. 

Order yours here.

For this assignment, I brought a Godox flash with a rectangular head profile since my Light Sphere wouldn't fit on my preferred, round headed Godox V1. There is a wide variety of accessories that attach magnetically to the round head including color correction gels, snoots, grids, and diffusion domes. 

I happened to visit the Gary Fong website, and found that they have updated the Light Sphere to accommodate the Godox V1 as you can see from this photo. In this photo taken from the Gary Fong website, you see the Light Sphere without the removable cloud dome. You can see that the magnetic bezel of the V1 is clearly visible, and accessible to a filter holder. This solves my gelling problem, and moves this round-headed wonder back into my camera bag.  It turns out that with the dome removed, it can be stuffed into the compartment in my Domke F2 Camera Bag where I normally stow my X-T2, nose down, with its 16-55mm lens. It takes up no additional space, and it adds some additional padding. The dome is removed and then stowed behind one of the bag's internal dividers.

Light Sphere In Use: Normally the LS is used with the flash pointing straight up and the dome in place. To the good, it make deflects all of the light back into the LS, directing it outward at 360 degrees on the horizontal. The light is free to bounce off the walls to provide some gentle fill light. This being said, the light is basically an above axis light source placed higher above a conventional, forward facing flash. The takeaway is the Light Sphere with its Dome in place can function in rooms with high ceilings.

Alternatively, in venues with rooms having conventional ceilings, you can remove the dome and orient you flash to an optimal bounce configuration. Guapo's photo was made with the dome off in a room with a conventional eight-foot ceiling. In the sample at the top of this post, the dome was removed and the flash pointed straight up. You can see that the lighting is even from front to back bouncing down from the ceiling onto the wood panels in the background. Examination of the catchlights shows a large catchlight from the ceiling. accompanied by a smaller one  from the Light Sphere itself. You can see this in the tight crop of the eye shown here. The third, small catchlight is probably from the varnished wooden bench my subject was sitting on. The latter two catchlights can be removed in post, if they bother you.

Alternate Techniques: As I mentioned, there are alternative bounce techniques when the dome is removed. For this shot I pointed the flash towards the wall so the light would land evenly on the wall. In this case, it worked fairly well, and the image, if submitted for publication, would require minimal exposure correction. The LS itself provided the light the illuminates the viewer at the left. As you can see by the shadow on my subject's jawline, there is sufficient modeling on her face in spite of the fact this is on-camera flash, but a little higher than normal.

The Light Sphere has been copied overseas, and while the original costs a little more, it's worth it. I've been using them for about fifteen years now (I consider myself a relatively early adopter) and is still the flash modifier I recommend if one is just starting out. And the product keeps improving, so I'm glad to add this newest iteration, the Gen 5, to my camera bag.

Update - March 19: As of today, I have not yet received my Light Sphere Generation 5. I ordered it a week ago, and received the Dome, but not the LSG5 itself. All attempts to contact the company have been bounced back. I can understand some production and delivery problems, but as of now, nothing but crickets. Will update this post when the LSG5 finally arrives. I have faith.

*Spanish for "handsome".

Sunday, August 14, 2016

David Hobby's Improvised Light Modifier

To read the Digicam review, click here.
I was checking an interesting blog post Pro Photographer, Cheap Camera, a You Tube Channel from Hong Kong featuring professional photographers using toy or novelty cameras on location in Digital Rev TV. One episode that was most interesting featured guest photographer David Hobby. The camera he was given was a toy Buzz Lightyear digital camera.

Now Mr. Hobby is well known for his flash work, and his ability to improvise light modifiers what hand materials. He's made modifiers from shirt boxes, spaghetti boxes, and plastic dry cleaning bags. He's also used Tupperware to create a functional Lightsphere, but as he is quick to add, it gives the quality light but not necessarily the "pro" look. Granted, the lighting you use to achieve you photograph is more important to the actual technique or equipment you employ, something the viewer never sees. But if "style points" are important to you, you buy the genuine article. But if you're staring out or on a budget, his DIY approach may be the proper path to take.


Watch the video by clicking on the "play button". You get to watch Mr. Hobby eat snake soup, work with people who don't understand English, and generally coax surprisingly good photos under predictably difficult conditions.

The screen shot at the right was taken from the video at 21:54. You are about to see him make a light "dome" by inflating a paper bag and shooting his flash through it. When I saw it, I looked around in my office for something that I might use as  a modifier. I found no paper bag, but did remember I used a similar dodge when photographing in the rain a while back. My original intent was to protect my equipment from the rain with a plastic bag, but as it turned out, the bag helped to expand the sphere of my light, and give me a softer quality of light.
tographer is as good as the simplest camera. -Edward Steichen 1 Most things in life are moments of pleasure and a lifetime of embarrassment; photography is a moment of embarrassment and a lifetime of pleasure. – Tony Benn 1 Sometimes I do get to places just when God’s ready to have somebody click the shutter. – Ansel Adams 1 Landscape photography is the supreme test of the photographer – and often the supreme disappointment. – Ansel Adams 1 is my intention to present – through the medium of photography – intuitive observations of the natural world which may have meaning to the spectators. – Ansel Adams 1 Not everybody trusts paintings but people believe photographs. – Ansel Adams 1 Always seeing something, never seeing nothing, being photographer. – Walter De Mulder 1 Photography is a reality so subtle that it becomes more real than reality. – Alfred Stieglitz 1 The Earth is Art, The Photographer is only a Witness. – Yann Arthus Bertrand 1 What i like about photographs is that they capture a moment that’s gone forever, impossible to reproduce. – Karl Lagerfeld 1 The photograph itself doesn’t interest me. I want only to capture a minute part of reality. -Henri Cartier Bresson 1 I never question what to do, it tells me what to do. The photographs make themselves with my help. -Ruth Bernhard «123Next » Submit A Quote Browse Quotes By Subject By Author Popular Topics Alcohol Anger Anniversary Attitude Baby Beauty Being Ignored Being Single Being Unappreciated Being Used Being Yourself Best Friend Breakup Brother Cheating Childhood Clever Coffee College Cowboy Daughter Depression Disappointment Ego Enemy Environment Ex Expectation Facebook Status Family Father Flirting Friendship Girly God Goodbye Gossip Grandfather Horse Husband Hypocrisy Insecurity Inspirational Insult Jealousy Karma Life Loneliness Love Loyalty Memory Missing You Mistake Mother Past Perfection Pirate Sad Sarcastic Silence Sister Smile Smoking Soccer Son Sorry Stop Caring Stupid Thank You Trust Waiting Wife Wise View All Funny Awkward Moments Funny Birthday Quotes Funny Golf Quotes Funny Marriage Quotes Funny Men Quotes Funny Women Quotes Short Funny Quotes Witty Quotes Official Facebook Page Join us on Facebook

Source : http://www.coolnsmart.com/photography_quotes/
No photographer is as good as the simplest camera. -Edward Steichen

Source : http://www.coolnsmart.com/photography_quotes/
No photographer is as good as the simplest camera. -Edward Steichen

Source : http://www.coolnsmart.com/photography_quotes

The full post can be seen here.

This pair of photos shows a plastic bag covering a Gary Fong Light Sphere. You can see that the size of the light source is more than doubled by this simple addition.

It just goes to show that sometimes if doesn't take much to improve the quality of light Sure, white walls, when available, make a great bounce surface, but a plastic bag may do in a pinch.

Quotes. Speaking of equipment, here a some clever quotes to remind one that it isn't always the equipment that makes the photo.

“A photographer went to a socialite party in New York. As he entered the front door, the host said ‘I love your pictures – they’re wonderful; you must have a fantastic camera.’ He said nothing until dinner was finished, then (said) ‘That was a wonderful dinner; you must have a terrific stove.'” By Sam Haskins.

No photographer is as good as the simplest camera. Edward Steichen

Scoff not the other man's camera - It may contain the photos you should have taken. Simon Nathan.

Sunday, April 17, 2016

Finally: A Camera Bag That Works!

http://www.bhphotovideo.com/c/product/1123603-REG/vanguard_veo_37_shoulder_bag.html
This bag may be the answer to my prayers. This bag, the Vanguard Veo 37, has been a near-perfect match for a shooting style that includes off-camera and multiple flash applications. It is closer in capacity to a messenger bag, with enough height and width to carry a small laptop. But the big sell isn't what you see from above. It's what you see from below.

If you examine the illustration at the top of the post, you can see a tripod pocket that can be accessed through its own zippered flap. It occurred to me that there might just be enough space to hold a Zumbrella and some sort of abbreviated hand-held
extension for a umbrella bracket..

Close examination of the on-line image showed the tripod was a Vanguard Veo 265CB. I checked the specifications, and it has a collapsed length of 15.4". I measured my Zumbrella, and found that it would just fit into tripod compartment. In the photo to the left, you can see my Canon Chestpod with a Westcott umbrella bracket which I chose because of the relatively small knobs. Anyone who is familiar with the Westcott bracket might notice that the umbrella retaining screw has been replaced by a plastic handled T-screw, which helps me get a better "bite" on the umbrella shaft. It happened that the original umbrella retaining screw was 1/4 x 20, so the swap was super simple.

Umbrella Shaft Length: If memory serves, the Westcott umbrellas are a tiny bit long for the pocket, which meant that the shaft would have to be shortened before it would fit. When you have to saw the shaft, here are two reminders: Use a fine-toothed hacksaw blade, and be sure to shove a wooden pencil into the shaft. This additional support will make the shaft much easier to cut. And don't forget to file down the end of the shaft so that there are no sharp edges to tear at the bag's lining.

Better To Have...: I'm a big believer in the old maxim, "Better to have it and not need it than to need it and not have it" is most apt. Since I've started carrying this bag, I have yet to actually use the Zumbrella rig on an assignment. There are two possible explanations. First of all, I've started to use "environmental bounce flash" whenever possible, so finding soft light is usually not a problem. But secondly, I don't have an automated system for use with an off-camera speedlight when I'm using Fuji cameras. I can get automated bounce using a camera mounted EF-42, and if I have the time, using a manual speedlight. I still want SOMEBODY to make a decent off-camera TTL speedlight system that works with the Fuji, and when it comes, I'll be much more likely to use the Zumbrella once again.

Sunday, June 18, 2017

My "Justin Case" - Just In Case

The first two weeks in June presented me with a major revelation: I carry too much equipment in my main bag, and not enough on my person. I am a strong subscriber to the adage "It's better to have it and not need it, than need it and not have it". Sure, I usually have three speedlights at the ready, but they are useless to me if they are in my camera bag beside my assistant on the other side of the venue. And it isn't just speedlights. I actually started photographing with an empty (no SD card inside) camera, not realizing my mistake until I started to review my morning's take. Luckily, I was able to duplicate most of the shots I lost, but some priceless expressions, along with a potential Pulitzer Prize Winner, were lost forever. Just kidding about the Pulitzer. And since I started using Fuji mirrorless cameras on assignment, I've been caught with dead or dying batteries on several occasions.

The Mission: My mission was to see how many essentials I could cram into a Think Tank Speed Changer 200 pack. After some thought, my list of must carries grew longer and longer, but so far, I've included the following:

  • 1 (or 2) Nikon SB-80 DX Speedlight/s: I prefer to use SB-80s when shooting Fujis. While there is no TTL automation, they do offer the older, non TTL flash exposure automation, which has worked reasonably well outdoors as fill lighting. In a pinch, I could exchange one speedlight for a SD-8A battery pack. By installing two padded dividers in the Think Tank bag, I was able to position the two SB-80s at either end of the bag, leaving room in the middle compartment for:
  • 1 Neutered Nikon SC-17 Flash Cable: Cables are a quick way to achieve an improved, off-camera look to one's photos. The neutered cable eliminates any possible conflicts when attaching a Nikon speedlight to any camera that has an ISO standard hot shoe and will tolerate a flash triggering voltage of approximately 8 volts.
  •  1 Nikon Diffusion Dome: One SW-10H Wide Angle Flash Adapter fits neatly at the bottom.
  •  1 12-Pack of AA Batteries: This inexpensive plastic box holds enough batteries to completely change out three speedlights, or one plus a Nikon SD-8a Battery Pack. 
In the outer compartment, you'll find: 
  • 1 Lumiquest Pocket Bouncer: Just in case I need to soften my key light a bit. I include a LumiQuest UltraStrap to attach it. For the moment, I've given up on putting Velcro directly on my speedlights. I wrap the Ultra Strap around the Bouncer to keep things neat.
  • 1 Geppe Card Safe with 2 SD and 2 CF cards.
  • Pre-cut Gels: I carry CTO gels cut to the size required by the SB-80s.
  • 1 strip Gaffer Tape. I cut a 6" strip to a width of 1 1/4" and stick it to the waxed paper backing from sheets of adhesive mailing labels. By "notching" the tape at 1/2" intervals, I can tear off "stitches" of tape for attaching loose CC gels to a speedlight.
  •  Nikon AS-19 Stand: These stands come with with the higher-end Nikon Speedlights. May not work with the SB-900.
  • 2 Fuji Batteries: I carry one for the X100 cameras and one for the X-E and X-T bodies.
  • Microfiber Lens Wiping Cloth. 
  • 1 Cardboard Snoot: Made from a spaghetti box, a la David Hobby.
Among the various and sundry items you'll find:
  • 2 pens (I might lose one).
  • 1 Moleskine (mini) Journal: Hey, it was a gift. Seriously, any paper will do to record the names of my subjects when in the field.
  • Business Cards/Contact Cards: I never seem to have them on me, so now there is no excuse.
  • 1 Swiss Army Knife: Any variant will do,as long as it has a pair of scissors.
  • Anti Bacterial Hand Wipes (Wet Ones). Just a few. I have plenty in my car's glove box.
  • Mini-Maglight Flashlight: These were all the rage when they first came out, and I literally have a dozen of them floating about the house. I modified mine to take a push button switch for one-hand operation, and a Krypton bulb for brightness.
Irving Penn (1917-2009) Theatre Accident, 1947
Irving Penn: The photo "Theatre Accident" has always been one of my favorite still life photos. It incorporates a feeling of how a handbag's contents might spill at the feet of an opera (or ballet) patron's feet. My photo is a humble homage to the photo. All that's missing is the patent leather pump.

Fully packed, this bag weighs about three pounds and is difficult to attach to a dress belt. My next problem is how to simplify attaching the bundle without the appearance of a struggle. I may wind up attaching the bag to a wide, load bearing web belt, thus converting my original concept of a quick backup bag into a superhero's utility belt. In time, I may trim back on the bag's contents, but in the mean time, I'll have more than enough great stuff securely attached to my waist.


Sunday, April 7, 2019

Back To Basics, Circa 1970

ISBN-13: 978-0471256922
Great Reads From The 70's: Books have always been a great source of inspiration for my photographic pursuits. Moments Preserved by Irving Penn inspired me to experiment with studio lighting and still life composition. Later, The Viet Nam Photo Book by Mark Jury, along with the work of Life Magazine photographer Larry Burrows, helped me imagine myself as a battle-hardened war photographer. So much for the inspiration. Now all I had to do was develop the technique.

I found Milton Feinberg's  Techniques In Photojournalism in the stacks of the City College of San Francisco Library. If memory serves, I was the first student to check it out, and subjected it to many, many renewals. This was the photojournalist's lifestyle I was looking for, minus the danger.

35mm photography was experiencing its own growing pains. While the choice of the new generation of "concerned young photographers with expensive cameras and their just-so faded blue jeans"* was indeed the Nikon F, commercial photographers hadn't fully adopted the smaller format, relying on 2 1/4" roll film Hasselblads and Rolleiflexes with Norman or Stroboflex flashes for serious color wedding and location portraiture. To carry a 35mm camera on so important an assignment was to be branded a heretic.

From Anatomy Films. Click here.
News photographers were quicker to adopt the 35mm rangefinder, with the German Leica and Contax cameras providing convenient backup for the clumsy  Speed Graphics of the day. A suitably equipped camera bag included the camera itself, a dozen film holders, each the size of a slice of bread and capable of capturing two images each, and a pack of flash bulbs, each the size of an apricot. Needless to say, the reduction in weight and bulk afforded by a 35 mm "kit" was indeed welcomed.

From a post on Film Locations in London. Click here.
I am reminded of the minimalist aspect taken to an extreme. In this photo, a screen capture from the movie "Blowup", a photographer named Thomas (David Hemmings) returns to  his Rolls Royce convertible after completing a photo essay in a gritty men's shelter using only a Nikon F hidden in a paper bag. And if you don't believe me, watch the movie! Minimalism at its least.

Advance To 2019: Nearly 50 years later, I find myself looking for that minimalist approach to equipment when I'm positive I won't need an extreme telephoto or an ultra-wide angle lens. Outdoor location event shooting is a prime example. Lately, I've found that a Fuji X-100 with the wide angle adapter attached has proven adequate for fully 99% of my submitted images. But when on an assignment, I still need to have a backup camera, just in case something goes terribly wrong.

Mr. Feinberg's minimal kit, as echoed by Popular Photography's Bob Schwalberg, included two bodies and only two lenses: a fast 35 mm lens for general work and an 80 mm lens for tight head shots. Since my Fuji combination allowed me the equivalent of a 28 mm lens with, and a 35mm lens without the WCL-X100 adapter, I needed to add the equivalent of that 80mm lens just to stay with program. Until recently,  I had carried a second Fuji X100 with the TCL-X100 telephoto adapter semi-permanently mounted. This converted the camera's existing lens to a 50 mm equivalent, a painfully modest gain in focal length, considering the bulk it added to the otherwise compact X100. When used wide open, the images from this combination were disappointingly soft, so the combination was seldom used.

My solution was to purchase a Fuji X Mount 50mm F 2.0 WR lens. My reasoning was simple: I needed a companion WR (Weather Resistant) lens to accompany my 35mm WR lens should I be called upon to photograph under damp conditions. My choice made sense on many levels. When mounted on a WR body like my X-T2, I shall fear no mist though I walk in the valley of  drizzle. The lens is relatively compact, relatively fast, and certainly less bulky (and less dear) than my 56 mm F 1.2 lens.

Fuji X-E1 with 50mm F 2.0 lens (left) compared to an X100S with the TCL-X100 telephoto adapter.

You can see in this side by side comparison just how bulky the adapted X100, shown on  the right,  is when compared to the 50 mm F 2.0 WR mounted an X-E1 body, shown on the left. Based on size alone, the choice was a clear one, but while I solved the 75mm lens dilemma, another potential problem presented itself. concerning how one properly equips a wedding photographer. The author of a column written for Rangefinder Magazine stressed the importance of a backup camera system, not just a backup camera body or lens. If your primary camera should fail after the first photo is made, you should be able to complete the assignment using your backup camera, a "suitable" lens, a compatible flash, and enough film to complete the assignment if your primary and backup cameras don't share the same film format.

Order yours here.
Because it would be almost impossible to complete an indoor assignment with only a short telephoto lens, I will add my compact 27mm F 2.8 "pancake" lens to the kit in case my short-lensed X100 fails. Mounted on the XT-2 body, I'll have a 42 mm lens equivalent, a usable indoor focal length.  Its compact size should make it easy to tuck away in some unused corner of my camera bag, assuming I can find some way to ensure its safety in transit. I suspect that a small plastic box can be lined with foam and pressed into service, and when one is found, I'll do just that.

Content for the moment, I must now find a matching purse to carry my new ensemble.

*The "Concerned young photographers" quote came from an article in Popular Photography in the 1970's. It poked fun at the emergence of of the 35mm SLR as the trendy fashion accessory of the "hip" generation. Groovy.