Sunday, May 26, 2019

Wedding Bell Blues

1/180th second, F 11.0, ISO 200

Vintage Wedding Gowns
Wedding Fashions Throughout Time was 
scheduled for May 18, 2018, and I was anxious to make a photo to help publicize the event. Two models would be at the Historic Courthouse for a final fitting of their gowns the week before, so I jumped at the chance to make a flash-enhanced outdoor photo at the Historic Courthouse in Redwood City.


Buy yours here.
Location lighting has become far less daunting since the introduction of the Godox AD200 flash, a self-contained, speedlight sized flash that packs a 200 Watt-Second punch. Not only that, the designers have given a lot of thought into how the unit would be used in the field, and they created a mounting system that integrates both the need to secure the flash itself while providing an attaching point for a variety of light modifiers. They came up with the Glow S-type Bowens Mount Bracket which has a hole to accommodate umbrella shafts at the bottom of the mounting ring. There are also recesses to accept the Bowens mount compliant soft boxes. And as a final pleasant surprise, the mounting ring's diameter is the same as the "lollipop" mounting disk used in the Lastolite E-Z Box softboxes. It costs about $20.00, about what you would pay for a conventional umbrella mount, but much more versatile considering the options you get for mounting light modifiers.

If you bought the AD200, you know it comes with a bare bulb adapter and flash tube. When used, it allows light to completely fill the corners of a softbox's diffusion surface, reducing hotspots and giving a more even light distribution for softer lighting. The clamping arrangement of the  Glow bracket simplifies the mounting of the AD200, and just about any other flash or speedlight.


Get yours here.
With those 200 watt-seconds at my disposal, I didn't think twice about using a softbox. This weekend I used an Adorama Glow 31" x 31", an obvious knock-off of the Lastolite E-Z Box. At about $40.00 (mount bracket included), it costs less than one fourth the Lastolite unit. The softbox collapses into a compact bundle which you then stuffed into its own zippered bag. Adorama thoughtfully provides a semi-rigid case that holds both the collapsed softbox and the necessary mounting ring, allowing you to gather everything you need except the flash itself, and a dedicated triggering device. Since I knew my car would be parked a short distance from where I would be working, I brought a 12' lightstand, mainly for the stability provided by its long legs.

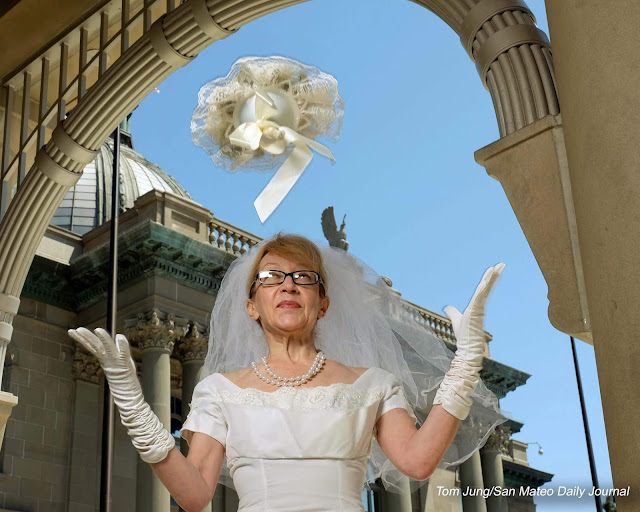
I chose my location, a covered seating area beside the square, because it allowed me to better control my flash exposure without having to deal with any direct sunlight. The image at the top of the post was the best of the bunch, and I subsequently submitted it for publication. But at the last minute, I was asked to pull the image in favor of one showing only one bride.  Since we had been experimenting with a bouquet toss photo, I was able to submit this image instead. 


1/180th second, F 9.0, ISO 200
The visual elements are too spread out for my taste, and this shot would not have been my first choice. Normally, the bride would throw the bouquet over her shoulder, but I needed a face to go with the dress, and this was the result. It is funny that she looks more like she is about to catch the bouquet, rather than having just thrown it. Timing was critical, and it took nearly a dozen attempts just to get this shot. Try as I might, I never got a photo with the bouquet much close than this.


Glare Spots: Softboxes provide a broader light source resulting in a gentler transition from highlight to shadow. I might add that this is not the same as lowered contrast, since that is the result of light bouncing off reflective surfaces such as the wedding dress or bare skin. Softboxes also create huge glare spots on glasses, as you can see here. This photo was not submitted because of the glare, and serves as a reminder that when shooting from a low position, the height of your light source could cause some trouble.

This combination has proven itself powerful enough for outdoor work. I will replace my preferred light stand with a short monopod held by a relatively tall assistant. Hopefully, I may be able to test at Carnaval in San Francisco.

Here's the final image, as it appeared in the May 15, 2019 edition. Again, the exposure proper balance between the shadows and the highlights give both saturation and detail to the entire image, with no inky shadows or blocked highlights.


Sunday, May 19, 2019

Back To Basics: Backup Flash


Improvised plastic cover in place
You Need A Backup Flash: As photographers, we know that having a backup camera is a necessary precaution. Why shouldn't this apply to flash? When working indoors, you can't always count on high ISO settings to give you enough light to make a proper exposure, so flash may be your only suitable light source.  Having a second flash could save the day if your primary fails. But what if the two flashes could also be used in a controller/remote capacity? I've done this routinely with my Nikon speedlights, but until now, couldn't justify fully buy additional Fuji flashes to fill out my Fuji kit. Since I started to drift away from my usual Nikon DSLR camera solution, I started looking for a way to achieve that same level of versatility while adding as little to the weight of my kit as possible.


Mini Backup: For backup, I have two mini-flash candidates that provide TTL exposure metering for the Fuji: A Nissin i40 and an Adorama Flashpoint Zoom-Mini. Both claim to have controller/remote capabilities, but were initially purchased because they were "cute". The Nissin has fallen from favor due to some performance quirks I can neither explain nor forgive*. However, the Flashpoint unit, a.k.a. Godox TT350F , while modest in size and output, can double as a radio controller for the Godox TT685F that already rides in my bag. The little flash occupies the same space as a coiled flash cord, and offers several distinct lighting (TTL) options:
  • The small TT350F can be used as a radio trigger and the larger TT685F used with an umbrella or small soft box.
  • The large TT685F can be used to provide a bounced fill light, while the small FF350F can be used as a narrow-beamed key light.
  • Both flashes could be used together in a direct key / fill light combination.


Cameras and the protective cover for the Flashpoint were removed to show the general layout
My bag, in its current configuration, accommodates two cameras and two flashes. Stored in the left compartment are two plastic boxes: one for the pancake lens and the other for an assortment of lens hoods, lens caps, and filters.  The X-E1 sits on top. In the center, the folded Adorama Flash Point Mini Zoom minus the improvised protective cover. The X100T sits on top. The full-sized Godox TT685F sits at the right.


Be really REALLY careful when you cut!
Here you see the inverted plastic box with the lid open. The flash cover was made by cutting along the inked line to remove one side and the lid. This little "garage" sits on top of the flash, as seen at the top of this post. If you are careful, a craft knife will work. I used a band saw because it was handy.

Defeating Radio Trigger Delays: There is always a short delay when using radio triggered flashes. As a result, the flash may discharge after the second shutter curtain (a quaint term from when the shutters were made of rubberized fabric) has started to close. When using a focal plane shutter (X-E1), it appears as a dark band across the bottom of the frame. This clipping only occurs when shooting at the maximum flash synchronization speed, or one shorter in duration.

When using the X100 and its "sync at all speeds" leaf shutter, I would normally rely on a neutered flash cable to bypass any unnecessary TTL communication between the flash and the camera. Instead, I could now use the shoe-mounted, TT350F in manual mode and trigger the more powerful TT685F using its built-in optical slave in the manual mode, eliminating the delay. This is done by setting the on-camera TT350F to manual and rotating the head towards the TT695F which has been set to fire using the built-in optical slave. 

While this my seem like an overly complicated game plan, I feel comfortable that given a short period of time, I can meet almost any lighting challenge that might come along. But in reality, nearly all of my work is done with a single, on-camera flash and my flash-at-any-speed Fuji X100T, and these two items are instantly accessible. The fun begins when I have an abundance of both time and energy to make a photo I would really be happy with.

*When used in the manual mode, the Nissin  i40 will deliver a full-power discharge only when the sync speed is 1/250 or slower, based on some simple exposure tests.

Sunday, May 12, 2019

Back To Basics - In The Field


May 5 In Wooside: I took my minimalist kit to photograph two Woodside events: The Soapbox Derby, which I found by accident, and Historical Woodside Store, an annual recreation of country life in rural California during the 1880’s. Since these would be conventional assignments, it would be a good way to see if my wide angle / telephoto pairs could meet the challenge.

ISO 200, 1/2000 second, F 8.0. Underexposed by 2 stops, corrected in post
Up Close: Nothing beats a super wide angle lens, but when working outdoors, the flash synchronization advantages of the X100T's leaf shutter give the photographer a clear advantage when it comes to equalizing sun-lit highlights with flash-filled shadows.

From my track-side vantage point, the 28mm equivalent Fuji X100 couldn't give me as wide a view as my 10-24 zoom on an X-T2 body. However, this shot shows the potential of using a flash outdoors, and while the lighting isn't particularly attractive, the driver's expression is easily seen. Unfortunately, the officials in the background are looking back at the next racer, and this detracts the viewer's attention away from racer in the foreground.

Next time, I'll keep shooting in spite of the discouraging initial efforts, and see if I can improve my timing and composition. Holding the camera in my left hand while holding the (cabled) flash in my right hand would have improved the lighting considerably.

1/900 second, F 11.0, ISO 200, flash fill
The Awards Ceremony: This was an easy shot to make, and full of detail. If I were make on suggestion, it would be to underexpose the image by 2/3 of a stop. Failure to do so will result in an overexposure of the highlights, which were properly preserved in this shot. Don't forget that the flash illumination is on top of the light already in the shadows, so a little bit of light goes a long way.  The distance was about ten feet, about the outer limits for a battery powered flash at F 11. But having a leaf shutter in the X100T makes that 1/900 of  second flash shot possible, something a conventional focal plane shutter couldn't accomplish without some seriously geeky equipment tweaks.

Making Rag Dolls: At the Old Woodside Store, two docents were showing groups of children how dolls were made from simple fabric scraps. The room was lit by an single, under-powered light bulb that hung from the ceiling, with some additional sunlight coming through a south-facing window. It suffices to say that there wasn't much ambient light to speak of, so I resorted to wall-bouncing the Godox 685 flash I brought for the occasion. Making a well-exposed photo wasn't the problem. Attempting to create a suitable composition was.

In this first sample, the overall composition was acceptable, but the photo had several shortcomings. First off, the mother and son grouping in the lower left drew the viewer's attention from the seated docent on the right. In addition, the gap between the seated children essentially cuts the image into two parts. Finally, the doll that the docent is making isn't recognizable as such, the brightness and coloration blending in with its background.


In the end, I chose to submit this image. The way the doll's garment is being held, the gaze of the docent, and the two faceless children created a better composition. I wish the docent was a little more animated, but I chose the photo's composition in favor of the expression.

ISO 200, 1/420 second, F 4.0
Eating Pie: Statistically speaking, I am far more likely to choose a wide angle lens when I have the chance to work near my subjects. But in this case, I needed my short telephoto lens for the Pie Eating Contest.  These shots were made in the Aperture Priority mode, and choosing a relatively large shooting aperture gave me backgrounds that were pleasingly out of focus. I was thankful for the white paper table covering which provided enough reflected light to give detail to the shadows. Without it the photo would have had blown highlights or overly dark shadows, depending on which of the two extremes I chose to sacrifice.

1/390 second, F 4.0, ISO 200
When grabbing candid shots, it's too easy to concentrate on your main subject and forget that the edges will often add some context to the photo. Had I seen the expression of disbelief on this young man's face sooner, I might have re-framed the shot to included more of it. As it stands, I can be forgiven because this final crop included both of his eyes, although just barely.

All in all, my lens choices were satisfactory, although I wish I had some zooms for the actions shots. I felt some professional pride in making do with so basic a kit, and felt my cameras were up to the assignment. I was forced to re-think the single flash concept, and I'll discuss some additions I made in my next post.

Postscript May 15, 2019: My editor ran this shot of these two soapbox racers whose car won the Most Original Car award. The photo of the docent holding the doll clothing was also submitted, but not used. I think this photo, taken outdoors with a flash assist, had more detail, better color, and most importantly, two happy kids. 

Using a flash exposure to properly balance the existing daylight allowed me to underexpose the highlights slightly to prevent them from "blocking up". As a rule of thumb, under-exposed the sunlight exposure by 1/2 of a stop, while underexposing the flash an equal amount. Since digital cameras and lenses tend to be calibrated in 1/3 stop increments (the same as the ISO settings, coincidentally), just try to keep your settings near the 1/2 stop range. 

One piece of advice from the film days, underexpose transparency (slide) film to maintain saturation in the highlights. Treat your digital exposures the same way.

Sunday, May 5, 2019

JJC Lens Hoods

Buy your OEM hood here.
OEM = OMG! Lens hoods are a necessity when working outdoors in the presence of other sticky fingers. While their effectiveness in blocking stray light can be problematic, they are very effective in keeping errant digits off the front element of your camera's lens. Depend on it, sooner or later a big, juicy thumb print will find its way onto the front element of your lens, so anything you can do to prevent this should be considered. And if you add the protection provided by a glass UV filter, so much the better.

When the Fuji X100 was first introduced in 2010, it was universally hailed as a contender for the Greatest Camera In The World award, and rightfully so. But one thing did not sit well with most photographers: the inordinately expensive lens hood. Retailing for about $70.00, the Original Equipment Manufacturer (OEM) hood was considered far too expensive for what it did, although I never heard anybody criticize the overall quality of the product. As a former film photographer, I had already acclimated myself to the astronomical prices commanded by genuine Leica accessories, But $70.00 for a newly manufactured Japanese product? I don't think so.

There was another issue that may have added to the manufacturing cost of a suitable lens hood. For whatever reason, the 49 mm filter threads, hidden beneath a protective bezel ring, are male (external), the exact opposite of the nearly universal female (internal) threads normally encountered. This means that if you want to mount a filter, you needed some kind of adapter that would have female threads on the camera side AND the filter side, something the Fuji hood addressed. A sticky wicket, none the less.

Get your hood here.
Enter JJC. This Chinese manufacturer makes a close copy (cheap knockoff) of the hood for under $15.00 through several EBay vendors. Workmanship? The hood feels a little gritty when installed, but other than that, it's perfectly serviceable.  And with the money you save you can afford a first-rate UV filter. Just be sure you buy the hood that includes the phrase "filter adapter" in the description.

You may notice the slots cut into the hood. This feature dates back to the original lens hoods designed for use on rangefinder cameras where the slots would allow you to see "through" the hood when using the camera's viewfinder window.

Order your hood here.
Hood For The X70: The OEM hood for the X70 does not have the ability to take a filter. The hood itself looks a little like an inverted bowl with a hole that matches the angle of view of the lens' 28mm equivalent angle of acceptance. Perhaps the designers felt the added protection provided by the hood would make a protective filter unnecessary. However, the JJC designers felt otherwise and included a filter adapter similar to the one on their X100 model. The final product is a real winner in my book.

You will notice that the slots have been omitted. Since the X70 does not have a viewfinder, there is no need to provide the see-through cutouts.

Photo source here.
Dedicated Hoods For Specific Lenses: My final JJC purchase was thus rectangular lens hood for my 56 mm F 1.2 lens. In this case, the OEM hood is a simple plastic tube that attaches to the lens' bayonet mounting flange. JJC has copied the rectangular hood format used on some of the Fuji primes, and also copies the snap-on cover in lieu of a lens cap. You can still install a protective filter on the lens, but you cannot install a center-pinch lens cap when this hood is in place.

One might argue that the shallow design of the JJC hood wouldn't shield the lens as well as the deeper "soup can" OEM version, since the hood can also be used on the Fuji 23mm F 1.4 lens. Even if it didn't, the compact design still provides sufficient protection from fingerprints, a hazard I consider far more real than a beam of errant light. And I simply like the way the hood looks. After all, you can never have too many style points.

You can order yours here. Price should be under $40.00.