Sunday, November 29, 2020

Fact, Truth, And Filoli At Night


"Archeology is the search for fact, not truth. If it's truth you're interested in, Dr. Tyree's philosophy class is right down the hall..." 

Indiana Jones, from "The Last Crusade".

It's odd that this quote, taken from a movie, could help me come to grips with an ethical problem I have with a photo I made for the Journal. You see, since the advent of Photoshop, photographers have been forced to adhere to high ethical and professional standards. As such, we are tasked to make images that are a reflection of what was actually before us, and that the viewers of our photos can be assured that what was pictured actually happened. Photojournalism, like golf, has but one golden rule: Tell It Like It Is.

David Hobby, formerly of the Baltimore Sun and creator of Strobist.com, has contributed more to understanding the proper use of flash than anyone else, save Joe McNally of the Nikon Tribe. As a former photojournalist, Mr. Hobby was acutely aware of photography's power to misinform since the advent of the digital camera and post-production applications such as Photoshop. During the transition to digital, he made a simple rule that addresses truthfulness in imaging. In essence, he stated that if you limited yourself to darkroom techniques available to the black and white film photographer, you would remain within the limits of ethical documentary imaging.

Being a practicing black and white processor and printer since the early 1970's, I've taken this to heart. Since film was the only medium available, everybody was anxious to improve their images during the printing process. Dodging and burning, the standard darkroom techniques, have their Photoshop counterparts in the 21st century. Perspective control? We learned to tilt our easels (frames that kept our photo paper flat) to correct converging lines, But in all cases, the negative was essentially incorruptible, a moment in time forever preserved in a microscopic cluster of silver crystals suspended in emulsion.

Advanced technologies, both in the equipment and in post production processing, have radically pushed the boundaries between accuracy and truth. Affordable lenses, high ISO sensitivities, and Photoshop magic have managed to alter our acceptance of what is real and factual. An article written by Ed Elliot and posted on his blog  catalogued, in great detail, the many ways our images can persuade, intentionally or not, the viewer into drawing a conclusion that may be factual, but not entirely truthful. I present a case in point.

Filoli: The world famous Filoli Gardens and Estate were preparing to debut their winter decorations for the holidays. A press-only event had been scheduled to give us a chance to speak with the staff, take in the sights, and go forth to write our stories. My first job was one make a photo to accompany a story about the floral coordinator of the estate - a environmental headshot if you will. The second was to make a shot illustrating some of the lighting and to encourage  attendance in the event.


Shot #1: I decided to make the shot in the Gift Shop, choosing a majestic tree as my background. My editor had a better idea - Why not place her in front of fully decked with ornaments and standing beside a mountain of gifts? Her solution was brilliant, and this shot was quickly made with an on-camera flash bounced off the ceiling and built-in bounce card raised for some additional sparkle.

There are some important qualifications about this photo that need to be made. First, it is obviously not a candid because the subject is looking straight at me. Second, she was in the gift shop at our request, since it was raining outside and the message of "Christmas" was as important as her job as Horticulture Manager. And finally, there was some "crime scene manipulation". I moved a stuffed horse to the left so that the "S" in "Santa" was clearly visible. All in all, it's not a tour de force in artificial lighting, but it got the job done within the looser constraints of community photography. Fact, yes. Truth, meah...

1/8 second, F 5.6, ISO 3200, Cloudy white balance

Shot #2: I'm  conflicted with this one. It was meant to illustrate what a person might actually see if they joined the nightly tour. These trees, plus the lights draped about their limbs, formed a natural bower leading to the main entrance to the mansion.  When I encountered one of the publicists rejoining the docents inside, I thought there might be a photo here, so I framed the shot and asked her to walk toward me from the house until a suitable balance between the subject and the background was achieved. By selecting a shutter speed of 1/8 second, I was able to get the detail in the trees and the cobblestone walkway. I had my subject look up slightly so she could be lit from above. I did use a tiny bit of fill flash, directed up to prevent burning out the immediate foreground. 

1/15 second, F 5.6, ISO 3200
Nice photo Tom, so what's the problem? In reality, only an owl could have seen as much detail as you see here. Through the miracle of high ISO settings, I've presented the viewer with a scene no human could have seen unaided. 

If you look at the sample on the right, you'll get a better idea of how the scene actually appear. Here, the individual lights are properly exposed (no highlight blowout), but there is little detail in the midtones, and none whatsoever in the shadow areas. Clearly the exposure boost of a full stop completely transformed the image and made it printable, if in theory, less accurate.

In short, it all comes down the conflict between fact and truth. The technology gives me an effortless means of recording the facts, down to the smallest detail. But truth, the final interpretation made by the viewer, can still be manipulated to promote an idea. Luckily for me, the community photography venue allows for promotion of a social agenda, one that allows me to always present the bright side of truth.

Wednesday, November 25, 2020

San Rafael Sidetrip

  For a compilation of the morning walk images, click here.


Seewood Photo In San Rafael: I took a drive to Seawood Photo in San Rafael, one of the few remaining camera stores that speak Film. I have a black Nikon FE2 that has been in my family for many years. It belonged to my Uncle Bob, then was used by both my Father and my Sister. After a while, it came back to me, and even though I have no intention of using it, I can't stand to have something that isn't fully operation.  It turns out that Seawood can replace the camera's foam rubber strips that serve as a vibration dampener for the reflex mirror and as a trap to prevent light leaks into the camera's film chamber. The years of storage caused the strips to decompose, so it will be nice to get it function properly.


For whatever reason, San Rafael is alive with color when the leaves start to fall. I suppose that some specific microclimates allow certain trees to flourish, bringing their fall display of colors when the season turns to winter. This random collection of leaves found on the street reminds me of an assortment of sautéed peppers served in a fine restaurant. Restaurant dining. I SO miss it!


Thinking Pink: I'm not sure what this pink parking meter does, but I believe it accepts spare change for distribution to local charities. I think it's a very nice place to deposit unwanted small change, knowing that it will help the community.


Good Start: I think this bicycle in a car-top rack might make an interesting photo if there were more leaf-laden trees in the background and that errant utility pole hadn't been so prominent in the background. Woulda, coulda, shoulda.


The Mission: I never photographed Mission San Rafael Arcangel until today. Somehow, the clarity of the day and the brilliance of the mission made it a must-do. I never realized how imposing a structure it was.

It was a good day to be out, and nice to be taking photos again. 

Monday, November 9, 2020

San Francisco Opera Costume Sale

 For a compilation of the morning walk images, click here.


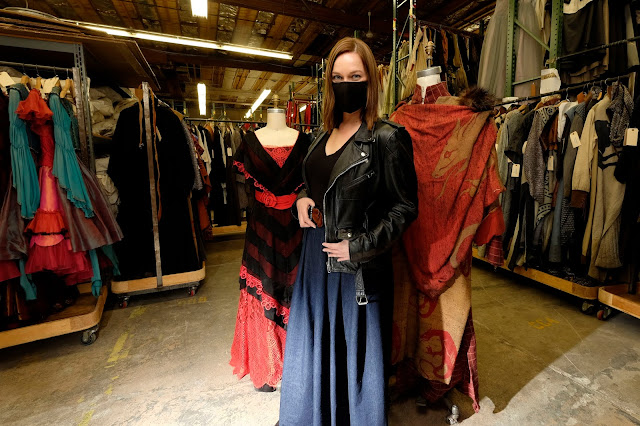
Opera Costume Warehouse: Covid 19 will leave its mark on every face I photograph for a long time to come. Since the shot was indoors, protocol dictated masks at all times, and in the interest of demonstrating the staff's willingness to following prescribed safety protocols, the mask stayed put.

There is room for debate concerning the relative size of the three visual elements. On the one hand, the photo must call attention to the number of costumes available for sale (more than 500). On the other  hand, it's about the young costume manager who happens to be a San Mateo resident. In retrospect, I could have experimented with the placement of the mannequins and the subsequent placement of my young subject. As usual, the placement is a compromise, since I had limited time, and my subject had her job to do.

Lighting: The key light was provided by a speedlight mounted about 8 feet off the ground,  and slightly to my left. It was modified with a Zumbrella shoot-through umbrella. As a note of caution, I was using a radio-triggered speedlight which started to act up at the last moment. After several unsuccessful attempts to trigger the flash (it was function tested that very morning, so I knew it worked), I swapped it out for Old Reliable, a Nikon SB-800 set to SU-4 (optical remote) mode. A second flash, hotshoe mounted and directed towards the wall behind me, served as an on-camera optical trigger. 

Floor Bounce Fill: I needed a bit of fill to add a bit of detail to my subject's dark skirt. Normally, fill light would be delivered from a position very near the optical axis of the lens. Some photographers, most notably David Hobby, employ a ring light to provide shadowless, on-axis fill light. Unfortunately, this technique usually produces a glare spot on the lenses of spectacle-wearing subjects.

An alternative fill technique involves bouncing the flash off the floor in front of the subject. No real name for this technique I learned about it in one of Joe McNally's instructional videos. I've used this technique before, but only in a controlled studio environment

Since I was using my flashes as optical remotes, it was easy to add a second SB-800 and configure it to the SU-4 mode. I then directed a nearby spectator to aim a second flash towards the floor in front of my subject. 

Fill light accidentally directed at the subject's feet
You can see in this first attempt that the fill light was actually pointed at my subject's feet, which allowed direct light to flood the lower portion of the frame. I had my assistant re-position the flash until it pointed straight down at the floor in front of the light stand. 

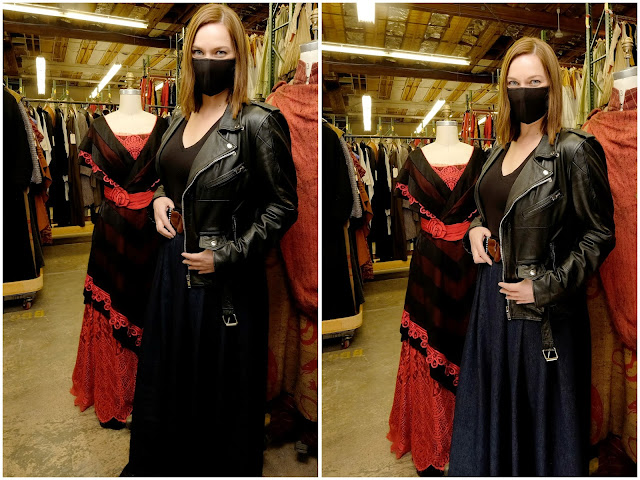
Without Floor Bounced Fill                                             With Floor Bounced Fill

The left photo in this pair* was made without the floor-bounced fill, the second after. If you look closely, you can see the additional detail in the skirt in the right hand photo, along with increased detail in the chrome buckle and additional highlights on my subject's jacket. It may be difficult to see, but trust me, the level of shadow detail is greatly increased. For the most part, there are no obvious traces of that second fill light. However, the best is yet to come.

The floor bounce provides a large lighting surface that is large and not particularly bright. It is strong enough to provide a highlight on any curved reflective surface, including the jacket buckle and my subject's eyes. It's not an intense highlight, but it is bright enough to add some sparkle to the iris.

I showed the the final image to several friends and they all commented on how pretty my subject's eyes were. That second highlight, created by the floor-bounced fill, add something very subtle, but very complimentary.

*For comparison, both images were copied onto a single blank file in Elements and all of the layers flattened. This ensured the any exposure (Levels Command) adjustments would be applied equally to both images. 

Sunday, November 1, 2020

Primer On Manually Focusing Non- Fuji Lenses

For a compilation of the morning walk images, click here.
From the start, my manual focusing experience has been limited to the X-E Bodies (1 and 2) and the X-Pro Bodies (1 and 2). For right now, I'm reserving my X-T bodies for Auto-Focus Zoom Lens applications, and keeping manual focus exploration restricted to recreational shooting.

Before you begin shooting, adjust your camera body to the following settings:
  • Set Body To Shoot Without Lens: Using your menu, be sure that the Shoot Without Lens function is set to "On". I found this option a little harder to find in the X-Pro2 menu structure.
  • Set Exposure Control to Aperture Priority: This is done by rotating the shutter speed dial to the "A" setting. Exposure will be based on the light passing through the shooting aperture you select.
  • Set Focus Mode To Manual: The switch is located at the front of the camera body. This will activate Focus Peaking and viewfinder magnification.
Camera Body Layout: So far as ease of use is concerned, the X-Pro bodies I've used have a slight advantage over the E-series bodies. Simply put, the big difference I've experienced is the placement of the Preview Button.

X-E body (above left) and X-Pro2 body (above right).  Red Arrows show Playback Button.

On the X-Pro bodies, the placement of the Playback Button (red arrows) is on the right side of the LCD Monitor, and can be accessed easily with the right thumb. It is much easier to review your images with the X-Pro body when you hold the camera with your left hand.


Magnified Viewing and Manual Focus Assist Modes: Pressing the center of the Command Dial (blue arrow) magnifies the view in the electronic viewfinder or on the LCD Monitor display. Once in the magnified view mode, rotating the Command Dial will toggle between 4X and 6X magnification. This is extremely useful for establishing critical focus. 

A single, prolonged press on the Command Wheel allows you to select the desired Manual Focus Assist Mode (Standard, Focus Peaking, or Digital Split Image when available)

Focus Frame Selection: Digital SLR cameras have always had multiple focusing frames, a real boon to photographers when their compositions emphasized regions not in the center of the frame. This valuable feature, as applied to the Fuji camera bodies, can be extremely helpful when focusing manually. Check your instruction manual for the section that covers Focus Frame Selection.

Old School/New School: Old school photographers would insist that the focus point (small brackets indicating where focus is determined) be positioned in the center of the screen. It also coincided with the location of the whatever optical focusing aids (either micro prism or a split image rangefinder) built into a film-fueled SLR camera body. Photographers were forced to compose the frame with the main subject  (I'll call it the Focal Point) in the center, focus on the subject, then re-compose the image to reflect the intended layout. This focus-reframe-shoot sequence was how things were done in the film days, and many photographers, myself included, continued the practice into the auto-focusing, digital era. 

I've placed a Fuji X-Pro1 on a tripod to help illustrate the steps I take when focusing manually. behind it, a second camera, focused on the LCD, was used to simulate what the photographer would actually see. A quick apology for the poor quality of the images, since the difficulty associated with photographing the display of a digital camera using another digital camera should not be underestimated.


Compose The Image: Using the viewfinder, I'll do the forward/backward, left/right, and up/down positioning dance until I get the desired composition. The red arrow shows the default position in the center of the viewfinder.  


Position The Focus Frame: The focal point will probably not be perfectly centered if you're following the guidelines suggested by the Rule Of Thirds. Using your four selector buttons, position the Focus Frame over your point of focus, and tap the shutter release button to lock the position in place. Hitting the "OK" button will return the Focus Frame to the center. Check your manual to see how this is done. BTW: The Focus Frame turns green when you're in the re-position mode.


Magnify The Viewing Image: Press the Command Dial to enlarge the viewfinder image, then rotate the command dial to choose either the 4X or 6X magnification options. Fuji cameras with eye-level viewing options allow you to use your forehead for additional support while focusing. The sample shown here is 4X.

Focus The Lens, And Shoot: Since your composition has already been established, you're free to focus on your subject with the knowledge that when you make your exposure, critical focus and the desired framing will have already been established. I suggest that you experiment with both the Standard and the Focus Peaking modes to see which you prefer.
I also suggest that you focus both in front of, and behind, your desired point of focus, as you really need to see how the camera's display, viewfinder or rear LCD, renders critical focus. When you're happy with what you see, press the shutter release, and your shot is made.

Review The Image: The coolest part of this whole process is that when you magnify the image in the Review mode, it zooms in on the position where the focus frame was at the moment the image is made. You'll have to try this out for yourself.

This sounds like a lot of work, and if you've never used a film camera without auto-focus, you may be asking yourself why one would even bother. Truth is, now that I must focus manually, I tend to think more about the technical aspects of the photo, and have a greater sense of accomplishment when everything, the exposure, the composition, and the shutter release, all work together. I definite believe the quality of my images has improved significantly, and this should always be a personal goal no matter what the endeavor.