Sunday, September 29, 2013

"Be Respectful Of Our Clients"


Photo #1
My Father gave me some important advise: Never photography anyone who doesn't want his picture taken. It certainly made a lot of sense then, and even more so now, with everyone poised to sue everyone else on the grounds of "evasion of privacy". Then again, the subject might be "on the lamb", as they use to say, and therefore very reluctant to be photographed. In the digital age, that photo of you scratching the nether regions has the potential of being seen by anyone with a computer and an Internet connection.

As a community photographer I usually work with "happy" people, since they are usually in environments of their choosing. And since this is not hard news, I can influence  the environment, as I can actually speak with my subjects and let them know exactly why the photo is being taken. Including the subject's name at publication makes it more difficult to prove the photo was made without implied consent, should the issue ever come up.

Options For Anonymity:  In past assignments, I've dealt with the privacy issue in a number of ways.


Example A
In Example A, the photo was made in a daycare facility located in the Redwood City courthouse. These children might be involved in custody disputes or restraining orders, so anonymity was very much a safety issue. By photographing down and directing the child to look at the lower edge of the computer screen, I was able to hide her face with her hair. I was very lucky to get this shot because the girl was actually the daughter of one of the teachers and she fully supported the project. Since this was to be an editorial photo, the resulting image only needed to be an accurate depiction of the facility. From the standpoint of composition, the adult teacher's gaze draws the viewer away from the child. The final shot made the ambiance of the facility the real subject.


Example B
When necessary, you can make the photo from behind, as I did in Example B. In order for the photo to work, you would need to concentrate on getting an expression that carries the story. In this case, the hosting location was adamant that no actual clients be photographed, insisting that I use one of the facility's secretaries as a stand in. To get this expression, I encouraged the two to talk until they found something of mutual interest. I was pleased with the result, and as in Example A, the expression,the direction of the gaze, and the hand gesture helped pull the image together, giving enough detail to allow the viewer to correctly interpret what is happening.

Example C
Example C uses a slightly different approach. in this case, I stepped back and used a longer focal length on my lens along with a wide aperture so that the shallow depth of field would blur the foreground subject. In this case, both subjects appeared to be looking at the document in the foreground, giving the impression of serious concentration on the task at hand.  Incidentally, I spoke with the woman, and she was very cooperative. I believe I actually used her name, but in this shot she could have easily been anonymous.

Showing Up: This assignment was at Society of Saint Vincent de Paul, at an outreach facility for homeless people. On this day, pharmacists from Walgreen's, a local drugstore, were giving free flu shots to SVdP clients. I was asked by the Journal to bring back a photo. The Society was both anxious for the publicity and mindful of the need to "be respectful of our clients", which was a nice way of saying, "No faces, please".

I arrived on time, but could only find a parking space with a 24-minute meter. I figured this was as much time as I would need, if everything went well. When I entered the vaccination room, I saw that the line of clients waiting for their shots extended outside of the back door and around the corner into the parking lot. With a pharmacists giving injections at a rate of one per minute, there would be no time for pleasantries.

Nightmare Lighting: I had already decided that using a flash would have made my presence too obvious. The available light was lousy, and there wasn't much of it. The fluorescent lighting coming from the ceiling mixed with some natural light coming from windows at camera left. These two sources, plus color contamination from the beige walls, made for an ugly mix. My one lucky break was the the window light was the dominant light source, so at least my photo wouldn't be too flat. In desperation, I did something I seldom do: I went to Auto White Balance because no matter which preset I chose, the colors would be off. Tweak 'em in post, and hope for the best. Exposure was equally laissez faire: Aperture Priority, F 2.8, ISO 1600.

Showtime: I did introduce myself to the pharmacist, Sharon, letting her know that I was photographing for the paper. I immediately smiled at the patient, stating that I was only interest in his arm and Sharon giving the shot. He smiled back, perhaps relieved that he would be anonymous in the final photo. My lens was a 24-70 2.8 set to 24mm, and even at the widest setting, I had to move as far from my subjects as the cramped quarters would allow. No time to switch lenses. I positioned myself so the the client was not easily recognized and made five quick exposures, plus on of the name tag for future reference.

Photo #2
You can see in the composite (Photo #2) that the images are very similar. I opted for the fourth because the syringe is slightly more visible. The sixth photo was a quick identification shot. All six were made in about one minute. A quick preview of the take showed that there was a "keeper", so I packed up my gear and left. The final shot, Photo #1, appears at the top of the page.

When I got to my car, there was still time on the meter. And the photo ran the day after I submitted it.

Imagine that.
Sunday, September 22, 2013

The Greeting Card On Top Of The Freezer

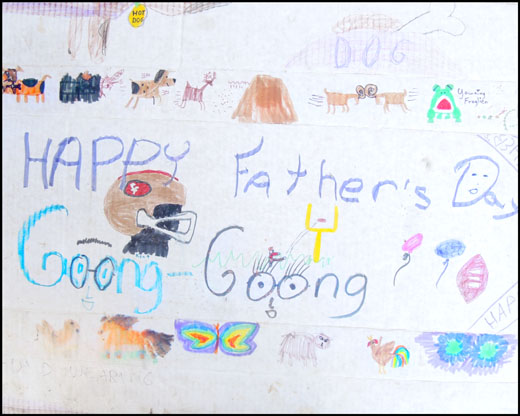
In spite of everything, you can't always tweak an image to match what you originally visualized. This shot, taken with a point and shoot camera, was meant only as a record of a precious moment in time, when two grandchildren put into pictures the love they felt for their grandfather.

I am beginning the "dig out" from under an accumulation of the by-products of the my parent's lives. Now, as I start to accept, but never embrace, my life as an adult orphan, I must let go of the things that may have been meaningful to them, but perhaps not to me. I will try to place these items in appreciative homes, just as my parents would have wished.

However, with the sublime comes the ridiculous in the form of a chest freezer that has not been plugged in for over twenty years. After some thoughtful planning I was able to move it with a crowbar and some furniture "skids", pushing it through the garage and onto the driveway for its eventual removal. But when the top was cleared of assorted "stuff", I noticed that my mother covered it with some cardboard my niece and nephew used to make a "bigger than life" Father's Day card for "Goong-Goong", the phonetic spelling of the Cantonese word for "Grandfather". I thought about removing it from the freezer and keeping it, but decided that it was only the embodiment of a concept, the medium used by two children to show their love in the best way they knew. I know that my father saw it, allowing that love to flow from their two little hearts directly into his. It was a precious gift, one that he would carry forever.

As children or as adults, we can never fully understand how important these gifts of love can be, or how long they will be cherished. Better than books, better than videos, my niece and nephew did far more than their young selves could understand, but after all these years, they will surely understand now.

Perhaps I shall use the "Yawning Froglien" as my personal avatar. That seems fitting and proper.

Sunday, September 15, 2013

Starter Camera - The Nikon D70

From DPreview: Click here to read full evaluation
Last week I was asked for my opinion about a starter camera. I had been discussing some of the lighting techniques I use in the field, and had spurred some interest in exploring some of these lighting techniques, including using an off-camera flash. My new friend was leaning towards a Canon G15, the latest iteration in a long line of sophisticated point-and-shoot cameras. His reasoning was sound, since the camera combines high performance, good pixel count, and high-definition video.

My response probably won't surprise anybody who has followed this blog for any length of time. I told him that the small size of the G15 and the small flash control feature set were a handicap. My qualified choice is the Nikon D70 or D70s, a ten-year old camera with a solid reputation for value and performance. I own more than a handful, and use them constantly when experimenting with new lighting arrangements. It is also my "fun" camera, and when coupled with three lenses (10-24 Tamron, 24-70 2.8 Tamron, and a 70-300 Nikkor) and a flash (Nikon SB-800), it's at the center of my kit when I'm shooting for my own pleasure.


Click here to read the full article
David Hobby also believes that the D70s (an improved D70) makes a good, fully functional starter camera. Since his article was written, D70/70s bodies have dropped in price, and to some extent, serviceability. I add this last caveat because any specimen you're likely to find for sale will have been used that much longer, or may have been subjected to longer periods of user abuse.

I'm sure my recommendation could be easily dismissed on a number of levels. However, there are some features that set the D70 apart the other DSLR cameras that you might be considering. So before you consider purchasing one, you had better review these pros and cons, based only on features.

Here are some reasons why you should own a D70/70s.
  • Size and weight: The camera with its plastic construction makes the camera easy to hold and use. I find the ergonomics very accommodating, although photographers with really large hands might not agree with me. It suffices to say that I don't remember ever making a accident change in settings because a control button was pushed accidentally.
  • Compatibility with  AF lenses: New entry level Nikon DLSR require AF-S lenses which have the focusing motor built into each lens. The D70 has its focusing motor built into the body, so it can work with the older AF and the newer AF-S lenses.
  • 1/500 Flash Synchronization: The 1/500 flash synchronization is a big plus when using flash outdoors, and is top on my list for useful features. This gives the user some flexibility to work with flash outdoors.
  • Pop-up Speedlight Commander:The pop up speedlight can be used to control a iTTL enabled off-camera speedlight. Users are limited to a single channel (A) and a single group (3). This is somewhat limiting, but when you're starting out, you may only have one off-camera speedlight to control. Not the 2 group, 3 channel capacity of the more expensive DSLR, but a good place to start.One thing: the D70's built-in serves only a commander and does not (normally) contribute to the exposure. When shooting up close, the built-in can add to the exposure, making for some lighting irregularities. When working close, you might want to use a Nikon SG-3IR IR Panel.

  • Twin Command Dials: For those wanting full control over the aperture and the shutter speed, the D70 (normally) uses the front command dial for the aperture and the rear (main) command dial controls the shutter.
From DPreiew.
  • Topside Control Panel: Entry level Nikon use the rear LCD panel both for view previews and as the Control Panel when making adjustments. I find this a bit clumsy, since you cannot simultaneously view the image and the camera settings in these newer cameras. The placement of the Metering Mode button and the Exposure Compensation button makes them easy to reach with the index finger while your thumb uses the Main Command Dial to make adjustments. I find this a very logical layout, and this is the main reason I went with Nikon and passed up Canon and the then-new Sony.
  • Focus Selector Lock button: When using the Single Servo Focusing Mode and the Auto Focus Area Mode, the focus selector lock button allow you to select which focusing brackets you prefer and lock them in place. This prevents accidentally choosing the wrong focusing brackets by accidentally pressing the Multi-Selector. Because the D70/D70s only has 5 focusing brackets, I find it more reliable to lock my focus by depressing the shutter release, and shoot.
  • CF Cards: Compact Flash cards are larger and a tiny bit more fragile than the SD card, but D70/70s users could use higher capacity cards, while the D70's contemporaries that utilized SD cards were limited to 2 Gigs. 
Now for the Cons:
  • Blinking Green Light of Death: Early D70s can succumb to the Blinking Green Light of Death (BGLOD). Nikon did not do a recall on all D70s since the problem only occurred in early production cameras and was traced to a circuit board that was subcontracted out. I had two cameras succumb to the BGLOD, and sent them to Nikon. One was repaired, free of charge, and the other wasn't.
  • Required Firmware Upgrade: You may encounter a D70 that needs a firmware update. Improvements became available after the initial release, and the firmware upgrade brings the D70 performance closer to that of the later D70s. The update is a little scary to do, but read the instructions and follow them exactly. You and your camera will survive. 
  • 6 Megapixels: One last con, but a small one. The D70 is a 6 megapixel camera, producing an image that is 3000 x 2000 pixels. For images 8x12 or small, this is entirely adequate, so long as you avoid cropping and compose carefully. 
  • Ridden Hard: I purchased an eBay special that appeared pristine. When I ran it through Opanda, I found that this D70s had been used, and used hard. I was fooled because the outside didn't match the inside. Unfortunately, it died, and I never bothered to have it repaired.
  •  Put Away Wet: The cameras are getting old. Improper storage can encourage corrosion. I have on body that has a spot of corrosion on a non-contact area of the lens mount. In this particular body, everything else works fine. 
Buying Used: Obviously, any D70/70s you purchase will be used, and as I said, sometime used hard. It is not impossible for someone to purchase one, and have it die almost immediately, expecially if you buy on eBay. I'm sure that most dealers try to describe the merchandise accurately, but there is still the element of risk when buying anything online. I suggest that you purchase from a local dealer who will give some sort of return policy. Buy it, use it, and see if anything "strange" happens during your test drive. After you're satisfied that the camera is performing satisfactorily, get the sensor cleaned.

I know that buying used equipment may not be something you would care to do. But a good D70/70s body will give you a camera that allows the user to manually select a wide variety of settings to encourage experimentation, while retaining an "Auto" setting and several specific shooting modes to help you get the ball rolling. And with asking prices in the $100-$150 range, they are hard to resist.

Sunday, September 8, 2013

Up Close (And Personal) Photography


Photo #1

In many situations, you'll need to work up close and fast. This is particularly true when grabbing a quick shot at an event where you know you won't have much time.


The reception was for the 50th Anniversary of the Sister City relationship between San Mateo, California and Toyonaka, Japan. San Mateo Mayor David Lim was hosting a dinner and reception for Toyonaka's  Mayor Keiichiro Asari and his entourage. I suspected that the Mayor's office would go to great lengths to entertain our Japanese visitor, and was sure the dinner would include entertainment by local community dance groups. I felt that had I stayed past the initial reception, it might have been seen as rude and pushy, so I was determined to insert myself into position, get my shot, and quietly leave. 

I normally keep my equipment cased until I arrive on location. As soon as the cameras are out, I made a quick sketch shot to determine my base settings. My goal was to underexpose the ambient light by one to two stops. I usually start start at ISO 800, 1/100 of a second, and F 4.0, set manually. From this base exposure, I could quickly adjust my exposure up or down to get a baseline I would be happy with. This was done without flash initially. When the flash is added to the hot shoe, it set to TTL mode, plus 1/3 or 2/3 of a stop, depending on the conditions.

For Shot #1, I changed my settings to 1/50 at 4.5, keeping the ISO at 800. The background was suitably underexposed, and the shoe-mounted SB-800, aimed at the wall behind me, gave a proper exposure. I was a little surprised by the lack of depth of field, as I was using a 11-16 Tokina set to F 4.5 at 16mm. I could have doubled my ISO setting and stopped the lens down an additional stop, but I prefer to keep the ISO settings as low as possible. Since it was a test shot, the mystery arm on the right wasn't an issue. All I really wanted was an engaged expression on the young woman in the black and white kimono.

Photo #2
Photo #2 was a quick "turn around" shot made minutes before Shot #1.The shot was made with a Black Foamie Thing on a forward-facing speedlight, and I did it mainly to see what my effective range was in the event I needed to make a distance shot. This was done with a 24-70 lens set to 52mm. The aperture was set to 4.5, just like the first shot.


Photo #3
Sometimes I'll resort to photographing something totally unrelated to the assignment, just to look "busy". Photo #3 is just such an example. The White Balance setting was had been set to "flash" despite the beige-colored walls. Color correction in post production was still an option, but it the shot was published on newsprint, the possible tint would be barely noticeable.

Looking For Help. I had been wandering around for almost 30 minutes, waiting for what I assumed would be the Mayor's grand entrance. I was worried that I had missed him. Just then, I spotted a rather ordinary looking man walking about, carrying something I should have looked for earlier: a clipboard. Here was somebody who obviously held a position of responsibility, so I introduced myself and sheepishly asked if he knew when the Mayor might be arriving. He paused a moment, looked around, and said, "He's standing right over there". I then realized I had walked passed in several times, but never took the time to read the name cards.


Photo #4
I went over and introduced myself, fully aware that he probably couldn't understand a word I was saying. I did point to my camera, and motioned that I would like to make a photograph of him. I motioned to his friends that they would be included if they would all move closer together, which they did. I made two quick shots, making sure that there were not blinkers. The result was Photo #4. If all else failed, I had a shot, albeit a marginal one.
Composite #1
Getting Names Fast! Before anyone had a chance to leave, I pointed to their name badges, then pointed to my camera, so they would understand that I was photographing their badges so I could get their names. Composite #1 is a collection of the five badges, photographed so quickly that the speedlight didn't have a chance to fully re-charge. But the names are legible even with an exposure adjustment in post processing. The sixth badge was worn by the interpreter.


Photo #5
A few minutes later, I found Mayor Asari talking to San Mateo Mayor David Lim (left) and Vice Mayor Robert Ross (right). I explained to Mayor Lim that I wanted to make a photo  and I encouraged the three of them to continue chatting. It had just occurred to me that there was an interpreter nearby, helping Mayor Asari navigate through the evening. I don't know what she said to Mayor Asari but I'm sure he understood, and Photo #5, while not Pulitzer material, shows all three men looking far more relaxed than those in my earlier photo.

The shot was made in very tight quarters. The lens was set to a focal length of 11mm, as wide as it would go. Mayor Lim is getting some "stretch", but not too noticeable. The super-wide Tokina is my go-to lens whenever I work indoors, and it has saved me more times than I care to remember. In this case it was just too crowded to back up, so when I say "close and personal", I really mean it here.
 

San Mateo Daily Journal, Monday August 19, 2013. Page 1.
Jason Mai. There was a baseball game between Little League teams from the two cities, and photographer Jason Mai from the Journal earned a "triple" with three wonderful photos from the event. These three were published in the August 19 edition of the Journal, Front Page. He really captured the spirit of the event. To view the edition in its entirety, click here. Good job, Jason!

Sunday, September 1, 2013

Menlo Charity Horse Show Part 2 (Nikon D7000)


In my last post, I had just finished shooting a "cute kids with horses" photo, and set about executing the original concept, a photo that highlighted the sponsors and planners of this charity event. I caught up with the event's publicist, and together worked out a shot that included three co-chairs, an Olympic Equestrian, and a representative from Bentley Motors, a major event donor.  It seemed logical to have a Bentley in the photo, so we chose to make it in the display area in front of the stables, which you can see in the background. Besides, convincing people to pose by a car would be easier that getting them next to a horse. We agreed that the shot would be made at exactly 3:45 and take no more than 15 minutes so that everybody would be available for the hors d'oeuvre and champagne party Bentley scheduled for 4:00 pm.

More Planning: A shot like this doesn't just happen. Since the shot would be made in broad daylight, I would need to have as much light as I could muster. Speedlights  weren't up to the task.  While three SB-800s fired at full power might be bright enough, the  ten-second recycle times would not be well received. With something of a sigh, I drove back to retrieve my "big guns", a pair of Norman 200B flashes. I normally use two in a cross-light arrangement for large groups, so I brought them both, along with two Eilenchrome Skyport radio triggers. Now I follow an old wedding photographer's maxim: Carry two of everything, just in case. So I packed two six-pound 200B battery packs, two Quantum X flash heads, and two Skyports packed in a backpack. To hold them aloft, I had a 12-foot light stand with double anchor points in case I had to mount both flash heads. With the flashes in a backpack, the light stand on my left shoulder, and my full camera kit on my right shoulder, I felt more like a pack-mule than a photographer and when I walked the 300 yards from my parking spot to the the per-determined location.

Photo #1
After catching my breath, I mounted single Quantum head with the Skyport trigger on the end of the light stand and hoisted them about twelve feet off the ground. I made a quick self portrait by simply standing next to the car and pointing the camera at my face (Photo #1). I could now adjust the aperture to get the "look" I wanted. This shot was a little over-exposed, so I adjusted my aperture down by one-third of a stop. My final settings on my D7000 were 1/200, ISO 100, F 10. The lens was my 11-16 Tokina. The D7000 tends to be the "go to" body because the resolution is higher than my D300.

Backup At The Ready: As a precaution, I took my second body, a Nikon D300, installed a 24-70mm lens, and applied the exact same exposure settings as the D7000. I did this so that if something goes wrong, I could simply pull the Skyport transmitter off the D7000 and install it on the D300 without worrying about the settings not matching.

Photo #2
In Photo #2, the image is quite acceptable. Before I started shooting, I went down my standard pre-shoot checklist with my subjects.
  • Be sure you can see the light. (If they can't see the light, their faces will be in shadow.)
  • Turn yourself so that you are facing slightly away from the camera. (This has a slimming effect which most people will appreciate.)
  • Turn at the waist towards the camera. (This slims down the waist by making the shoulders appear slightly wider)
  • Put your weight on your rear leg. (When people are turned, one leg will be closer to the camera than the other. By putting all of your weight on the rear leg, it gets "shorter", forcing the forward leg to bend slightly. This allows you to re-position the front leg to take advantage of resulting bend. Bringing the ankles together creates a smoother curve.)
On closer examination, the stables in the background appear further away than they really are. This resulted in a lot of blue sky, which might not be desirable. Cropping wouldn't help the composition because it's the shooting distance, not the lens, that determines the spacial relationship between the foreground and the background. The focal length was already at 16mm, so I didn't have any more "lens" to zoom. Here's the shot, re-cropped (Photo #3). You can see how prominent the clock tower is.


Photo #3
Border Shift: To change the foreground/background relationship, I switched out to the D300, transferred the Skyport transmitter, and quickly as far away from my subjects as was practical. I resumed shooting with the D300's lens set to 35mm, and got this shot (Photo #4).


Photo #4
The final shot made the background a bit less "busy". Because the light itself hadn't moved (it was mounted on a lightstand), I didn't need to change my exposure settings when I retreated to my new shooting position.

Light Modifiers? In this case, I used the Quantum flash heads without any light modifiers. Here are three reasons:
  • Umbrellas and softboxes could be blown over by a modest gust of wind. 
  • The flash output would have to be increased significantly, perhaps by a factor of four, or more. 
  • I would have needed a HUGE softbox or umbrella to have a noticeable improvement. 
So if you can't see an improvement, even when you're specifically looking for it, it doesn't matter.

The designated Event Photographer for the Menlo Circus Club spoke with me briefly after the shot was made. She commented that she was having a great deal of difficulty producing usable images whenever there was sunlight involved. While she had a D700, a 24-70 Nikkor and an SB-900 with a Quantum Power Pack, I explained that there simply wasn't enough power in a single SB-900 to properly fill direct sunlight. That single Norman 200B has the same power as 3 SB-900's but deploying a Norman flash takes time, effort, and thorough exposure testing, since this was a totally manual proposition. But the final result was worth the effort.

Incidentally, Photo #4 is the image my editor chose. Sorry kids.