Wednesday, December 29, 2021

Rethinking Location Lighting Part 1

After my recent experience at Bethlehem A.D. 2021, I started to re-think what I carry in my supplementary lighting bag. In the past, the speedlights, modifiers, and mounting bits and pieces were thrown into a partition-less Tenba bag, making it necessary to rummage through a jumble of lighting stuff, searching for the bits needed to assemble a proper lighting solution. Working at night with only a miner's lamp on my head doesn't make the task an easy one.

Buy your Domke bag here.
In years past I worked exclusively out of my big Domke F2 Bag where optional inserts with adjustable  dividers made it easier to store items in an upright position.  Then again, my approach to lighting consisted mainly of ceiling and wall bounce applications, and the only light modifier I carried was a Gary Fong Light Sphere. That second speedlight was just a backup

This catalog photo shows how I packed my equipment. With the partitions installed, you can see how easy it was to extract anything I needed.I would use the external pockets to hold two or more speedlights, while I kept the lenses and bodies in the padded interior. I still think the Domke is a great bag, but the weight of a full-blown system made me re-think my choosing Nikon DSLRs as my first-line, go to cameras. When I shifted to Fuji, much of the weight had been eliminated and my main carry bag got much smaller. But as my lighting solutions became more sophisticated, there were other carry issues to be addressed.

Initially, I relied heavily on the Nikon OEM CLS system, and employed the expensive (for the time) SB-800s and SB-900s for my primary flashes. When I started using Fujis, I tried to stay with the Fuji  OEM speedlights, but found them overpriced and underpowered, and I never felt that their TTL exposure metering was consistent enough for my purposes. Eventually I used my Nikon speedlights manually and relied on their native SU-4 (optical trigger) mode when multiple speedlights were needed.

Radio Triggered Flashes: As my conversion to Fuji is pretty much complete, I started to think about how much of my old equipment could be re-purposed to a mirrorless lifestyle.  The aforementioned Tenba bag has been my constant, though disorganized, companion for several years, having served as my primary Nikon camera bag in my pre-Domke years. In my re-imagination of the ultimate bag, organization of my speedlights was first in mind. I took an insert from a Think Tank Change Up camera pack, added some additional padded partitions, and voilĂ , my speedlights were now neatly arranged and easily accessible. And should I return to the Nikon world, the partitions will accommodate SB-800 and SB-900 speedlights without any additional adjustment.  
"Flash A" with settings taped in place.
Currently, four now-discontinued first generation Adorama / Godox Li-On Zoom speedlights replaced the Nikon SB-800s. Their primary claim to fame was that one could assemble an on-camera, radio triggered and adjusted lighting system that could be used on any platform that employed a conventional hot shoe. If you look closely, you can see that the flash "foot" has only a center contact. This allows the controller to ignore all proprietary electrical contacts, making it a pretty universal setup. I programmed the 4 flashes into four different letter groups, Each has its group letter written on a piece of tape. In addition, they have their settings taped in place so they can't be accidentally changed. Also, once a flash is used, I return it with the hot shoe down to remind me that the batteries may be partially depleted. If you look closely, you can see that I've added a 2 gig Compact Flash card and an 8 gig SD card to the slots in the insert. I chose a small CF card because I have several older DSLRs that can't use a larger card. You never know when an assignment demands the unique talents of an aging Fuji S2 Pro, my first 12 Megapixel camera.

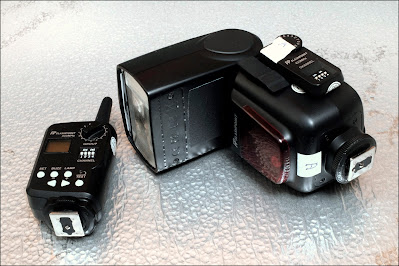
Dedicated Radio Flash Triggers: The Flash Point Radio Transmitter (to the left of the flash) will ride in the mesh compartment in the Tenba's lid. By keeping them above the other equipment, I can minimize any possible damage to their antennas. I normally carry three transmitters but load batteries in only one. I'll load a second if I need to use a second camera.

Buy yours here.
Batteries: The batteries were my next concern. Because of their density, they could potentially damage fragile electronic equipment if allowed to crash about. This battery carrier from The Container Store gives me space for some AA and AAA batteries, two lithium-ion batteries for the Flash Points, plus some other odds and ends. There's plenty of additional room for spare batteries for my Godox V1, my Fuji X-100s, and my other Fuji bodies. It also holds two spare plug-in receiver modules for the Flash Point flashes.

For the moment, this little box currently holds all of the loose "heavies" that I brought with me on my last assignment, and the contents could be easily changed if the situation warrants. Spare camera batteries are usually kept in the camera bag and not the flash bag, but misfortunes arrive when it's least expected. It's comforting to know that I have spares in two different places.


So far, everything I've listed in this post has been neatly stowed away. As you can see, there's still plenty of space in the area beside the speedlight cluster and the battery box. And I still have the three outside pockets to fill.

I think I'm on to something. In my next post I'll add more goodies.

Wednesday, December 22, 2021

Bethlehem A.D. 2021

Manual exposure settings: 1/125 second, F 5.6, ISO 3200. Flash with CTO gel. WB Cloudy.

Bethlehem A.D. 2021 is an annual event sponsored by the Rise City Church in Redwood City. It was postponed last year because of the pandemic, but it's back again, sure and strong. Volunteers to to great lengths to recreate the look and feel of Bethlehem as it would have been at the first Christmas. I've been photographing the event since 2013, usually during the first night of this three-evening event. I chose to photograph the event during the dress rehearsal for several reasons. First, I'd be working alone, so the light stand I used to improve the lighting would be a real tripping hazard should the public was about. Second, I can easily direct my subjects when necessary. And finally, the evening of the rehearsal was going to be "dry", as rain was forecast for all three nights of the actual event.

This pair of shot were made at the same exposure. The left shot was done with only the ambient light, while the right shot with a CTO gelled Speedlight mounted on a 12' light stand, a necessary application since they are actually standing on a platform six feet off the ground. A Stofen-type diffusion dome was installed on a Flashpoint radio-controlled manual flash. In addition to the key light, an accent light was placed behind the center angel facing skyward. The light spill helped to add some "kick" to the outstretched sleeves of the center angel.

The camera was my Fuji X-T2 with the 16-55 F 2.8 lens set to 16mm. The vertical poles on the sides formed a frame to support incandescent lights on the left and right sides. The staging area wasn't as deep as one might have wished, so i positioned my subjects so the frame could be cropped out. In addition, I positioned the angels fore and aft so they would appear similar in height.

This tableau faced directly on Middlefield Road, one of Redwood City's main drags. Its prominent location encouraged the stage managers to pull out all the special effects stops, so both a fog machine and a spark generator were used to bring drama to the performance.  While the different effects were tested, I had a chance to see how they would affect the photograph, so there were lots and lots of sketch photos were made before the final shot. When the fog machine was at full power, my angels were completely hidden, forcing me to wait until most of the fog had dissipated. 

Next, the spark machine was fired up, and while the effect can be dramatic, it loses a lot in the translation. The perspective created by the subject position and the wide angle lens Here, the three angels were lost it the fog while sparks flew skyward from behind. There just weren't enough sparks to add substantively to the background, so I decided that the final shot would be a "fog only" proposition.

In this shot (right), you can see the sparks set against a completely black background. There really weren't enough sparks to fill the background, and frankly the sparks that were produced look a little lonely out there. 

I feel I need to make a final point about the lighting. The diffusion dome on  the speedlight doesn't soften the light noticeably. The shot is carried by the position of the light itself. With the light stand extended to 12', the light was position slightly above my subject's eye level, since they're standing on an elevated platform. 


This shot was submitted because there was just enough fog to give the background some character while not completely obscuring my subject's faces. This is often a trial and error process because what you thought you saw in the viewfinder isn't always what shows up on the playback.  To repeat an old maxim:  Photographers build their reputations on the images they discard as well as those they choose to submit.


When the shot was in the "can", the stage crew asked if I'd make a shot of them together. Easy peasey, since the lights were still in position and the exposure dialed in. For the record, once the lighting was established and exposure set, I made my first exposure at 8:57 PM, and the last at 9:22 PM. It was a little longer than I would have wanted, but I had to work through al lot a variables, including waiting for the appearance of my third angel. But all in all, the shoot was a lot of fun.

Sunday, December 12, 2021

TTArtisan Lenses - Redux

35mm F 1.4 TTArtisan Lens. Buy yours here.
I have been using the 35mm F 1.4 TTArtisan lens for about a week now. I bought it, just as I threatened to do, because it shares the same physical layout as my first TTArtisan purchase, the 17mm 1.4. Both are bright, smooth focusing, and have half-stop clicks on the aperture ring, the 35's being quite distinct and the 17's almost imperceptible. Still, I am generally pleased with their performance, but decided that I wouldn't complete the trio by buying the 50mm F 1.2 since the control placement on my 7artisans 50mm 1.2 is very similar to the other two.

The 35 has some minor quirks. First, the half-stop clicks end at F 4.0 and thereafter click on the full stops only. Second, there is no click to identify F 11, only a red dot on the aperture ring between F 8.0 and F 16. Lastly, the distance scale is only in meters.

TTArtisan Filter Sizes, Lens Hoods: The 35mm and the 17mm both use unusually small filters, the 17 using a 40.5mm filter while the 35 a 39mm. Neither size is impossible to find, as they were both standard filter sizes for Leitz lenses. When it comes tor lens hoods, the 35mm lens isn't fussy at all, since any hood for a so-called "normal" (50mm full frame equivalent) lens will do. Finding a hood for the 17mm was a bit of a struggle, since even the so-called "wide angle" hoods introduced some vignetting (obstruction at the very corners of the frame). I settled on a Nikon HN CP17 lens hood which I just happened to have, but definitely did NOT pay full price for. A less expensive alternative would be one from a third-party maker on eBay since Nikon no longer sells this hood, as it was designed for the discontinued P7700 Point-and-Shoot.

November 20, 2021

On The Road: I've taken the lens out on three morning walks and today I came up short in the inspiration and opportunity departments. In this shot of a dustpan on the side of a garbage truck there was none of the distortion normally associated with wide angle lenses when used at short working distances. I find this image relaxing to look at, maybe because the two dimensional nature of the scene doesn't challenge my notions of perspective, since there is no foreground or background.

One final note: Another reason I won't be buying a TTArtisans 50mm F 1.4 lens is its 52mm filter threads, while the 7Artisans is already threaded for 49mm.  I purchased step-up adapters for so I can use a 49mm polarizer on all of my manual lenses. Just in case. Incidentally, 49mm is the native filter size for the Fuji X100 and X70 cameras.

November 20, 2021

Entomologists Of The World Rejoice! I didn't realize that there was so much merchandise with this proclamation. Sweat shirts, T-Shirts, and windshield decals were easily found. Again, the longer subject-to-camera distance made this image easy to mentally process because of the gradual perspective transition from right (near) to left (far). 

November 21, 2021

This last photo is the only in-camera monochrome image that I actually like. By using the 35mm lens, I was able to include more of the shaded mountainside and less of the sky in the background. 

Thinking Wide: While I doubt that I'll be carrying both lenses tomorrow, this exercise did clarify the importance of the background, and how much it can add to. or detract from, the photo, taken as a whole. In this photo (right), I was able to use the blue sky and fluffy clouds to my advantage. In and of themselves, the sky background doesn't add anything to the photo, but it doesn't take anything away either. It allowed me to separate my dancing subjects from their surroundings. A wide angle lens, used at a low angle, and a short shooting distance helped to make this a real money shot. But had I used that same lens on my tree, the background would have been an uneven merger of blue sky and mountain shadow, thus introducing a possible distraction for the viewer.

I believe I'll be content to consider my collection of manual focus Fuji-compatible lenses complete. I have several adapters to allow me to use both NIkkor and Takumar lenses, should I need something a little longer. A collection of manual focusing prime lenses takes up less space that my "business" cameras, and if I ever take a road trip again, this retro-kit of a body and a couple of lenses would suit me fine.

Sunday, December 5, 2021

Fuji X100S, FlashQ Flash

1/1000 second, F 4.0, ISO 200

Taking A Break: I felt I deserved a break from manual focusing, and went in a totally different path I brought a Fuji X100S camera and a QFlash, just for fun. The Fuji's leaf shutter would allow me to use a wider variety of exposure times, but 1/1000 seems to be the minimum setting to avoid possible transmission delays when using radio flash triggers.

This particular stop sign has a makeshift blinder installed on the side to prevent drivers from a side street from misinterpreting its intended audience. I used the QFlash to help me maintain the dark sky while improving the color saturation in the sign. I  held it as high overhead as I could in an effort to even the top to bottom exposure. It worked reasonably well, and the "hot spots" aren't too distracting.


In this shot, the early morning sunlight created a highlight on my subject's left. All Minions look the same to me. The radio trigger feature allowed me to position the flash high overhead, as you can see by the shadow cast by the goggles.

1/1000 second, F 5.6, ISO 200 with flash

In this test shot, I  set the camera's exposure manually to darken the sky. I mounted the flash on the camera's hot shoe, set it to full power, and fired away. Before the flash could fully recycle, I made a second exposure to compare a "with flash" exposure with a "no flash" one. The camera to subject distance was about seven feet.

1/1000 second, F 5.6, ISO 200 without flash
When compared to the "no flash" version on the right, you can see that the little flash can really make a difference at close range. Based on this subjective, non-scientific evaluation, I estimate the outdoor guide number at full power to be about 40 at ISO 200. This is at odds with the factory Guide Number of 91, adjusted by a factor of 1.4 to accommodate the higher ISO of 200.

Guide Numbers Are Just Guides: If your wondering about the discrepancy, it's because factory guide numbers assume that the flash will be fired indoors, and that some of the light reflected from the walls and the ceiling will contribute to the total illumination on the subject. In the absence of reflectors, much more light is just lost, and the Guide Number will drop accordingly.

A leaf-shuttered camera and a small flash. Don't leave home without them.

Sunday, November 28, 2021

Thanksgiving In San Mateo


Providing meals to help less fortunate families celebrate Thanksgiving has become more important for a number of reasons. The economy has put a major strain on many families, and Covid precautions limits access to friends and families. No matter the reason, Samaritan House in San Mateo has been preparing meals and distributing them to all, free of charge.

As we emerge from the restrictions of total lockdown, there have been an increase in the number of events I've been asked to cover. Up until now, nearly all involved single subjects in easily controlled environments. This time, it's back to the "run and gun" events that involve lots of people and lots of action. I'm ashamed to admit that I need to start paying more attention to my equipment preparation, as on a recent assignment I lost the use of my spare Fuji body when I forgot to load a fresh battery in my primary camera  and needed to make a swap midway through the assignment. I've learned from my mistake, and both cameras had fully charged batteries and formatted cards.  Spare batteries were now safely stowed away, and my flash was fully charged.

I learned a clever procedure for getting permission to photograph meal recipients. Before any car, bicycle, or person entered the meal queue, they were interviewed by volunteers, asking is they could be photographed, or if they could be photographed and interviewed by the media. If they answered "yes" to the first question, a piece of orange tape was placed on the car's windshield. If the answer was "yes" to the second, two pieces were attached. Once permission was established, a number of consenting recipients were both interviewed and videoed for other news outlets. 

As is my practice, I avoid photographing the recipients altogether and instead concentrate on the volunteers who make the events possible. I also try in include any location identifiers, participant logos, and other visuals that add to the context. The submitted shot (top of post) has white food bags, masked volunteers, touchless loading to show Covid compliance, and if you look carefully, the logo of Samaritan House on the sign held by the woman in the background. There is one nit worth picking - You cannot tell of the young man is putting things in the trunk, or taking things out. Other than that, the photo supports the short caption that will be sent with the photo.

This photo (left) wasn't seriously considered, but illustrates an important point. My subject's hand placement sends a message of "Oh my goodness", or "Are those magic carrots?" Had I made the photo just a few seconds before, I might have had a shot of her placing the produce on the top of the pile. Unfortunately, burst shooting isn't an option when flash is used to supplement the existing lighting, so timing is all important.

If I were rating the photo on information points, it literally shouts "food", but fails to express anything else. I really liked the way the light was filtered through the rear window, and the way the carrots were exposed, but beyond that, it fails to win the cigar. Looking back it would have been easy to ask the volunteer to remove the carrots and place them back on the pile of groceries, but with so much going on, I thought it best to not attempt to micro-manage the shot because it would not have been significantly better than my current first choice.

I used a 10-24mm wide angle zoom for this last shot. It allowed me to move closer to my subject, a handy trick when working in crowds. The down side is the inherent altering of perspective. Here, the trunk of a hatchback appears cavernous compared to the volunteer filling it with meals. In some ways, the composition is the best of the lot, but it has fewer context points to support the story the photo was to tell. One technical point: Unless you narrow the flash's beam angle, you'll seriously overexpose objects that are closer to the flash. Using a narrower beam, the flash is confined to the center, and the light at the edges less intense. I like using a Godox V1 flash because it round reflector gives a smooth lighting transition from the center to the edge. In a pinch, you can also rotate the flash head to favor the right side of the frame, effectively reducing the light on the left. I tend to avoid using TTL flash exposure metering because I don't have a lot of confidence in the Fuji system's output accuracy. I have much more faith in the Nikon iTTL system, but the weight of the equipment forced me to seek lighter options.

I think this assignment was something of a wakeup call. For nearly two years my photography was confined to slow photos of plants and architectural details of the older homes in my neighborhood, taken with inexpensive manual focus lenses and a luxurious abundance of time. This wasn't prepared for my sudden re-emersion into the rush-rush environment of event photography where  nothing stops just because I'm unhappy with the composition or the exposure. I feel I got lucky this time, and I will work to bringing speed back to my run-and-gun game.

Sunday, November 21, 2021

The Light Pix Q20 - A Very Tiny Flash

Buy yours here.
LightPix Labs FlashQ Q20 II. This little flash may be epic. Or maybe sonnet-like. Oh well, consider it the first line of a haiku. In short, it's small. This little flash has been around since 2017, judging from the number of YouTube posts describing it. Alas, I am a legend only in my own mind, and the influencers of uber-cool failed to send me advance notification. If they had, I would have shouted about this flash much sooner.

Am I Late To The Party? I first saw it in a post from Mattias Burling made in April 2020. (Slide forward to 5:15 to skip the unrelated filter stuff). By that time the flash was old news, but it was new news to me. 

The flash is totally manual, so it can function on almost any camera with a hot shoe*. This also means that I would have to calibrate the output using the old, tried and true system using a Guide Number to calculate the proper aperture based on the-flash-to subject distance.

Guide Numbers? Based on the manufacturer's specifications, the Guide Number for ISO 100 is 65.62 in feet, or 20 in meters. If these numbers are to be taken as accurate, it means that when set to full power and used with a flash-to-subject distance of 10 feet, the proper aperture would be half way between F 5.6 and F 8.0. I will probably experiment and establish my own preferred guide number value, based on whether the flash is be used as a primary light source, or simply as fill. I just write it on a piece of tape and attach it to the flash itself.

Using Guide Numbes: When I first learned about guide numbers in the early 70s, I was using flash bulbs (!) and a Vivitar Flash set to low power to conserve battery power. Of course these were the film days, and since the time between the initial exposure and the final print was measured in weeks, I kept notes on the camera settings in a small brown binder. This was long before digital technology allowed "in flight adjustments" to exposure and composition could be made via image preview. These were Trial and Error times, and I made plenty of both.

Now let's start thinking digital. First, let me review the five factors influence the appearance of each flash photograph you make:

  1. ISO Setting,
  2. Shutter Speed (exposure time),
  3. Aperture Setting,
  4. Output, Flash and
  5. Distance, Flash to Subject.

Once you've established a combination that gives you the images that you like, write the details on a piece of tape and stick it to the flash. You'll find it much easier to set the camera and flash (Settings #1 through #4) and walk back and forth until you achieve Setting #5. Practice estimating a specific distance (I was good at estimating 7') and try to do most of you shooting at that distance.

Foot in the Remote Mode
Built In LED Movie Light: I may as well mention that it has a continuous LED video light, a feature I personally find incredibly annoying. Similar units seem to make the switch from flash to video light at the drop of a hat, and they'll drop the hat themselves. Let's just say that both flash and LED are controlled by pressing the (left arrow) and (right arrow) buttons, to decrease and increase the output, respectively. A line of tiny LEDs will light up to let you know the level of output for either mode.

Optical Remote Mode: An additional surprise is the inclusion of an optical remote mode. Simply put, it allows the flash to fire when it detects another nearby flash. In the Nikon world, it's called SU-4 mode. It also has an S2 mode, which allows the flash to fire on the second burst of light, thus ignoring the pre-flash associated with TTL flash metering.

Remote Mode: Now here's the magic. The foot of the flash is detachable by pressing a button. Once separated, the foot becomes a radio controller for the flash. It not only serves as a trigger but also allows for output adjustment using the two tiny buttons on the the foot. If you look closely, you can see them on the detached foot in the photo at the left.

To use the flash in the Remote Mode, you simply depress the large button above the foot and separate the two units. Then press and hold the Power On button located at the front of the foot until the LED lights up. According to the manual, this powers the foot for about three minutes, after which time it shuts itself off to conserve power. They thoughtfully provided a low-power warning light visible on power-up.

Pig-Tailed Charging Cable. Notice the  orange charge-status LED.
Power: Speaking of power, the flash itself uses two AA batteries, while the foot has a small built-in battery that you charge using a USB cable connected to your charger or laptop. The flash comes with a pig-tailed USB charging cable with two connectors so you could charge both the flash and the foot from a single charger if you are using rechargeable AA batteries. Being small, I of course misplaced the cable. No matter, I can use any of my existing USB chargers anyway.

Remote Mounting: When the Foot/Remote is removed, you can see that a 1/4 x 20 socket has been provided on the flash bottom to facilitate mounting on an equally tiny mounting gizmo like a Lilliputian Justin Clamp. In reality, a wad of chewing gum will hold the flash anywhere. No, it won't , but you might be able to use a ball bungie to lash the unit to a tree branch if that's the effect you're looking for.

Gels: And it that isn't cute enough for you, it also ships with a set of tiny gels that slide into a slot in the flashtube's clear faceplate. I haven't actually used them in the field, but have already misplaced them several times. They are just that small.

Bounce card (a white business card) pinched in place by the rotating flash head.

Improvised Bounce Card: One additional feature is the tilting flash head. The bad news is it lacks a bounce card, something most current flashes with a tilting head provide. Just a reminder about using the bounce card: In and of itself, it only provides some additional light into your subject's eyes when you're bouncing your flash off of the ceiling. Used by itself, light bounced off of the card isn't enough to properly expose a subject unless you're very close and using a very high ISO.  

Card inserted at an angle for effect
If you find yourself needing a bounce card, you can simply rotate the flash head to one click short of 90 degrees up. You'll notice a gap between the head and the main body of the flash. Simply slip a standard-sized white business card in the slot and rotate the head to the 90 degree (straight up) position. This effectively locks the card in place while clamping it in a forward leaning angle.

The good news is a standard white business card can be wedged into the narrow gap formed by the tilting head. If you use a high ISO setting, you can make some very pleasing ceiling bounce exposures. Again, determining optimal exposure is by trial and error, but when your photos start looking the way you like them, write down the settings and tape them to your flash.

Gels: A quick word on gels: The flash comes with a packet containing a red, yellow, blue, purple, and yellow gel, all the groovy colors that were so "in" with the Flower Power Generation. For the rest of us, there is also a quasi-CTO gel that is a fairly close to the standard 3200K temperature we call Incandescent. I found it worked best with a Kelvin setting of 3800K, but that could just be my old eyes. Anyway, it will get you in the ballpark so you can fine tune the color in post production.

1/1250 second, F 4.0, ISO 200, flash filling the shadows
In The Field: This photo was taken during a local Mountain Man Reenactment Event. For this shot I used a leaf-shuttered Fuji X100S. The lit shot (above) shows that this small flash can provide just enough light to balance the background blue sky with the subjects in the foreground. This can happen only if you use a camera with a leaf shutter, a necessary feature that allows you to synchronize flash at a large aperture setting. 

1/1250 second, F 4.0, ISO 200, no flash

Without the flash, you can see just how much that little flash helps. The key is the leaf shutter. The shutter speed of 1/1250 of a second allowed me to use a shooting aperture of F 4.0, large enough to actually benefit from the output of the tiny flash. Flash synchronization for most interchangeable lens digital cameras is about 1/200 of a second.

I believe that this little unit may be the ideal flash to carry on those outings when you're absolutely sure you won't need one. I consider the manual output control a plus because it forces you to bypass some of the downfalls associated with TTL flash metering. In these sample photos, the subjects are relatively small in the frame, and even Nikon's Matrix Metering may fail to figure out the proper light output. Experiment, and when you find combination that works for you, write yourself a note and tape it to the flash head.

*I have one older point and shoot, a Nikon P7000, that steadfastly refuses to work reliably with anything other than a genuine Nikon speedlight. It didn't function 100% with the FlashQ either.

Update: December 23, 3021: I had some functionality issues with the flash. It appears that the unit misbehaves when the batteries are less than fully charged. I would suggest if your unit starts to function erratically, change out the batteries!


Sunday, November 14, 2021

That Egg Shaped Lens

Get yours here.
I am sure I'll go broke buying every inexpensive manual focus lens made in China. It seems that as soon as a lens is brought to market, a number of variations appear ready to compete in both price point and performance.

Every since I started taking photos for the Journal, I've come to appreciate how useful wide angle lenses are. They allow me to work at shorter subject to camera distances when necessary, especially when working indoors. Outdoors, the wide view angle allows me to include large to huge swatches of cloud infused blue skies while reducing distracting background details.

My newest lens, a TTArtisan 17mm F 1.4, has played to good reviews on the Internet, so far as bloggers can be trusted. True, everybody is entitled to their own opinion, and there are too many bloggers ready to parrot, "Bokeh this, bokeh that, smooth focus, sharp center, nicely packaged, classy box, blah bla BLAH".

Prior to this latest purchase, my collection of manual focus wide angle (20mm or less) under $250.00 lenses included, in order of purchase:

12mm F 2.8 7artisans Lens: The first of my wide angle lenses, it produced some very acceptable images. The most compact of my four wide angles, it unfortunately utilizes a non-removable petal lens hood. You cannot attach filters unless you purchase a special filter adapter that is held in place with a setscrew. 

12mm F 2.0 Samyang Lens: This was the most expensive lens of the lot. I purchased it because it was on sale. I'm a sucker for fast lenses. It takes regular 67m filters and has a giant removable petal lens hood. However, it is smaller than the Zeiss 12mm F 2.8 I already own. It has yet to make a photo that made my eyes pop.

15mm F 4.0 Opteka Macro (close focusing) Lens: I saw a video where the unique perspective provided by a macro wide angle lens, and thought it might be interesting to try it when I found a lens at the right price. The Opteka is a corner-cutting copy of the more expensive and better made Venus Laowa tilt-shift lens of the the focal length, and sold at a fraction of t he cost. I used the Opteka once, and wasn't really impressed with its performance either as a wide angle lens or a macro lens. Big and clunky, mine has a Nikon F mount which I adapted to my Fuji X bodies. So configured, it's demeanor can only be described as "clunky". Incidentally, there apparently was a lawsuit against Opteka by the Venus people, so the lens is not readily available.

Why This Lens? Lens speed was the primary attribute. There are several of these manually focused wonders boasting 1.4 maximum apertures and better. Visually, the focusing seems to have a very precise in-focus / out-focus threshold, The focusing ring rotates smoothly, and while the knurled portion of the ring is quite narrow, the actual gripping surface of the focusing barrel is almost half the entire length of the lens. This, along with its position closest to the body, make for easy focusing, so far as finger placement is concerned. 

Speaking of finger placement, this TTArtisan lens, along with its two predecessors (35mm 
F 1.4 and the 50mm F 1.2) share a similar ring configuration: Aperture at the front, focusing at the rear. If you count the non-knurled portion of the focusing barrel, the gripping surface is extremely generous. 

Shop TTArtisan here.

If I had it to do all over again, I should have bought the trio of TTArtisan lenses and called it a day. I would have missed two of the 7Artisan lenses, the 12mm and the 25mm, whose focal lengths neatly straddle the 17mm. Still, shifting from one lens to another would be incredibly easy since control placement on the TTArtisan trio is almost identical. Also, the rotation of the aperture rings and focusing barrel are the same, too.

Observations From The Field: I have taken this lens out on two of my morning walks, and have found it very easy to focus, probably due to the F 1.4 maximum aperture. Its sharpness is more than adequate, but as you might have guessed, I have other sharper lenses to use when image sharpness is an issue. The TTArtisan lens will accept 40.5mm filters, while the 12mm F 2.8 won't accept any filters without the special adapter. Because of the design of the lens, I can't mount any of my lens hoods because their edges intrude into corners of the image space. Still, that bit of added protection provided by the filter makes me more likely to carry this lens. It's 17mm focal length, while longer than my 12mm, hasn't proven a handicap. 

When it comes to prime lenses, I prefer focal lengths that double at each step. If I chose the 12mm as my wide, I'd carry a 25 and a 50. If I chose the 17mm, the next two lenses would be the 35mm and a non-existent 70ish lens. As of now, 50-55mm are the longest focal lengths available in the inexpensive, manual focus, manual aperture lens lineup. I'll give some very serious consideration to an 80mm if and when one becomes available in a suitable price point. I might consider adding both the TTArtisan 35mm 1.4 and the 50mm 1.2 lenses for the simple reason that the focusing ring and aperture ring placement are handier than the 7Artisans lenses I already own. 

Friday, November 12, 2021

A Covid Commemoration

Photo #1
 
Photo #2
I have difficulty deciding which photo to submit for publication, especially if there are several worthy ones. This is not always the case. Often there is only one choice: the specific photo that was staged or posed specifically for the shot. Usually, it's a picket fence with my subjects wearing their best happy faces and hopefully with a prop of some kind. These shots are often the ones with the tightest restraints on shooting time, so the whole process must be wrapped up in a few minutes or less.

Before submitting the shot (or shots) to my editor, I have to consider the possibility that more than one photo will be needed to complete the story. In one case many years ago, the Journal published three photos taken at the same event. Of course, they were all of cute kids playing in a mountain of artificial snow, and I can assume there are three very happy families who now have their children immortalized in the paper's achieves. Here, during an actual event, I could make as many shots as I wished once each of the three main speakers took their place at the podium.

For the record, the photos were helped along with the help of a shoe-mounted flash. Both the camera's exposure settings and the flash output were adjusted to minimized blow out the highlights where the two light sources overlapped.

When I arrived on the set, I hadn't thought about creating a two-photo spread, which David Hobby called a "hen-egg" combination, where one photo set the context, and the second provided some additional detail. I first concentrated on getting a shot that featured my main subject, Congresswoman Jackie Speier, who was the primary speaker and the one dedicating the local memorial patterned after an installation of more than 700,000 white memorial flags artist Suzanne Brennan Firstenberg placed on the National Mall in September, one for each victim of the Covid virus.

Photo #3

In my first attempt, I got this shot that shows the flags in the background. This was the best position I could get, as an ABC News crew was position itself directly in front of the podium. While the composition combined all of the key elements, I considered it a keeper, since it had all the elements I wanted - representatives from the surrounding cities, a doctor, and a pastor from a church whose congregation suffered disproportionally from the virus. There was one drawback: Everybody was smiling. Maybe not the best impression to give the viewer. Still, it had all the visual elements I needed in a single photo, so I submitted it.

Photo #4

This second shot has a more serious quality, but I lost the view of the flags. Incidentally, these shots were made from the "Hail Mary" position, the camera being held high overhead. The rotating LCD screen made composition easy, but difficult to anticipate the "decisive moment". This was one of two photos I sent after initial five, definitely saturation bombing on my part.

Photo #5

This photo shows Pastor Paul Bains writing the name of a loved one who died from Covid on one of  the small flags. Visitors were encouraged to make a flag "their own" with a personal remembrance. This photo was also summitted.

Photo #6

Before the ceremony, I made this wide-angle shot to show give the view a sense for how many people had succumbed to the disease. Another submission.

A total of seven photos were eventually sent (two "serious" groups following my initial five). After some thought, I thought the first two photos at the top of this post would have been the best hen and egg pair. I wish I had given more thought before clicking "send", as they pretty much sum up most of the important details. The captions I provided gave the necessary detail, and in retrospect, the one flag wtih the printed name carries most of the emotion I wanted to elicit.

I wrote this post before I saw the final photo/s. I'd be curious to see how closely my final selection compares to that of the Editor In Chief.


Happy Note: The bag piper, Fred Payne, was warming up when he spotted some friends. He stopped long enough to give them this million dollar smile. The photo was made with a telephoto lens positioned about a foot off the ground. Camera to subject distance was about ten feet.

Post Script: On the following Monday, the paper ran Photo #6 on Page 2 using the caption I had originally submitted. That single photo morphed into an article that continued onto Page 15, which included the Photo #1 flag closeup with text taken from the press release. In addition, there was a tightly cropped portion from Photo #2 to show Congresswoman Speier. Had I known this simple photo would made a tight head shot, but who knew?

Sunday, November 7, 2021

Halloween At The Carolands Mansion

1/4 second, F 6.4, ISO 800, 6:33 PM.
The Carolands Chateau is a 46,050-square-foot, 4.5 floor, 98 room mansion on 5.83 acres in Hillsborough, California. While not generally open to the public, the thrown a major Halloween party the features animatronic ghouls, a light show on the mansion's walls, and a entertainers such as this unicycle-riding juggler. It's like an inside-out haunted house. 

Carolands Mansion, Halloween 2019
I photographed the event in 2019, so I wasn't surprised by what I found. That photo ran on the front page of the paper, and even through this two-year absence, many of the volunteers recognized me, and remembered the photograph. I was working alone that night, and relied on a shoe-mounted flash to get the two-level (background and foreground) lighting effect. In the original image, the foreground was a bit overexposed, a on-camera flash giveaway. This year 
projectors were used to create a green spider-web pattern on the cobblestones. I also brought a light stand to hold a radio-triggered speedlight about 10' off the ground. This, coupled with a flash-to-subject (FTS) distance of about 15'. This minimized the difference in distance between the foreground and the main subject, making the exposure difference between the two regions minimal.

1/180 second, F 8.0, ISO 200, 5:36 PM.
Squid Games: A number of youngsters donned their best Squid Games outfits and led other children in a squid game of their own. I needed to make an "ice breaker" photograph, so I arranged the players in a quick 2-line composition. Using a FTS distance of about 8', a reasonable ISO and full output from my flash, I was able to balance the clouds in the background with my subjects. Notice that the transition from the lower edge of the photo to my subject's feet is a gentle one, and doesn't shout "flash" as would be heard if the flash was on-camera.

1/2 second, F 6.4, ISO 1600, 6:40 PM.
The light show was spectacular this year. The images refreshed every few minutes, changing from this collage of ghostly images...

1/4 second, F 5.6, ISO 3200, 6:46 PM.
...to this cascade of digital skulls. As I mentioned, the green web flooring was new, and I must say, the effect was total. 

All exposures 1/4 second, F 6.4, ISO 800.
The Challenge: These four photos were taken in a period of one minute. I convinced the Juggler to hover within a small footprint to keep the subject to flash distance constant. I had to ask him to just hold the illuminated balls because they caused streaking when they were in motion. I chose to take the series while moving from group to group, so I had no control over which images were being projected on the mansion. I would have loved either of the two samples in the post, but you take what you can get, and try to inconvenience as few people as possible.

Rear Curtain Flash Synchronization: This is the default synchronization setting for all of cameras that have that option, which is nearly all. RCFS triggers the flash at the end of the exposure, which is particularly important when working with long exposures and moving subjects. When so adjusted, a moving subject will be flash-lit at the end of the exposure, thus preventing objectional image smearing. Even if you're not sure what it does, select RCFS, if for no other reason that you won't notice any difference with your plain-Jane, flash-supplemented exposures. But if you ever have to photograph a unicycle-riding juggler at twilight, you'll thank me.