Sunday, September 27, 2020

Old Tricks, New Dog

For a compilation of the morning walk images, click here.

Fuji X100S, 23mm F 2.0 lens. Incandescent WB setting, CTO bounce flash.

I wanted to mix things up a bit because sunrise came later in the morning and I'd have a better chance of finding some sunrise backgrounds to use with some flash-enhanced photography. As is always the case, that which you don't prepare for will get in your way when push comes to shove.

I decided to bring a Fuji X100S so that I could have access to a wider range of flash-synchronized shutter speeds. I also wanted to experiment with using the incandescent white balance preset in the hopes of obtaining some rich, blue skies.

CTO gel haphazardly attached to the faceplate of the flash.

It took some precious minutes to locate a suitable flash. I grabbed a Flashpoint Zoom Mini from my compact camera bag, pealed a used full CTO gel from my refrigerator door, then used some tape "stitches" to attach it to the flash. This accomplished, I slipped the flash in my pocket, along with some spare batteries, and headed out. As a consequences of the delays, the sky was beginning to brighten up, and my hopes of a dark, moody sky disappeared.

At first, I had some difficulty getting a sharply focused selfie. This normally isn't a problem, unless you're confronting the "fly" in the auto-focus ointment: backlighting. Auto focus systems rely on locating a zone of high contrast within the AF sensor boundaries. I found that it stumbles when confronting compositions where the background is significantly brighter than one's foreground subject. These are often the exact conditions you encounter whenever you both want, and need, supplementary flash illumination.

I solved this using the same technique I employed for making selfies with my manually focused lenses using the neck strap as a convenient distance marker.


This unimaginative photo shows me stretching the neck strap with my thumb to establish a repeatable camera-to-subject distance. Then I pressed the AFL/AEL button to lock that specific distance. I cover the reasoning behind the process here

Rather than my attempting to explain the application of the AFL/AEL button, I will refer you to Neil van Niekerk's excellent post of viewing and focusing options for the Fuji X100S. Here is a portion of that post.

"...Instead of twiddling the dial until the image snaps in focus, you can just press the AFL/ AEL button. (The red arrow in the diagram.) The focus is activated, and the camera auto-focuses for you … while you see the enlarged view. Perfect. This gives you instant accurate focus. And if you feel you can tweak it to focus a bit sharper, or that you’d rather focus on another part of your subject, then you turn the focus ring. The Spot-Focus method works very much like using Back-Button Focus on a DSLR. By letting go of the AFL/AEL button, the focus is now locked since the camera is in manual focus mode after all..."

The photo at the top of the post was lit by bouncing the flash, gel and all, off the side of a shingled home in my neighborhood.  White Balance was set to 3700K, so he results were technically warmer by about 500K. I dare say the colors are accurate enough for most purposes.


I made another selfie using the same focusing technique, but with two differences: First, I set the white balance to my usual Cloudy preset. From a color perspective, my skin tones resemble those of Luke Skywaker staring into the Tatooine sunset. Second, I used the flash's built-in bounce card to elevate the light source slightly farther from the lens axis. The result is a photo that's an improvement over a conventional, shoe-mounted flash exposure. This may be a fun photo, but one major shortcoming is pretty obvious: the disparity between the light on my face and the light on the background objects. If I'm being lit by the setting (or rising) sun, shouldn't there be light on the building behind me?

We'll explore that shortly!

Sunday, September 20, 2020

Lens Adapters On The X-Pro 1

For a compilation of the morning walk images, click here.

Fotodiox X-Mount (left) and Fotodiox Nikon F G-Type Lens Adapter (right) from B&H Camera.

The Idea: Adapting manual focus lenses to the Fuji XPro body  has been something of a gateway drug for film photographers who own lenses that aren't directly compatible with any modern digital bodies. It was no accident that the only lens adapter Fuji manufactures for its X-mount bodies accepts Leica M-Mount rangefinder lenses. It stands for reason, since the X-Pro1 body was less expensive than a digital M series Leica body at the time of its introduction in 2012, and even more so now that the Fuji X-Pro1 bodies are obtainable on the used market. The X-Pro bodies are a natural choice. X-Pro users can manually select the appropriate bright-line frame when using the unique hybrid optical viewfinder. The camera's controls are easily accessed, and the layout resembles that of a Leica M body. And last but not least, the X-Pro bodies had the feel and heft so familiar to Leicaphiles. Personally, I was mostly excited about adapting some older, non-AI Nikkor lenses to my Fuji bodies. 

My interest started when I read about the introduction of a manual focus 7artisans 7.5mm Fisheye Lens with a  Fuji mount. It made me wonder: Could I could mount my Nikon-mount 10-17mm Tokina Fisheye on a Fuji body, using an adapter? And while I'm at it, how about those mint Nikkor non-AI lenses gifted to me by a friend?

Two Adapters Styles: Which adapter should you buy? You can use an inexpensive Fotodiox X-Mount Adapter (above left, about $20.00 currently) or one with a built-in aperture adjustment ring like the FotodioX Nikon F G-Type Lens Adapter (above right, about $70.00). I eventually bought both, and I can say that you will be better off purchasing the more expensive, G series version at the start. In addition to giving you access to all Nikkor lens variations, the integral tripod mount gives you a carrying option. If you use a camera strap that attaches with a 1/4 x 20 tripod thread, the adapter, rather than the camera body, carries the weight of the lens. And some of those older, manual lenses can be quite heavy indeed.

Mounting The Lens: There are no control linkages between the camera body and the lens, so any Nikon bayonet mount can be safely used. There can be some quirks with certain generations of lenses, and I suggest the following settings.

Full Manual Lenses: A-I and Non A-I: 
The aperture coupling prong is the most visible characteristic of these two lens families. You can clearly see the prong (or "ears") in this photo from Ken Rockwell's excellent post on identifying Nikkor lenses. Not that it matters for this post: If you coupling prong is solid like the one in the photo, you have an earlier, non-AI lens. If you see two holes, one in each ear, you have an AI lens. Non-AI lenses have been converted to the AI configuration, so this rule for proper identification works 99% of the time. Refer to Mr. Rockwell's article for additional information.

For AI/non-AI lenses, you should control the aperture size using the ring on the lens barrel. You'll find the ring on the lens easier to adjust and the aperture sizes clearly marked. Here, you can see that both the aperture ring and the aperture coupling prong are aligned with the F 5.6 setting (above left).

When you install the lens, be sure that you set the (red) aperture ring on the adapter to the smallest aperture setting, as shown here (right). This prevents the adapter from interfering with the action of the lens aperture ring.

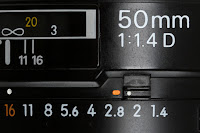
Nikon D Series Lenses: Nikon still manufactures prime lenses in the "D" configuration. For us, the most important aspect of the D series lenses is a small locking button located above the aperture control ring. This feature bridged the gap between the older film-only Nikon bodies and the newer digital/film bodies that controlled the aperture using a command dial located by the shutter release button.

In this photo of a later D-type lens, you can see a small sliding lock (white dot) aligned with an orange dot. 

If you wish to control the aperture using the adapter, you must rotate the aperture ring to the smallest setting (F 16 in the example to the left), and  slide the lock towards the body, the aperture will be locked at F 16. You need to use the adapter adjustment to open the aperture any wider. Older lenses have a tiny rotating button with two alignment dots, Set the aperture to its smallest setting, rotate the button until both dots are in alignment, and Bob's your uncle.

If you wish to control the lens aperture using the lens aperture ring, simply slide the lock button away from the camera body. This will unlock the aperture ring, which allows it to rotate freely. 

As with the AI lenses, I suggest that you make adjustments through the lens aperture ring because it is much easier to rotate and the aperture sizes clearly identified.

To see the complete dpreview.com Q&A posting on the subject, click here

Nikon G Series Lenses:
This is the current configuration for nearly all Nikon lenses. Check the photo (right). You'll see that there is no external aperture ring because aperture adjustments must be made only through the camera body, or the adapter in this case. You just install the lens on the adapter, and go. Due to the design of the mount, the lens figures everything out for you. Since I shoot aperture priority on my  early morning walks, I tend to set the aperture at 5.6 and leave alone. This is the Nikkor 50mm F 1.8. If you  need one, you can order it here.


To Buy Or Not To Buy: This image was made using the Tokina 10-17 mounted on a Nikon G to Fuji X adapter.  I have to say that the results were satisfactory, but I couldn't see myself going out of my way to carry a fisheye on the off chance that the curved perspective would be something I'd want to achieve.

Saturday, September 12, 2020

Filter Holder For The 7artisans 12mm Lens

For a compilation of the morning walk images, click here.

7artisans 12mm lens without (left) and with (right) the filter adapter.
My enthusiasm for creating a manual focus lens kit resulted in the assembly of a collection of compact lenses and bodies that would duplicate the minimum equipage for a rangefinder-toting photojournalist in the post WWII years. As a child of the Single Lens Reflex era, I never experienced any attachment to rangefinder cameras. However, I used an Olympus 35SP as my everyday camera during my years playing the part of the 70's Concerned Young Photographer, but have come to associate the "Kah-Clunk" of the SLR as the sound of an image being captured.

The 7artisans 12mm lens has become the shiny new object in my life, although it is neither my most recent photographic purchase, nor my most used lens. I've been very pleased with the results thus far, although it hasn't been taken on any assignments, primarily because there haven't been any since the Pandemic. I've taken it with me on my morning walks, but only when I had something specific in mind. 

One initial concern was the inability to attach a filter to protect the bulbous front lens element. I personally install filters on all of my lenses, and remove them only when I'm working indoors in a "clean" environment. The purchase of the 7artisans dedicated filter adapter, available from eBay and from B&H Camera, might eliminate my concerns for protecting the lens. I included links to a video describing the adapter in an earlier post. Having owned the adapter for several weeks, I discovered some design features that you might find interesting, if you're thinking about purchasing it.


The adapter is held in place by a strip of felt on the inner surface of the bezel, a method long used to provides a snug fit between the lens and traditional metal lens caps. It is threaded to accept a standard 77mm filter, which is the standard thread size for my larger Nikkors. To their credit, the designers provide recesses on the lens that correspond to alignment tabs on the adapter itself. I have noticed that the felt itself is starting to work free from adapter, the I've resorted to cutting off that little loose bit from time to time. Also noteworthy is the small thumbscrew that provides some additional retention. It is small, and easily lost if allowed to unscrew itself from the adapter. Because of this, I will probably store the adapter off camera and in a sealed pouch so the screw won't get lost.

In closing, the adapter does exactly what was designed to to, but may detract from the compactness of the lens when installed. If you decide to buy the lens, order the adapter at the same time. Better to have it and not need it, especially at its $10.00 price tag.

Double Exposure? No, actually. Since I don't own two lenses, I relied on the same programmed interval exposure technique from last week. Basically, I shot a series of photos with the lens in my left hand, followed by a series with the lens in my right. I check the viewfinder to be sure that the images didn't overlap, and layered the two images together.


I set up the camera to make a series of exposures at 5 second intervals. It took three exposures to get a shot where the highlights were reasonably placed. Since I was using bounce flash, it was helpful to preview the image immediately after the shot was made.

This second series shows the same lens, held in my right hand, and positioned in the right half of the frame. You'll notice that the background remains constant throughout the procedure. The selected images, #3 and #4, were then layered, on on top of the other, and the excess background erased. I discuss the technique in an earlier postHaving the camera mounted on a rigid tripod is essential for this technique to work properly.

Once again, here's the final image. A word of caution: The backgrounds of the two merged halves must match exactly. It's amazing at how easily the human eye can detect slight variations in the background. You need a sturdy tripod to support the camera. In addition, it is important the exposure settings for the left and right hand images be identical, as exposure variations are equally obvious. I normally make any post production tweaks after the two images have been joined and flattened into a  single layer. This helps to make the seam between the two images impossible to detect.

Thursday, September 10, 2020

The Conflagration Of 2020

For a compilation of the morning walk images, click here.

Wednesday, September 9, 2020. 8:45 am
Wednesday morning's air quality was particularly bad, and like most Bay Area residents, we woke to what felt like a never-ending morning, the skies dawning dark and later brightening to an unearthly glow. I would have described it as Nuclear Winter. Just the same, there was enough light to make photos, although I boosted the ISO rating to 6400. The red-tinted sky contributed to these unearthly vistas. One friend joked that it look like we "woke up on Mars".

Wednesday, September 9, 2020 at 8:39 am.
Instead of my normal Cloudy White Balance preset, I made this photo using the Auto Preset. It appears to have "neutralized" the incandescent lights within the sweet shop while "cooling down" the reddish ambient light. One still gets the warming effect of the morning sky, while rendering the coloration in the shop closer to what our mind's eye might expect.

Tuesday, September 8, 2020

Smokey Sunrise

For a compilation of the morning walk images, click here.

Smokey Sunrise. September 8, 2020. Tamron 17-50 2.8 Lens @ 50mm, adapted to XPro2 Body.

It was almost 7:30 when I ventured out to get my morning paper. I spotted the sun, a simple red spot in the morning sky, and decided I needed to photograph it, seeing as how my contributions to the blog have been rather sparse. The air quality has decreased significantly since several lightning-induced wildfires started contributing smoke and ash above and beyond the normal pollutants we've come to expect (sigh!). This photo was not taken with 7artisans lens, so I won't include it in my collection of morning walking images. An inexpensive Nikon G to Fuji X lens adapter made the mating of the Tamron lens to the Fuji body possible.

This shot does highlight the advantages of using a real camera vs. the readily available Smart phone. Pixels and lens resolution aside, the convenient placement of important exposure controls made the shot possible. I merely adjusted the  Exposure Compensation to -2 stops and let the camera do the heavy lifting. The result was a dark, ominous sky and a sun that managed to maintain its actual color. By underexposing the sky, I was able to give an interpretation of the morning sky, even though this isn't how it actually appeared.

Sunday, September 6, 2020

A More Compact Super Wide

For a compilation of the morning walk images, click here.

12mm F 2.8 7artisans lens, (left), and the 12mm F 2.8 Zeiss Touit (right)
Since becoming a Community Photographer for the Daily Journal, one thing became apparent: Telephoto lenses were far less useful than moderate wide angles. Working indoors, the camera-to-subject distances tended to be shorter, so you need a wide angle's extra coverage to include both the far left and far right subjects. In full frame, my go-to lens was the 24-70 Nikkor in full frame cameras and the 17-55 when a crop sensor body was deployed. When used wide, both lenses allowed me to include great swaths of background to establish context, with a acceptable level of wide angle "stretch face" distortion in the corners.

Extreme situations required extreme solutions, so my kit included short zoom lenses with minimum focal lengths of 15mm and 12mm for my full frame and crop sensor bodies, respectively. I had to be very careful with these super-wides, since corner distortion could be very distracting if not properly managed. I found that the most egregious distortion could be avoided by keeping my camera level and important details away from the corners.

My original intent was to create a compact collection of lenses that I could carry in a smaller camera bag. This was mostly realized with my adoption of my compact Fuji mirrorless "kit" composed of two bodies and the capability of a super wide, a moderate wide/normal, and a short telephoto, and a compact flash. This included a X100T with its native 23mm lens, a dedicated wide angle lens adapter for an 18mm equivalent, an X-E1 body with a 50mm lens, and a 27mm lens in case my X100 failed and I needed a wider view than the 50.


Order yours here.
With 4 potential focal lengths (18mm, 23mm, 27mm, and 50mm), I should have been content. But greed is a funny thing, and I still wanted a 12mm lens to give me a super-wide view. While I owned a 12mm F 2.8 Zeiss Touit, it proved to be a rather bulky lens, one I never felt comfortable carrying.

Take my word for it; With its smooth clean lines, this lovely lens  is a joy to behold, but its beautifully sculpted lens hood made it absolutely huge. And in spite of its discounted price (it's a refurbished lens), it's far too precious for everyday carry. So if I were to carry an additional lens, it needed to be compact. I decided that it would be used only when I had the time to properly compose and focus my shot, so a manual lens would be in totally in the running. 


Thinking Smaller: I had considered buying an older post-war, screw-thread Leica rangefinder lens. I quickly found that wide angle lenses in my desired focal length range hadn't yet been developed. The only practical solution was to look at the current crop of modern manual lenses marketed to the mirrorless camera crowd looking for cool bokeh, a good price point, and reasonable sharpness. Once again, 7artisans provided an answer, the 12mm F 2.8 lens. At the time of this posting, I've had a chance to use it on several occasions, and subjectively, it appears to be the sharpest of the 7artisan lenses.

At the top of this post, you can see a size comparison of the (manual) 7artisans F 2.8 12mm and the (auto) F 2.8 Zeiss Touit 12mm. I photographed the Zeiss without its bulbous petal lens hood so you could compare the two in their most compact forms. The 7artisans lens has a built-in petal lens hood which provides some protection from errant fingerprints. That said, if I add the filter adapter to the 7artisans lens, it's nearly as bulky as the Touit. 

Now that I own it, I am anxious to see if this 7artisans lens gets used as often as I think. Hopefully, the multiple plagues that beset us will soon become distant views in our collective rear view mirrors. Of course, they'll be be in reverse, visually.


Technique Tuesday, Early: It may not sound like a big thing, but making a photograph showing both of my hands requires some planning. At first glance, one might assume that the ubiquitous self-timer on nearly every camera, film or digital, was used to make the shot. After all, it was designed to trip the shutter (now that's an anachronistic phrase) when the photographer needed to be in the photo. Alas, there is one problem. You see, the camera establishes correct focus the moment the shutter button is pressed, meaning you're running towards your mark after focus has been set without you in the photo. Should you ask, using the Continuous Autofocus setting doesn't solve the problem.

I suggest that you read your instruction manuals or to consult a You Tube post to get the specifics on how to make these essential settings:
  • Autofocus: Automatic. This lets the camera decide which focal points are the most important.
  • Interval Timer Shooting: On. Next select a sequence of 5 shots, with a 5 second interval between shots. You have the option of delaying the first shot in the series, which I didn't use.

In this sequence of five shots, you can see the first one has a less than ideal framing. After reviewing that first shot, you can look through the viewfinder and refine your composition for the next. The neat part is the camera will re-focus a few moments before each exposure, so repositioning of the subject has no adverse effect on sharpness.

Be forewarned, setting up the interval timer will take a lot of experimenting. Before you start, commit to the number of photos you want to take and the interval between shots. As I used to tell my students: If a technique is too easily mastered, it may not have been worth learning in the first place.