Sunday, October 25, 2020

For Want Of A Pencil Eraser

For a compilation of the morning walk images, click here.

Read the article here.
My Kingdom For A Pencil: If you're like me, you need a pencil every now and then, but in this digital age, they are increasingly difficult to find in one's home. My Dad always kept one in his signature felt beany, but he was a man of action: A carpenter, a plumber, and all-around handyman. I, on the other hand, do most of my repairs with the backspace key and the delete button.

For years, I've used pencil erasers to remove the green oxidation that occurs when batteries leak during storage. The green corrosion is often found deep within the battery compartments, areas where a pencil's eraser might easily reach. Having found a bit of corrosion in the battery compartment of my SB700 flash, I went looking for a pencil eraser to facilitate its removal. Alas, in this digital age no pencil was to be found, so improvisation would be the key to my ultimate success.

After giving the problem some thought, I went to a local hardware store and bought some double-sided mounting tabs. Luckily, they came pre-cut in convenient 1" squares which would be than enough for what I had in mind. Next, I rummaged through my collection of silicon carbide (dark grey) abrasive papers and found a scrap of  600 grit paper. Next, I located a bit of 3/8" wooden dowel. I cut off a 3" section and carefully squared off the end. 

Next came the simple part. I used a pair of scissors to cut off a 1/2 square of the mounting tab and attached it to the dowel. Using a knife, I cut a bit of the 600 grit abrasive paper and stuck it on the tab. Finally, I trimmed away the excess tab and abrasive paper. 

If and when you decide to make your own contact cleaner, don't use scissors to do the trimming. You may have heard that you can sharpen scissors by simply cutting a sheet of abrasive paper. I suspect it does the exact opposite. I've never felt inclined to waste both abrasive paper and a pair of scissors to prove, or disprove, this bit of folksy advise.

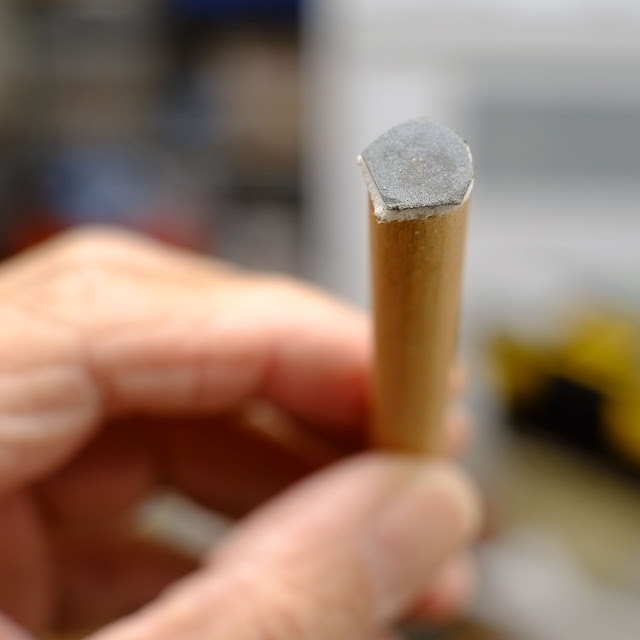
You can see from the slight depression that this improvised cleaner made full contact.

You can see the finished product here. Using my fingertips, I twisted the dowel in the battery compartment while applying downward pressure to the corroded contact. When the cleaning was finished, I used some canned compressed air to blow away any abrasive particles left in the battery chamber. The procedure successfully cleaned the battery contacts, so my SB700 is now as good as it ever was. I found that the soft nature of the adhesive tab could easily adapt to the contours of the raised dimple often found on the contacts, making my selection of the adhesive tab a win-win for everybody.

Cheap and easy, I now have a lifetime supply of battery contact cleaners for just a few bucks. Neat.


Sunday, October 18, 2020

Wide Angle Close Ups - The Opteka 15mm Macro Lens

For a compilation of the morning walk images, click here.


Stranger In A Strange Land: I had planned on postponing my take on the Opteka 15mm F 4.0 wide angle, manual focus, Nikon mount, macro lens until later in the month, but an opportunity just popped up today, and with my enthusiasm thus whipped to a fever pitch, I was compelled to write about it immediately. Unlike my past musings, this post will be a collection of loosely related,  "get to the point" paragraphs.

The Subject: I found this Walking Stick clinging to my green Recyclable bin. I don't see them that often, which is a testament to their ability to hide in plain sight. I felt this would make a interesting subject, so I grabbed my X-E2 on which I installed a Photodiox Nikon G to Fuji adapter.  I carefully moved the insect to a remaining branch on the camellia bush I cut down earlier this year, and went to work.

The Lens: The Opteka 15mm lens ($109 on Amazon) is the fraternal twin of the more expensive Venus Optics Laowa macro lens  (about $499 at B&H) with similar specifications. The former lacks the tilt/shift feature of the latter, and as such, sells for less than one-third the cost. Both offer the user a wide angle macro capability for when you want you close-up photos to include wide swaths of recognizable backgrounds.

The lens feels like its build quality was not foremost in the designer's mind. The focusing is not particularly smooth when compared to the 7artisans lenses. The big draw for the lens is the unique nature of the lens itself: It will focus to 1:1* when used with a full-frame DSLR body. Unfortunately, to achieve this reproduction ratio, the subject must almost touch the front element of the lens. The seriously restricts your lighting options. 

Lighting: I used an manually adjusted shoe-mounted speedlight with a Gary Fong Light Sphere. The head was tilted to 45 degrees to maximize the relative size of the light source. Test shots showed that the background was too dark, which is understandable, since the shoe-mounted speedlight was less than a foot away, while the background was nearly three times the distance. Think Inverse-Square Law. To remedy this, I added a second remote speedlight with an early iteration of the Gary Fong Power Grid. This concentrated the light into a "spot" that I could re-position as needed.


This shot shows the walking stick with its front legs extended forward. The photo was made from above the insect, so the background is the ivy that covers the ground in front of my home. I'm sure that if the background was less abstract and more recognizable, the visual impact of a close-focusing macro lens would have been more apparent.


Since this Walking Stick was about 4" long, I decided to switch to my favorite lens, the 25mm F 1.8 from 7artisans. Using the same aperture settings, this image shows the relationship between the focal length of the lens and the appearance of the background. The working distance between the film sensor and the subject is much shorter when using the 15mm lens, but the distance to the background is, for all intents and purposes, the same for both the 15mm and the 25mm. The shot made with the longer lens renders ivy leaves larger and less district. 

I will submit another post when I find a situation where the visual impact of this close-focusing wide angle lens is visually more interesting. For the moment, I was just pleased to have a chance to solve the lighting problems associated with using flash at very short working distances. 

*If you're wondering, a 1:1 Reproduction Ratio means that it is capable of filling a standard 35mm negative with a subject an inch long and one and a half inches wide. When used on a crop sensor body like the Fuji X cameras, the reproduction ratio is 2;1 or twice life size.

Sunday, October 11, 2020

It's In The Genes

For a compilation of the morning walk images, click here.

Filena Jung, (baby) Dick Moy Jr., Charlotte (Jung) Moy, Sam Jung, Marie Jung, (baby) Adelia Moy, Dick Moy, (grandpa) Thomas Jung, (grandma) Sue Lan Jung, and someone I don't recognize, (possibly) my Uncle Frank).

In my last post, I described a quick and dirty scanning technique I've been using to view the cache of 3.25" x 4.25" sheet film negatives I uncovered in our garage workshop. To this point, most had been negatives from which prints had already been made, so I was relatively familiar with the subjects. However, as I dug deeper into the pile, I began to find negatives that I've never seen, and more frequently, of people I didn't recognize, As this little project progressed, I've become more and more thankful that digital imaging evolved to the point where the recovery of these little gems is now quick and simple.

This family photo was probably taken before 1947 based on the absence of my sister (born 1947), and the approximate ages of Dick Jr. (born 1943) and Adelia (born 1942). I recognize neither the location or the identity of the gentleman sitting at the far right, although there is something vaguely familiar about his face. However, you  can see my father wearing his trademark felt "beany". Photos that include my Father are extremely rare, since he was normally behind the camera, and not in front of it. I suspect that the Speed Graphic used to make this photo was mounted on a tripod (there is another  negative with an identical composition) so the camera was probably triggered with a self-timer.


Theatricals: Among the undiscovered gems was this series of a Chinese actor portraying a traditional noble. The costume is quite elaborate, and I suspect I would have been just as excited with this assignment as my Father probably was. I have no idea where or when the sequence of photos was made, but the white curtain background indicate this was definitely not a candid photo opportunity.


I funny how these images so closely parallel some of my photographic projects. Working with costumes has been of particular interest to me, and thinking back on all of my favorite photos, they often include a nod to fashion photography and contemporary portraiture. I'm humbled to think about how much my Father was able to do with his Speed Graphic, some flashbulbs, and when working indoors, a few photofloods and a spotlight or two. His imagery was inspired by the photographic trends of the moment, tempered by the limitations set by cameras, light sources, and film.

I made this photo of Rebecca in the early 1970's, my best guess since film didn't record the shooting date as digital cameras do. I had access to a wider variety of lighting options, which included several Spiratone flashes aimed at a seamless white paper background and a Braun flash bounced from a reflective umbrella I made by lining an old umbrella with crumped aluminum foil. The camera was an old Hasselblad 1000F, whose Zeiss lens was showing some signs of physical deterioration. 12-exposure rolls of film were wet processed the old fashion way. As a student on a limited budget, 5 rolls of film, a maximum yield of 60 exposures, was considered an extravagance. The film was then processed in my two plastic Ansco film processing tanks. I could only do one roll per tank per session because the film spools had to be bone dry to properly load the film without any damage, so overnight drying was required.  Still, the photo is one of my photographic benchmarks for posing and lighting, the high-water mark of my abilities at the time. 
Obviously time, experience, and resources have had a marked effect on the outcome, but after seeing my Father's theatrical photos, there appears to be more to inheritance than meets the eye.

Sunday, October 4, 2020

Simple Negative Scanning


While cleaning out some shelves in our corner workshop I came across a collection of my father's old sheet film negatives . I was curious about the images they held, but was not curious enough to schedule a session at the Harvey Milk Photo Center to process some contact prints. Too much time, too much work. What I wanted was a relatively simple procedure to make a  "print"  from these of reasonable quality. If your goal is a museum-quality print, these instructions just won't do. But for family gatherings and such, I think it will be fine. 

Photograph The Negative: I decided to step outdoors and use a handy Fuji X100S. Since these were black and white negatives, I wasn't concerned about the white balance, so I just used normal default, the Cloudy preset. I held the negative overhead and used the blue sky as my background. I held the 3.25" x 4.25"  negative reasonably close to the camera so I could extract as much detail as possible. Close-up photography often exaggerates the effects of barrel distortion, so I planned to use only the center part of the negative and to eliminate any long, straight lines from the composition. I suggest that you set both your aperture and shutter speed manually. Adjust the exposure until you can barely see some detail in the densest parts of the negative. 

Caution: This simplified procedure works best with large negatives. Making a copy from a standard 35mm negative will require greater care and precision!

Post Production Magic: The process involves four basic steps. While the sequence is not particularly important, you might want to proceed as follows:


Create A Digital Positive: First, convert the negative to a positive. Think of this as a black and white slide.

Choose Filter > Adjustments > Invert


Convert To Monochrome: Next, convert the image to monochrome. 

Enhance > Adjust Color > Remove Color

Cropping: At this point, I like to crop the image as tightly as possible. I avoid including any straight lines that might be "curved" due to under-corrected distance distortion. You can see in subsequent samples that I purposely cropped out the archway between the shooter and the subjects.


Levels: Now adjust the Levels.

Enhance > Adjust Lighting > Levels

The photo (above) needs to have the contrast increased. As it stands, the image lacks contrast, so we'll need to alter the histogram to achieve a true black and a true white.


Here, I dragged the Black Point (left black triangle) and the White Point (right white triangle) to the left and right boundaries of the histogram, respectively. You will be able to see the effects of these adjustments in real time. 

When you have established the Black and White Points, drag the Mid Point to the left or right to get your preferred middle greys.


This is how the final image turned out. Again, it's a quick and easy way to obtain a usable black and white from a negative without a lot off fuss and bother. The little girl seated in the front row is my sister, and our Mother sits to her right.

One final note: I can't explain the blotchy appearance of the wall in the background. However, it is not uncommon for large negatives to show signs of uneven development. The chemicals deplete faster when they contact the denser regions of the negative, so during processing, the film must be gently agitated to keep the solution fresh and uniform. 


These three photos of Bill and Edith Wong's wedding haven't been viewed for more than a half century. For the amount of effort involved, these images are perfectly acceptable, perhaps even worthy of a suitable frame.