Sunday, December 28, 2025

Clement Malin - Cirque du Soleil


"Preparation is everything until the battle starts, and then it doesn't mean anything." So said Dwight Eisenhower, and probably many other strategists with slight variations. This assignment represented a challenge to my ability to deliver a meaningful image of this Cirque du Soleil performer, who performed a variety of moves on a ladder high above the stage. Honestly, I was busy thinking about ways to capture an image of a performer standing on a ladder ten feet above the stage.

This photo was part of the online Press Packet that is often sent to bloggers who are writing about the event. Wonderful as they were, they weren't suitable for an  article highlighting a single performer. My subject, Clement Malin, is the one standing on the ladder.

When my editor asked to make a photo, she wanted one that emphasized the performer in his environment. After seeing this photo, I wondered how I could get my camera high enough to suggest the height where he worked. I believed that if I could bring his shoulders to a height of ten feet off the stage I had enough bits and pieces to make the shot. My kit would include:
  • Two twelve-foot Manfrotto Light Stands. I could have one for the key light, and one to use as a free-standing monopod, unless I needed a "kicker" highlight for my subject or the background.
  • One heavy duty monopod with a ball head to support the camera.
My 10-24 F 4.0 lens would be mounted on my Fuji T-4 camera body. Because of the T-4's fully articulated LCD display, I could mount the camera on the monopod and rotate the display so that it could be seen from below. I planned to use both hands to hold the monopod, so I wouldn't have a free hand to control the camera through my smartphone.

Exposure Control: Camera settings would be adjusted manually, but making the exposure would be a problem. There were two possible approaches:
  • Self Timer: While this would be the simplest choice, there is a major problem. When the timer is activated, focus would be locked, which has no relationship to the actual shooting distance once my camera was hoisted to the subject's eye level. I could have manually set the focus, but trying to consistently position the camera while swaying at the end of a monopod held high overhead. The worst part is the self timer must be set for each shot.
  • Interval Timer: The camera body could be programmed to make a series of exposures at specified intervals. There are two key settings: Interval and the Number Of Times. The major advantage is the focus is determined at the moment of exposure. I had planned to set the camera to five exposures at ten-second intervals. I would activate the Interval Timer (wasting the first shot), hoist the camera to Mr. Malin's eye level, and tell him to change his expression after each pop of the flash. I could easily watch the action with the LCD panel rotated so I could watch from below.
Day Of The Shoot: Despite my native San Franciscan status, I dislike taking assignments in my hometown. The difficulty finding parking and schlepping my gear over long distances is often daunting. I  ended up paying $50.00 to park in the "reserved" lot which brought me a short distance from the main entrance.  Once parked, I called Kevin, my handler for the day, and was told to meet him at the back gate at the other side of the venue. After the two block walk, Keven ushered me into the "big top", the huge tent the Cirque installs at every performance.

Now The Bad News: I was told that I would be photographing Mr. Malin in the "workout room". The ladder could not be used on the padded exercise area, and that the props would be a series of cardboard boxes that can be seen in the background of the Cirque publicity shot. The Good News was that my equipment and I would be standing firmly on the floor of the tent.

For the shot I decided to use a reflective umbrella half-opened to concentrate the light. This would give me light softer than a bare bulb flash and more contained.  Positioning the flash inside the umbrella prevents the light from spilling onto the foreground, It is also easy to aim directly at your subject. For my accent  light I mounted a grid spot on a second flash and positioned it opposite my key light. This would give the shot a theatrical look. As luck would have it, Kevin came by to see how things were going, and asked if he could be of any assistance. I thanked him, and asked him to stand where I planned to position Mr. Malin when he arrived on set. After one hasty test shot,  I was satisfied that my lighting solution would work.

Since I was now shooting from a lower angle, I stayed with my Fuji  T-2 body because  the LCD panel flips down in alignment with the lens axis, which I find easier to use. Shot from a low camera position, you can see the shadow cast by the kicker light I placed in the background just behind my subject. It was triggered by the same controller I used for the key light.

You can see that by shooting from a low angle I could use the ceiling "hot spot" created by a utility light as a visual element in the background. When I showed the image to Kevin, he was pleasantly surprised, and noticed the exposed work area in the background, which he had the technicians draw the curtain to conceal it.

When Mr. Malin arrived on set, I showed him this photo, and he was intrigued by the shot. We did have to work within the confines of a horizontal shot, a potential obstacle because Mr. Malin's work is mostly vertical in nature. He brought some of the cardboard boxes he stacks during his performance, so these were my only props. I also had him kneel so I could keep him within the confines of a horizontal format.

Towards the end Mr. Malin and I were having fun improvising visual stunts on the spot, perhaps waiting for some inspirational pose to bring all the visual elements together.

Color Contamination:
I didn't count on the athletic mats reflecting as much purple light as they did, as you can see the tint in the box bottoms. Also, the smooth white cardboard made the boxes extremely bright, but I didn't get to choose the props, so I did the best with what  I had.

You will notice the Accent Light behind Mr. Malin's right hip. The Fuji lens handled potential flaring very well, as in-frame point light sources can produce some unwanted flare in the image.  I also got a nice sun star radiating from the flash, something I wouldn't have had if  his body completely blocked the light. He just moved out of position at the moment of exposure. It isn't noticeable since there is another, even larger highlight on the ceiling.

The assignment was a lot of fun in spite of the difficulties encountered. My"airborne camera" approach was an interesting solution, and one I hope to apply in the near future.

Thursday, December 25, 2025

One Gift Closer To Merry

Routine photographs often provide more challenges than we realize. For example, there is an annual toy giveaway sponsored by Samaritan House. I've photographed this event for many years and the venue can be extremely difficult to work in. The main obstacle to the photographer is the extensive use of black curtains to separate the distribution area from the sorting and staging areas.  ​

For this assignment I used an on-camera flash with a diffusion dome. I used a wide angle zoom lens ​set to its shortest focal length.  Short lenses used require short working distances, which may cause overexposure of the foreground. I solved this by rotating the flash head to feather the light on the right portion of the frame. Selective burning in post-production was needed, but for the most part the important details were be maintained. 

While it would be easy to stage a photograph I  always try to make a managed candid. For this photograph I simply introduced myself, and complimented my subject on his warm smile. All I had to do next was wait until the right combination of visual elements fell into place.

I made about twenty photographs of my subject distributing gifts. I chose this shot for two important visual elements. First, the gift itself can be easily seen and is brightly colored, and becomes the real center of interest. Second, the hand pointing at the gift suggested that this would be the selected gift. The receiver’s identity was purposely concealed over privacy concerns.

Hope your Christmas was a merry one and filled with love and joy.

Monday, December 15, 2025

Home Town Parade

Fuji X-T2" 1/30, F 4.5, ISO 12800  10-24 lens @ 14.5mm.

Long Day: I had a morning assignment in San Mateo, and an evening assignment in Redwood City. The former was a Christmas Brunch for members of SMPD Police Athletic League and their families. the latter a Home Town Parade in Courthouse Square. There were events scheduled throughout the day, and the finale would be the lighting of the town square Christmas Tree.

Christmas 2024
Last year was the final appearance of the Holiday Train, a special CalTrain complete with decorated cars and a special "rolling stage" where carolers sang along with the crowd. It turns out that much of the necessary 
equipment was not compatible with the newly electrified fleet of trains. This year the event was re-booted as a family event featuring vendors, carnival rides, and a variety of holiday-themed vendors in front of Courthouse Square in downtown Redwood City. As in years past, a parade marched through the downtown area with floats and marching/walking units from local schools, business, social clubs, and philanthropic organizations.

Christmas 2023
In 2023 I made some sketch photos at the parade, and I liked this one in particular. I used a narrow beam flash to light the foreground faces while doing my best to keep both the sky and the Fox Theater marquee reasonably well exposed. 

Richard Avedon once said that if you look into your viewfinder and see a photo you've already taken, stop and rethink your approach. Keep it fresh, he might have said. But since this was just a "sketch", I don't feel compelled to follow his advice. I really liked the effect that this lucky confluence of exposures (the sky, the marquee, and the flash) all came together. I had context for the image, but no basic story, no raison d'ĂȘtre. If it did, the photo might have had legs. Alas, it was not to be.

Train Theme: The event organizers managed to pull together a link with the past by running a motorized train, complete with passengers, past the historic Redwood City Courthouse. When I first saw it rolling down the street, I felt the train in the photo would provide a visual link to last year's Holiday Train. I started to walk beside it, attempting to find a good background. When it passed in front of the Courthouse, the visual elements, background and subject, started to fall together. However, when it passed by a particularly well lit vendor's stall, the train was noticeably brighter, so I decided that if I was going to make the photo, I should  take advantage of this extra light. My first attempts came up short, so I decided to wait until the train returned to the "station" and pick up another group of passengers.  This also gave me some time to adjust my shooting position to improve the background somewhat.

Look closely at the brass-colored pipes along the engine's side and you will see that the lights from the vendor's stall cast some very distinct shadows. This validated my shooting position, and after three round trips by the train I managed to get this one photo just before some pedestrians walked into the frame. Had I made the  shot a bit earlier in the evening there would have been more light on the Courthouse, and the sky would have been brighter. But I played the shot where the ball landed, and was very pleased with the result. And in spite of my penchant to add a flash, none was needed. Blessed are the fast lenses and the high ISO capabilities of my Fuji system. The combination certainly delivered the goods.

Sunday, December 7, 2025

Professor Darryl

The assignment to photograph astronomy professor Darryl Stanford at the College of San Mateo probably had the longest pre-session planning calendar of any photo I've ever made to date. 

October 21, 2025
October 21: In anticipation of the upcoming photo shoot, I visited the CSM campus at 6:30 pm, which on Photo Day would give us 30 minutes to work before his evening class started.  When I arrived at the planetarium the evening sky provided a marvelous potential backdrop for the photo. Professor Stanford would be positioned on the left third of the photograph.

The only problem would be getting some light on the Planetarium marque. Any lightstand would need to be more than twenty feet away from the building if it was positioned outside of the frame. I was confident that I could solve that problem during the preparation period before the October 23 session date. 

A non-technical issue came up: We had failed to see if there would be any security issues associated with this on-campus photo, and Professor Stanford said he'd follow up with the Dean. Ever the optimist, I planned to show up as scheduled, confident that approval would be shortcoming.

October 23: I parked my car on campus, and waited for Professor Stanford to call me. It turns out that he was unable to secure clearance for the Dean to make the photo on campus, so the shoot was off. Early dinner.

November 11: I received word that approval had been obtained, so I returned to the campus to see if I could still take advantage of the sunset reflecting in the windows of the Science Building. Alas, 6:30 PM was long after sunset, so I was left with a half-empty building with minimal hallway lighting. I decided that I would use the lobby of the Planetarium as my  background, 

Order yours here.
November 13: I arrived on campus with 45 minutes to set up the  shot. For the Planetarium marque I used a 200 watt-second flash with 2 grids to concentrate the light into a large spot with smooth edges. I used my tallest light stand to align the flash beam perpendicular to the wall. A CTO gel was added to better match the ambient lighting of the lobby. For the key light  I decided to use a gelled speedlight with a Lumiquest Softbox III. This small softbox is less affected by the wind, but it doesn't provide the same softness of a shoot-through umbrella. 

I added two additional speedlights for accents. You can see it at the left edge of the sketch photo. I added a blue gel, primarily to see if I could subtly suggest that it was a chilly evening, as it was. Finally, a fourth speedlight was placed on the ground and pointed straight up. Professor Stanford would be bringing a sky globe as a prop, and I thought it might benefit from a bit of light coming from below.

November 13, 2025
This draft photo shows the effect of the four flashes on the final image. You can see that the un-gelled floor light appears on the palm of my right hand, the anticipated location of the sky globe. The Lumiquest Softbox is, to paraphrase David Hobby, "Not hard, and not soft". I was able to gently direct light away from the lower half of my body by tilting the softbox up slightly.

If it isn't apparent, I mounted the camera on a tripod to ensure a consistent relationship between the subject and the background. I also had a piece of gaffer tape on the ground to ensure that Professor Stanford would always be in the same location in the frame.

Preparation was completed just as Professor Stanford arrived. This helped to promote the illusion of an organized photographer with a clear vision of the photograph and the ability to carry it off. Well played, Tom.

The final photograph (top of post) turned out well. If you look at this cropped image, you can see that the facial highlights are very smooth and not overly bright. Not as soft as those from a larger shoot-through umbrella, but certainly adequate for an environmental portrait made outdoors.

Alternative Marquee Lighting: I don't always carry a 200 watt-second flash, so I thought about how I would have lit the marque with a speedlight of lesser power. The easiest way to maximize the output would be to move the speedlight closer to the subject. 

For this exercise, it is important that both the camera and the subject locations are used as static reference points. Since the camera was on a tripod, its location would remain constant.  I would then put a piece of gaffer tape on the ground where I wanted my subject to stand. Next, I would stand at a point where the camera (tripod) and the subject (gaffer tape) were in perfect alignment. Then I would walk away from the subject's mark while keeping it aligned with the camera. If I placed the lightstand along this line it would be hidden behind the subject. You'll now have placed the speedlight where it can't be seen by the camera. The process could have been made simpler with a lighting diagram, but at the moment I haven't found a source for photo appropriate clipart. I know that they're out there, and I would have purchased an entire set if I had realized how useful they would someday become.

Monday, December 1, 2025

Drone

1/250 exposure, F 20.0, ISO 200

Sometimes photo shoots provide an opportunity to experiment with different lighting and compositional arrangements, and sometimes you are forced to take what you are given. This was the latter case.

I had an appointment to photograph one of San Mateo Police Department's drone pilots, and had explored, in my mind, several possibilities for an attention-getting shot. I arrived fully equipped and brimming with ideas, including a shot of a  hovering drone, reflected in the operator's  mirrored sunglasses. Another possibility might have been the hovering drone, viewed at eye level, with the operator in the background, out of focus. I came fully prepared to make either of these photographs. 

When I arrived at the rooftop staging area, I was told that the drone was controlled from a command center located inside the building, and that it couldn't be controlled from the rooftop. Also, the drone "hangar" was not a permanent fixture, and could not be moved. Luckily for me, the drone, once uncovered, was in full sunlight at a classic "45 degrees and 45 degrees to the side" orientation. The position of the key light forced the fill flash to play a very minor role in the overall exposure, and it was used only to provide some illumination under my subject's chin. After installing an on-camera flash for fill, I started shooting.

My first efforts were pretty lackluster, but when my subject picked up a microfiber cloth and started dusting off the rotors, the photo now had a purpose. Animating my subject has saved many of my earlier photos, and luckily for me my subject just did "what comes naturally". I made several shots, and the shots that worked best were made when his attention was directed towards the rear rotors. This positioned his sunglasses at a slight angle from the flash and eliminated the common reflected "hot spot" on the lenses. 

Now the shot was not without some quirks.

  • The lens was a 10-24mm zoom set to 12mm to include the operator and the drone. 
  •  The 1/180 second exposure was the minimum exposure that would assure complete coverage by the flash.
  • The aperture was F 20.0, which was also needed to get everything in sharp focus, and coincidentally give me the darkened sky that I prefer. 

The roof-top location dictated the exposure and the composition, leaving me with the simple tasks of framing the shot and pressing the shutter release. A simple shot at first glance, it is the product of exposure adjustments dictated by the environment.

Monday, August 11, 2025

My Camera, My Speedlight, And Me*


I submitted this image in case the Layout Department at the Journal needed something to fill some space on the Community Page. The photo, however plain, does present some solutions to problems one encounters when photographing in the field and on the run. First, one doesn't have much control over the shot. In this sequence, the photos were made during a tour of "old town" Woodside, so interfering with the presentation was out of the question. In addition, one usually can't rearrange one's subjects to improve the framing of the photo. Finally, when working "live" makes using a lightstand impractical, or even dangerous, in tight quarters, so the lighting options are limited. Some compromises have to be made just to get a photograph.

1/250 second, F 16, ISO 250.
I have my gripes about some of the equipment I use, and the Godox flashes' built-in radio triggering system and the robust lithium-ion batteries make them my first choice for field work, in spite of some inherent problems. The fast recycle times provided by the robust lithium-ion batteries outweigh the difficulty of power output adjustment when used in manual exposure mode.

In this sample image you can see that the speedlight accidentally intruded into the upper left portion of the frame. Before shooting, I will usually extend my arm out towards the subject so I can see my hand, Then I will move my hand until it disappears from sight, allowing me to position my speedlight as close to my subject as possible. 

1/125 second, F 16, ISO 250.
For this second shot, I attempted to improve the composition by moving closer to my subject. Unfortunately, the Handicapped Parking sign was in the worst possible location, but considering the conditions I was working under, I had to "play the ball where it landed". I was careful to move the speedlight out of the frame, and I lightened the front of the Pioneer Hotel and the sky by doubling the shutter speed. This adjustment only affected the areas solely lit by the ambient skylight.

Diffusion Dome: I added the diffusion dome in an attempt to soften the edge of light from the flash. It is a fact that small diffusers do little to improve the quality of the light, but in this case I was willing to try anything to get a better "look" to the photo. Pointing the flash above the subject, rather than dead on, decreased the overexposure on the lower half of my subject's torso and helped to draw the viewer's attention toward the subject's face. I have had many pleasant surprises when working with domes like the Sto-Fen, so I'm willing to give it a try when I think it might help.
Strategic Cropping: While I submitted the top photo for publication, I continued to wonder what I could have done to improve my approach of the composition. My biggest concern was that Nino, the tour guide, seemed very isolated in the photo. While the tour members were few in number, the top photo, unfortunately, seemed to emphasize that. While it is too late to send, this cropped version manages to maintain the important visual elements while completely hiding the group's small size. The black and white photograph along with Nino's hand gesture advanced the narrative that we're seeing the building, Independence Hall, in its historical context and its current state.

While it's too late to help this particular photo, I'll keep this in mind when I encounter a similar situation and will remember to experiment with the composition.

I need to curb my enthusiasm for emptying my Outbox. This isn't the first time a more effective submission could be found by careful cropping, or by taking the time to more carefully examine the day's take.

* A riff on "My Rifle, My Pony, and Me", sung by Rick Nelson and Dean Martin in the John Wayne movie "Rio Bravo".

Addendum: I submitted the cropped version and they are going to run it instead. You can see it here, to our left.

Tuesday, July 29, 2025

Mike Annuzzi


The assignment was to make a photo of Redwood City native Mike Annuzzi as a promotion for his upcoming show at the Fox Theater. I've been very fortunate that my assignments have included so many local talents, I was delighted with the prospect of photographing another San Mateo County creative.

My editor suggested that a photograph could be published to highlight Mr. Annuzzi's first theater performance in Redwood City, his home town. While casting about for the background location, Mr. Annuzzi suggested that a local music store in RWC might be appropriate and convenient. He sent me a photo of the store's guitar showroom, and I liked what I saw. After confirming that a 1:00 pm photoshoot would present little or no hardship on the store's operations, we went for it.

When I first saw the showroom, I decided to concentrate on the following visual elements:

  • I wanted to use converging lines to direct the viewer's attention to Mr. Annuzi's face,
  • I wanted to feature as many guitars as possible, and
  • I wanted the lighting placement to add some visual drama.

I started with a shoot-through umbrella mounted on top of a light stand at a height of almost eight feet. This test shot demonstrated that I would need to increase the output to get the desired level of brightness. Also, I would be shooting from the back of the store towards the front, and the store itself was pretty dark when compared to the showroom.

For this next shot, I added two flashes that are positioned out of frame. First, I put a snoot on Flash Number two and positioned it outside the showroom and pointed directly as Mr. Annuzzi's head. If you look closely you can see the highlight on his neck which provides some background separation. Flash Number Three was pointed at the guitar display just outside of the showroom.

For this shot I positioned the camera very close to the ground with the intent of using the black ceiling to direct the viewer towards Ms. Annuzzi's face. Looking at the intersection of the black ceiling and my subject's head, I think I overdid it. Time to move on.

For the final series of shots I added two additional flashes. First, I wasn't happy with the black ceiling visible at the front of the store. I added Flash Number Four on the counter and aimed it towards the ceiling. Fortunately it naturally pointed to the light fixture in the ceiling. This suggests, gently, that the lighting fixture itself provided that bit of brightness. Flash Number Five was clamped to a stool and pointed straight down at the floor. This bounce light provides a bit of fill light that is barely detectable because it does not add additional highlights on the subject's face. 

Looking back, it might seem that this was a lot of work for a photo as ephemeral as a newspaper publicity shot. However, I wasn't looking for a simple shot. I wanted a photo that had some visual depth, where one could sense that there were details behind the main subject, and I believe the photo succeeded. I was not without some areas that could be improved.

Light Spillage: I struggled to eliminate, or at least reduce, the glare coming off the faces of these guitars. My first impulse was to change the position of the key light in relation to my shooting position. After several tries, I gave it. But during post production, I realized the glare was not created by the light's location, It was actually light spilling over the edge of the shoot-through umbrella. I then noticed that the shadows from the "shiny" guitars were cast in a direction different from those from the guitars closer to the ceiling. What I should have done was to add some sort of light-proof barrier (called a "flag") on the flash head to prevent the light from sneaking past the umbrella. A big piece of gaffer tape would have done the trick, so I just slapped a 2" wide strip of gaffer tape onto the flash body so I won't have to look for one the next time it's needed. Be sure to fold one end over itself (sticky face to sticky face) to provide a handy tab for rapid deployment.

Kicking The Kicker: The "kicker" light is directed from behind the subject and used to provide separation from the background.
In this uncropped version of the submitted photo you can see the kicker at left edge of frame. The arrows along Mr. Annuzzi's right side shows where the light "skidded" off the edge to provide a rim of light. Since the flash
 hadn't yet been restricted by a grid spot or a snoot, its broad beam light edges his whole upper body. When a snoot or grid spot is added, the beam would be narrower, and lighting a specific portion of the subject would become a matter of luck.

The work-around for this would be to position your subject and then walk back to where the flash is. With the grid spot/snoot in place, photograph your subject from the rear. When you preview the image, you can see exactly how much of the subject will benefit from the kicker. Adjust the light until the beam falls exactly where you want it.

Now that I have solutions to these "in the field" problems, I can wait for another assignment that requires a similar level of attention to detail. Incidentally, the shoot took about one hour from first to last handshake, but the satisfaction I received from the final result was immeasurable.

Monday, July 21, 2025

Good Old Reliable Light Sphere

If a photographer is just getting into the indoor flash thing, I continue to recommend that the first light modifier you buy is the Gary Fong Light Sphere. In spite of all my experimentation with dozens of different modifiers and techniques, you can't beat the Light Sphere for simplicity and consistency. I remember the first time I used it to make a group photo with Senator Jackie Speier when she visited an upholstery class that was held on one of our campuses. I literally took it out of the box, attached it to a NIkon D600 speedlight mounted on a Nikon D50 body, and by simply following the instructions, took a very acceptable class photo. The Light Sphere was a relatively new product at the time, and was something my subjects had never seen before. It was introduced in late 2004, and since then one of the many versions has always been within arm's reach. 

Hail Mary: The photo at the top of this post was taken by simply mounting the Sphere onto an on-camera flash, holding the camera high overhead, and framing the shot using the tilting LCD on the back of my T-2. I mentioned that I find the T-2's simple "tipping" panel more practical that the T-4's that is fully articulating. Notice that by using a reasonably powerful flash at a relatively short distance, there is enough light to balance the street visible through the window behind my subjects. 

I will say  that there is no perfect variation. The originals were designed to fit certain families of flash heads and while easily attached to the flash, they were easily knocked free with the slightest bump. Later models incorporated a Velcro cinch strap which was more secure, but impossible to install with only one hand. When the collapsible variant became available, I settled on that one, as it was easily stuffed into a camera bag and used as a "lens cozy" for my medium zoom lens. The "dome" portion was detached and stored separately. Good thing, because I've taken to using the dome as a diffuser when taking white balance readings.

Packing Heavy: I normally carry two of everything when I'm on an assignment. Either as redundancy for backup or a chance to get multi-light creative, you will find two flashes in my bag. In being prepared, I normally use a round-headed Godox flash for its more even light pattern. But when the Light Sphere is needed, I switch to a more convention square-headed speedlight. Gary Fong claims to have made a new version that can be attached to a round-headed flash, but I haven't seen one for sale, and since I always have a suitable flash, haven't felt the need.

Monday, July 14, 2025

The Fourth Of July - Stage And Audience Combined


There are several Fourth of July events on the Peninsula. So far I've photographed in Foster City and Half Moon Bay, but never in San Mateo Proper.  As I mentioned in an earlier post, the Pet Parade in Foster City was a bust, so I drove up to San Mateo to photograph their dance party in Central Park. I didn't arrive in time for the Raising of the Flag, but did arrive in time to hear the band do their sound checks.

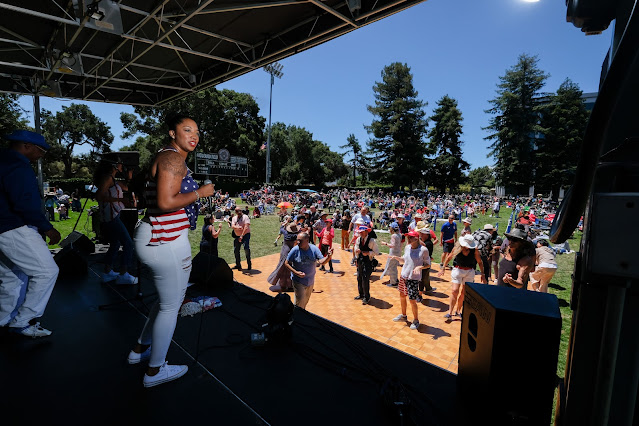
Early in the set I made a photo to determine the proper exposure for the sunlit dancers in the background. You can see plenty of color, contrast, and saturation, but the performers on the stage are terribly underexposed. Obviously I would need some flash assistance.

I had a Flashpoint Zoom Li-on R2, Adorama's house brand made before Godox imported the flash under its own name. The primary advantage is its fast recycle time (it uses a proprietary lithium ion 7.2 volt rechargeable battery and has a round head design for a more even lighting distribution. It also has a built-in receiver for the R2 series of radio flash triggers, so that output can be adjusted remotely. I decided I would make a simple exposure with the flash mounted in the camera's hot shoe.

This test shot showed that a camera-mounted flash could get the job done. with some limitations. The lighting was flat, as was expected. There was also a positioning issue. In order to get a good profile of my singer, she would have to be looking towards the audience at frame right, or else very little of her face could be seen. Even holding the flash with my outstretched right arm would  have improved the shot incrementally. 

While I do keep a small clamp for mounting a small flash in my camera bag, it has a maximum "bite" of 1.5", and there was nothing that size that I could reach.

It happens that I also carry a few small ball bungee cords, and by linking two of them together, I had enough stretch to tie my flash onto almost any convenient standing support. In this photo I made for an earlier post, you can see that this mini-flash was easily attached to a street sign support pole using a single short ball bungie. This particular flash, the diminutive LightPix Lab's Q20, is mounted up-side-down so I can tilt the beam directly at my subject  if I can get some altitude in my placement. The flash also has a built-in proprietary remote trigger built into the detachable hotshoe, a very handy feature. 

If you use your imagination, you can visualize how two linked ball bungee cords could be used to secure a medium-sized speedlight to one of the supports for the roof of this portable stage (red arrow). You can also see that I added a dome diffuser in an effort to get some light falloff so that my subject's white jeans would not be overexposed. Since the Godox remote flash triggers allow me to adjust the flash output from the camera. I was able to adjust the output at will. Even at full power my subject is not 100% properly exposed. In retrospect, the easiest fix would be to increase the ISO setting on the camera to brighten up my subject at the cost of overexposing my background.  I may try that next time, but I was confident that all the necessary corrections could be made in post production.
This last shot was made with the flash attached to the support, and a diffusion dome in place. I was hoping to soften the edges of the shadows by a tiny bit. I also tilted the flash head up slightly to feather the light hitting my subject's white pants. This would help draw the viewer's attention to her upper torso. Also the placement of the light to my right, along with the subject's gaze toward the left side of the frame, helped to separate her silhouette from the much darker background. 

I am not really happy with the poses, but as an unofficial member of the audience I had no say on where my subject stood, or what gestures you might make with her hands. This is an enlargement of the photo at the top of the post. As I mentioned, the position of the flash to my right allowed her silhouette to be clearly defined against the dark background. While it may look like a nose-thumbing, my justification for submitting this particular shot was that her hand was recognized for what it was, and not some shapeless beige appendage floating in space. 

I think about the context of the image, and it easily carries a message of "concert on a summer's day". The attitude of the dancers suggest that they are having a good time, and San Mateo residents will recognize the baseball field's transition to a concert venue. Really, everybody appeared to be having a fun time, and that's what this event was all about.

Monday, July 7, 2025

The Fourth Of July - The Doggie Dilemma

Happy Fourth of July: Two peninsula cities, Foster City and San Mateo, each scheduled their own Fourth of July celebration. In Foster City, there was a Pet Parade, followed by a band performance at Leo Ryan Park. Families had already laid claim to their place on the lawns for their picnics, and in years past, a place where they would normally watch the fireworks display over the lagoon. San Mateo planned for a band to perform on a stage erected on the baseball diamond in Central Park just for the occasion. Since this two-fer gave me two venues to work from, I decided to attempt to make a photo of the Pet Parade. then drive north to San Mateo for the Dance Party.

Experimenting: I've always tried to find different ways to photograph pets from their perspectives. I carry two Fuji bodies: a  T4 with a fully articulating LCD panel, and an older T2, which has an LCD panel that only rotates up or down, while staying aligned with the lens axis. If I'm looking straight down onto the camera  when making a long-angle shot, I much prefer the T2 because the LCD is easier to stay in alignment with the subject. I mounted my 10-24 zoom lens because I knew that I'd be working very close to my canine subjects. Finally, to the best light possible, I rotated my flash head so that when I held the camera at waist level, the flash would be pointing directly at my chest. I made a quick test shot of this dog whose owner was wearing these lovely heart-shaped sunglasses. After a few tries, I resigned myself to the fact that I was winning my Pulitzer here.

This tight cropping of one of those attempts does successfully illustrate the effects of my camera and flash setup. In the reflection you can see the silhouette of my shoe-mounted flash with the light bouncing off of my light-colored shirt. You will also notice that the light will fall on the subject from above the lens axis, which changes the size and nature of the catchlight. There is a problem with the camera-to-subject distance. As you can see that the farther from the subject you and your camera are positioned, the flatter the lighting becomes. You can see that there is almost no shadow beneath my subject's nose.

Photobombed: I was determined to make that full-framed photo of a patriotic puppy using this lighting setup. As I was preparing to photograph the dog with the star-spangled neck kerchief, this brave little Corgi decided to walk directly into the frame. You can catch the expression on my original subject, and almost see both the surprise and indignation in his eyes. However, the effect of this shirt-bounced flash on the Corgi was exactly what I was looking for.

Having been so upstaged, my enthusiasm for the venue fell through the floor, and I resigned myself to winning my Pulitzer with a photo for San Mateo. 

Head 'em up, move 'em out. Keep them doggies moving.

Sunday, June 15, 2025

The Viltrox 28mm F 4.5 In Use

1/200 second, F 4.5, ISO 200, 3-stop neutral density filter.
Sharp! I've been playing around with my new Viltrox 28mm F 4.5 quite a bit, and am very impressed with both its wide angle outlook on life, and the high degree of clinical sharpness. My assessment has been quite favorable so far, although adapting to the fixed F 4.5  aperture is still a work in progress.  But sharp it is, and this quality alone might justify a higher suggested retail price.

Now just for fun I included a cropped portion of the lead photograph. You can easily see the embossing on the bridge of my spectacles, which is a performance level well above its pay grade. Going back the lead image, I really liked how the out-of-focus background was so softly rendered

The Fixed Aperture: This particular lens has an aperture fixed at F 4.5. With low ISO settings, aperture priority exposure mode setting, and an outdoor subject this is definitely not a disadvantage unless you want/need greater depth of field. But as you may have guessed, I tend to think about what I would need to do if I wanted to employ a flash, and how this fixed aperture size might complicate a shooting solution. Since all of my current  interchangeable lens mirrorless bodies sync at about 1/200 of a second, the F 4.5 aperture makes it almost impossible to use it with flash outdoors. Que the ND Filter.

Bring The Darkness: Neutral Density (ND) filters can darken an image by reducing the amount of light passing through the lens. The one I purchased decreases the light throughput by 3 stops, turning my F 4.5 lens to an effective F-stop of between F11 and F 16. If you examine the lead shot's exposure data and adjust the aperture to accommodate the ND filter. the settings closely correspond to the values derived from the "Sunny Sixteen Rule". The combination of filter and fixed aperture allows my to properly expose a sunlit subject at a shutter setting low enough for effective lash application. The exposure settings gave me the cyan sky I so adore, but shadow detail has been sacrificed to achieve it. The facial illumination? I used a shoe mounted flash bounced off my neighbor's  white garage door.


Here's my Sony Alpha 7 with, from top to bottom :
Conclusion: This has been an exercise in extending the capabilities of an inexpensive, albeit useful, lens into the possible deployment into the "flash zone". Now all of this could be duplicated by using an 18mm APS lens on any of my Fuji bodies and mounting a neutral density filter for use with the F 4.5 shooting aperture. This flash, ND filter, and lens combination produced an interesting image with foreground detail and a softly rendered background. Again, just the sort of trick that might come in handy someday.

Sunday, June 1, 2025

Custom White Balance With Flash


This should have been the money shot from a recent "Kitten Shower" held by the Peninsula SPCA. I sent two other photos for the Editor In Chief to select from and for some reason this one wasn't one of them, although the more I look at it, the more I wished I had sent it.

The venue featured narrow hallways with yellow walls and ceilings. I made this test shot by bouncing my flash off the ceiling, and you can see the yellow tint on my subject's faces. If the surroundings were painted in a warm color, the added tint might have gone unnoticed, or in the best case, actually improved their coloration. Yellow, unfortunately, gives my subjects a jaundiced look, and technically accurate, but not complimentary.

Now before proceeding, you should familiarize yourself with how to create a custom white balance (CWB) setting. While it may have been a novelty when digital cameras evolved, photographers soon realized that while one such preset would be very useful, the ability to create one for each venue where the lighting varied even the slightest bit. Currently, most cameras have provisions for multiple saved presets. Sure, you can correct this in post production, but by taking a few seconds to establish an "environmentally appropriate" CWB setting, you can save yourself  a lot of time during post production.

Read Ken Rockwell's review here.
White Balance Measurement. When the Expo Disc first appeared on the market in 2011, it gave photographers an easy way to obtain a CWB setting. It was designed primarily for achieving a compromise white balance formula when working with continuous artificial light sources. In use, one would:
  • Select the CWB (or equivalent) setting from the camera's menu,
  • Set the Exposure Control to A,
  • Attach the Expo Disk to the front of the lens,
  • Point the camera towards the light source, and
  • Press the shutter release.
Internally, the camera would evaluate each photo sensor and adjust the red, green, and blue readings until they were all the same value, yielding a "neutral" baseline for the white balance setting.

Buy yours here.
I gave away my Expo Disk years ago, and experimented with a variety of gray card substitutes as a "target" for creating a CWP value. I finally replaced the Expo Disk with this inexpensive plastic Dot Line White Balance Lens Cap, which works just as well as the three-times more expensive Expo Disk. It could be adapted to serve as a lens cap, as it was made in a variety of diameters from 52 to 77mm. At one time they could be had in 49 and 82mm sizes, but apparently no longer. Since they were so inexpensive, I bought one in every diameter, but in the end, just carried the 82mm size and just held it in place over the lens whenever I needed to create a CWB for the current photographic venue. I keep one of these in all of my "recreational" camera bags, and there should have been one in the "working bag" I carry when on assignment.  I repeat: Should have.

I realized that the disk would have been the only way to properly achieve a  CWB for those pesky yellow walls. As it turned out, the disk was nowhere to be found. I wondered what I would do next, until I found the Dome from my Gary Fong Light Sphere. I now held a perfectly usable neutral diffuser that I could hold in front of my lens while I measured the light bouncing off of those yellow walls. I promptly did just that, and it gave me the proper white balance for all the photos when I bounced my flash off of similarly painted walls

In this historically accurate reenactment, you can see how I held the dome in front of the lens while I made the CWB reading. The forward-facing flash is directed towards the selected bounce surface when the reading is made. In the event of an over or under exposure warning, I will need to adjust the output until I get a proper reading. I rotate the flash head towards the bounce surface when I am actually shooting.

As described, this flash technique should only be used when bouncing off of a reflective surface. If the flash is to be used as a direct light source,  repeat this process while aiming your flash/camera into a convenient mirror. If you're adjusting the flash output manually, you'll need to dial the output way down, select a smaller shooting aperture, or both.

For the technically inclined, this photo was made (obviously) with two cameras: one mounted on a tripod, and the other held in my hand. The key light was provided by a radio controlled speedlight mounted on a light stand just to the left of the camera. A shoot-through umbrella was utilized for the shot. The second flash on the camera in my hand was programmed to respond to the radio trigger of the tripod camera, thus ensuring that it would fire when the tripod camera fired the key light. The fully articulating screen of the Fuji T-4 helped me position myself within the frame. Final cropping gave me the composition I wanted.