Tuesday, July 29, 2025

Mike Annuzzi


The assignment was to make a photo of Redwood City native Mike Annuzzi as a promotion for his upcoming show at the Fox Theater. I've been very fortunate that my assignments have included so many local talents, I was delighted with the prospect of photographing another San Mateo County creative.

My editor suggested that a photograph could be published to highlight Mr. Annuzzi's first theater performance in Redwood City, his home town. While casting about for the background location, Mr. Annuzzi suggested that a local music store in RWC might be appropriate and convenient. He sent me a photo of the store's guitar showroom, and I liked what I saw. After confirming that a 1:00 pm photoshoot would present little or no hardship on the store's operations, we went for it.

When I first saw the showroom, I decided to concentrate on the following visual elements:

  • I wanted to use converging lines to direct the viewer's attention to Mr. Annuzi's face,
  • I wanted to feature as many guitars as possible, and
  • I wanted the lighting placement to add some visual drama.

I started with a shoot-through umbrella mounted on top of a light stand at a height of almost eight feet. This test shot demonstrated that I would need to increase the output to get the desired level of brightness. Also, I would be shooting from the back of the store towards the front, and the store itself was pretty dark when compared to the showroom.

For this next shot, I added two flashes that are positioned out of frame. First, I put a snoot on Flash Number two and positioned it outside the showroom and pointed directly as Mr. Annuzzi's head. If you look closely you can see the highlight on his neck which provides some background separation. Flash Number Three was pointed at the guitar display just outside of the showroom.

For this shot I positioned the camera very close to the ground with the intent of using the black ceiling to direct the viewer towards Ms. Annuzzi's face. Looking at the intersection of the black ceiling and my subject's head, I think I overdid it. Time to move on.

For the final series of shots I added two additional flashes. First, I wasn't happy with the black ceiling visible at the front of the store. I added Flash Number Four on the counter and aimed it towards the ceiling. Fortunately it naturally pointed to the light fixture in the ceiling. This suggests, gently, that the lighting fixture itself provided that bit of brightness. Flash Number Five was clamped to a stool and pointed straight down at the floor. This bounce light provides a bit of fill light that is barely detectable because it does not add additional highlights on the subject's face. 

Looking back, it might seem that this was a lot of work for a photo as ephemeral as a newspaper publicity shot. However, I wasn't looking for a simple shot. I wanted a photo that had some visual depth, where one could sense that there were details behind the main subject, and I believe the photo succeeded. I was not without some areas that could be improved.

Light Spillage: I struggled to eliminate, or at least reduce, the glare coming off the faces of these guitars. My first impulse was to change the position of the key light in relation to my shooting position. After several tries, I gave it. But during post production, I realized the glare was not created by the light's location, It was actually light spilling over the edge of the shoot-through umbrella. I then noticed that the shadows from the "shiny" guitars were cast in a direction different from those from the guitars closer to the ceiling. What I should have done was to add some sort of light-proof barrier (called a "flag") on the flash head to prevent the light from sneaking past the umbrella. A big piece of gaffer tape would have done the trick, so I just slapped a 2" wide strip of gaffer tape onto the flash body so I won't have to look for one the next time it's needed. Be sure to fold one end over itself (sticky face to sticky face) to provide a handy tab for rapid deployment.

Kicking The Kicker: The "kicker" light is directed from behind the subject and used to provide separation from the background.
In this uncropped version of the submitted photo you can see the kicker at left edge of frame. The arrows along Mr. Annuzzi's right side shows where the light "skidded" off the edge to provide a rim of light. Since the flash
 hadn't yet been restricted by a grid spot or a snoot, its broad beam light edges his whole upper body. When a snoot or grid spot is added, the beam would be narrower, and lighting a specific portion of the subject would become a matter of luck.

The work-around for this would be to position your subject and then walk back to where the flash is. With the grid spot/snoot in place, photograph your subject from the rear. When you preview the image, you can see exactly how much of the subject will benefit from the kicker. Adjust the light until the beam falls exactly where you want it.

Now that I have solutions to these "in the field" problems, I can wait for another assignment that requires a similar level of attention to detail. Incidentally, the shoot took about one hour from first to last handshake, but the satisfaction I received from the final result was immeasurable.

Monday, July 21, 2025

Good Old Reliable Light Sphere

If a photographer is just getting into the indoor flash thing, I continue to recommend that the first light modifier you buy is the Gary Fong Light Sphere. In spite of all my experimentation with dozens of different modifiers and techniques, you can't beat the Light Sphere for simplicity and consistency. I remember the first time I used it to make a group photo with Senator Jackie Speier when she visited an upholstery class that was held on one of our campuses. I literally took it out of the box, attached it to a NIkon D600 speedlight mounted on a Nikon D50 body, and by simply following the instructions, took a very acceptable class photo. The Light Sphere was a relatively new product at the time, and was something my subjects had never seen before. It was introduced in late 2004, and since then one of the many versions has always been within arm's reach. 

Hail Mary: The photo at the top of this post was taken by simply mounting the Sphere onto an on-camera flash, holding the camera high overhead, and framing the shot using the tilting LCD on the back of my T-2. I mentioned that I find the T-2's simple "tipping" panel more practical that the T-4's that is fully articulating. Notice that by using a reasonably powerful flash at a relatively short distance, there is enough light to balance the street visible through the window behind my subjects. 

I will say  that there is no perfect variation. The originals were designed to fit certain families of flash heads and while easily attached to the flash, they were easily knocked free with the slightest bump. Later models incorporated a Velcro cinch strap which was more secure, but impossible to install with only one hand. When the collapsible variant became available, I settled on that one, as it was easily stuffed into a camera bag and used as a "lens cozy" for my medium zoom lens. The "dome" portion was detached and stored separately. Good thing, because I've taken to using the dome as a diffuser when taking white balance readings.

Packing Heavy: I normally carry two of everything when I'm on an assignment. Either as redundancy for backup or a chance to get multi-light creative, you will find two flashes in my bag. In being prepared, I normally use a round-headed Godox flash for its more even light pattern. But when the Light Sphere is needed, I switch to a more convention square-headed speedlight. Gary Fong claims to have made a new version that can be attached to a round-headed flash, but I haven't seen one for sale, and since I always have a suitable flash, haven't felt the need.

Monday, July 14, 2025

The Fourth Of July - Stage And Audience Combined


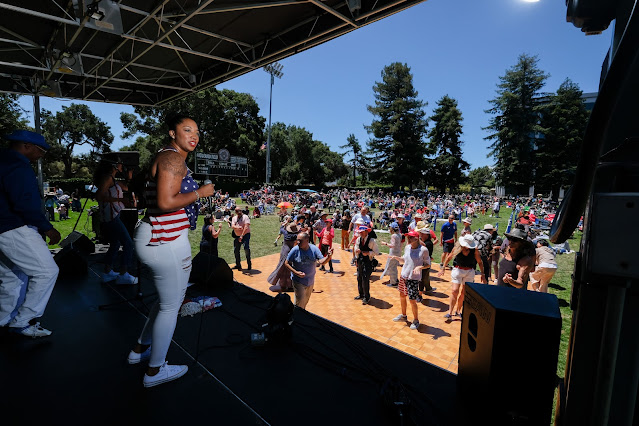
There are several Fourth of July events on the Peninsula. So far I've photographed in Foster City and Half Moon Bay, but never in San Mateo Proper.  As I mentioned in an earlier post, the Pet Parade in Foster City was a bust, so I drove up to San Mateo to photograph their dance party in Central Park. I didn't arrive in time for the Raising of the Flag, but did arrive in time to hear the band do their sound checks.

Early in the set I made a photo to determine the proper exposure for the sunlit dancers in the background. You can see plenty of color, contrast, and saturation, but the performers on the stage are terribly underexposed. Obviously I would need some flash assistance.

I had a Flashpoint Zoom Li-on R2, Adorama's house brand made before Godox imported the flash under its own name. The primary advantage is its fast recycle time (it uses a proprietary lithium ion 7.2 volt rechargeable battery and has a round head design for a more even lighting distribution. It also has a built-in receiver for the R2 series of radio flash triggers, so that output can be adjusted remotely. I decided I would make a simple exposure with the flash mounted in the camera's hot shoe.

This test shot showed that a camera-mounted flash could get the job done. with some limitations. The lighting was flat, as was expected. There was also a positioning issue. In order to get a good profile of my singer, she would have to be looking towards the audience at frame right, or else very little of her face could be seen. Even holding the flash with my outstretched right arm would  have improved the shot incrementally. 

While I do keep a small clamp for mounting a small flash in my camera bag, it has a maximum "bite" of 1.5", and there was nothing that size that I could reach.

It happens that I also carry a few small ball bungee cords, and by linking two of them together, I had enough stretch to tie my flash onto almost any convenient standing support. In this photo I made for an earlier post, you can see that this mini-flash was easily attached to a street sign support pole using a single short ball bungie. This particular flash, the diminutive LightPix Lab's Q20, is mounted up-side-down so I can tilt the beam directly at my subject  if I can get some altitude in my placement. The flash also has a built-in proprietary remote trigger built into the detachable hotshoe, a very handy feature. 

If you use your imagination, you can visualize how two linked ball bungee cords could be used to secure a medium-sized speedlight to one of the supports for the roof of this portable stage (red arrow). You can also see that I added a dome diffuser in an effort to get some light falloff so that my subject's white jeans would not be overexposed. Since the Godox remote flash triggers allow me to adjust the flash output from the camera. I was able to adjust the output at will. Even at full power my subject is not 100% properly exposed. In retrospect, the easiest fix would be to increase the ISO setting on the camera to brighten up my subject at the cost of overexposing my background.  I may try that next time, but I was confident that all the necessary corrections could be made in post production.
This last shot was made with the flash attached to the support, and a diffusion dome in place. I was hoping to soften the edges of the shadows by a tiny bit. I also tilted the flash head up slightly to feather the light hitting my subject's white pants. This would help draw the viewer's attention to her upper torso. Also the placement of the light to my right, along with the subject's gaze toward the left side of the frame, helped to separate her silhouette from the much darker background. 

I am not really happy with the poses, but as an unofficial member of the audience I had no say on where my subject stood, or what gestures you might make with her hands. This is an enlargement of the photo at the top of the post. As I mentioned, the position of the flash to my right allowed her silhouette to be clearly defined against the dark background. While it may look like a nose-thumbing, my justification for submitting this particular shot was that her hand was recognized for what it was, and not some shapeless beige appendage floating in space. 

I think about the context of the image, and it easily carries a message of "concert on a summer's day". The attitude of the dancers suggest that they are having a good time, and San Mateo residents will recognize the baseball field's transition to a concert venue. Really, everybody appeared to be having a fun time, and that's what this event was all about.

Monday, July 7, 2025

The Fourth Of July - The Doggie Dilemma

Happy Fourth of July: Two peninsula cities, Foster City and San Mateo, each scheduled their own Fourth of July celebration. In Foster City, there was a Pet Parade, followed by a band performance at Leo Ryan Park. Families had already laid claim to their place on the lawns for their picnics, and in years past, a place where they would normally watch the fireworks display over the lagoon. San Mateo planned for a band to perform on a stage erected on the baseball diamond in Central Park just for the occasion. Since this two-fer gave me two venues to work from, I decided to attempt to make a photo of the Pet Parade. then drive north to San Mateo for the Dance Party.

Experimenting: I've always tried to find different ways to photograph pets from their perspectives. I carry two Fuji bodies: a  T4 with a fully articulating LCD panel, and an older T2, which has an LCD panel that only rotates up or down, while staying aligned with the lens axis. If I'm looking straight down onto the camera  when making a long-angle shot, I much prefer the T2 because the LCD is easier to stay in alignment with the subject. I mounted my 10-24 zoom lens because I knew that I'd be working very close to my canine subjects. Finally, to the best light possible, I rotated my flash head so that when I held the camera at waist level, the flash would be pointing directly at my chest. I made a quick test shot of this dog whose owner was wearing these lovely heart-shaped sunglasses. After a few tries, I resigned myself to the fact that I was winning my Pulitzer here.

This tight cropping of one of those attempts does successfully illustrate the effects of my camera and flash setup. In the reflection you can see the silhouette of my shoe-mounted flash with the light bouncing off of my light-colored shirt. You will also notice that the light will fall on the subject from above the lens axis, which changes the size and nature of the catchlight. There is a problem with the camera-to-subject distance. As you can see that the farther from the subject you and your camera are positioned, the flatter the lighting becomes. You can see that there is almost no shadow beneath my subject's nose.

Photobombed: I was determined to make that full-framed photo of a patriotic puppy using this lighting setup. As I was preparing to photograph the dog with the star-spangled neck kerchief, this brave little Corgi decided to walk directly into the frame. You can catch the expression on my original subject, and almost see both the surprise and indignation in his eyes. However, the effect of this shirt-bounced flash on the Corgi was exactly what I was looking for.

Having been so upstaged, my enthusiasm for the venue fell through the floor, and I resigned myself to winning my Pulitzer with a photo for San Mateo. 

Head 'em up, move 'em out. Keep them doggies moving.