Sunday, November 3, 2019

Upping My Game With Background Lighting

1/125 second, F 5.6, ISO 1600
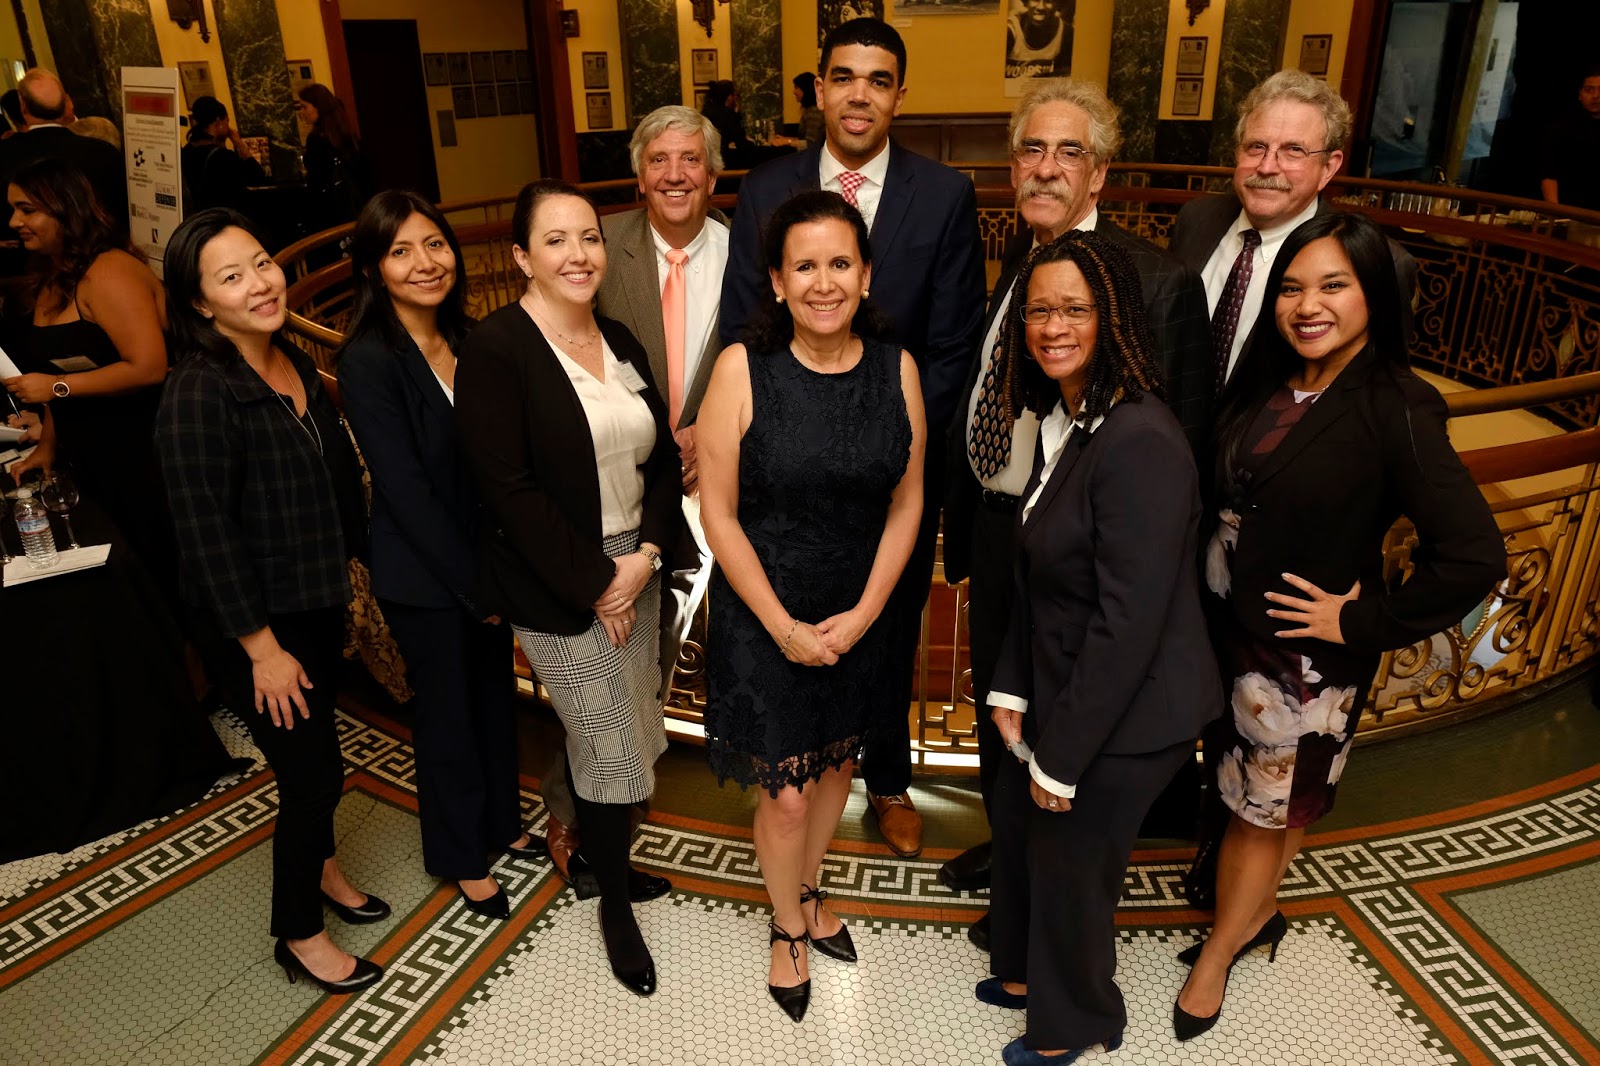
Trying Something Different: I've photographed members of San Mateo's legal community for several years, and frequently find myself in the historic Courthouse in Redwood City. The rotunda is especially photogenic, but at times difficult to light properly. In the past, I'd use a speedlight with a shoot-through Zumbrella* mounted on a light stand. But the last time I was there, I left the lightstand in the car and simply bounced a camera-mounted speedlight off of a large wall behind me. By using a high ISO, I was able to get a proper exposure with a Godox V1 flash. The wall bounce created a lighting surface many times larger than the one created by a shoot-through umbrella or a softbox. Notice that the shadow edges are extremely soft, and that the highlights on my subject's foreheads are very broad.

Next, I needed to balance the background with the bounce-lit foreground. I clamped a second V1 flash on the balustrade and aimed it towards the wall behind my subjects. I own one Nikon and one Fuji version, and when the shoe mounted Fuji version was used as a commander, it can communicate with the Nikon unit, so long as the group and channel settings on both units match. This cuts costs and increases compatibility when you work with two different platforms, as I do.

Because of the distance across the rotunda, the flash output was at nearly full power. You can see the Gorillapod I used to attach the flash on the rail. The flash was held in place with a cold shoe mounted on the 'pod's 1/4 x 20 tripod screw. When the flash was properly aligned, gave me the results I wanted. It turns out that stability of the arrangement was an issue. More on that later.


Because the flash to subject and flash to background distances remain fairly constant, some balancing of the two lights  may be required. Once the optimal output was determined, moving closer to my three subjects required no major exposure adjustments. While the photograph appears to have only one light source, careful examination will show that there are some indicators of my twin-flash lighting solution. If you look at the archway on the left side of the background, you will see a distinct vertical shadow, a sign that a second light was used. The shadow is also an reminder of how dark the background would have been if the a second flash was not used.

Bumps In The Road: As is my habit, I invited my host to gather as many group photos as she liked, simply because it wouldn't involve any additional effort once the lighting solution has been established. I noticed that this series of photos didn't look like the others because it appeared that my background light had failed to trigger. After this shot was made, I dismissed the group and discovered that the Gorillapod had rotated on the round railing and was now facing straight down, probably bumped by one of my subjects. If you look at the cropping on the right, you can see the highlights created by that wayward flash. In the future, I'll be sure that the 'pod legs have something else to grab onto for additional support. I also purchased a medium-sized lightweight photo clamp with a tiny ball head for mounting a 1/4 x 20 cold shoe. This should prove more secure.

The Takaway: There is an important takeaway from this assignment: A second flash can really improve the appearance of the final photo without too much additional work. When I attempt a similar shot in the future, I would start by determining the  background flash output and ISO combination necessary to produce a suitably exposed background at F 5.6. Next, I'll stand exactly where I plan to place my subjects and make selfies, adjusting the power output on the flash until I get a suitable selfie exposure.  Once this is done, I'll only need to adjust the exposure on my on-camera flash.

Radio Triggering Alternative: You may know that I've taken to using Godox flashes, primarily for their fast recycling times and built-in radio triggers. While convenient, they can be flummoxed when you cannot establish an unobstructed line-of-sight relationship between the controller and the remote. In the future, I may include a Nikon SB-800 speedlight to use an an optical trigger. Forgive my terrible mockup. I'd tape my snooted SB-800 (red bubble) set to the optical trigger (SU-4) mode on the other side of the rotunda. Both the flash head and the sensor would be rotated to face the backs of my subjects. Then I would  re-configure the Godox flash  on the balustrade to trigger with its built-in optical trigger. The on-camera Godox would be configured in the manual mode. In use, my on-camera flash would bounce off the back wall, providing enough light to trigger my background SB-800. When it flashes, the light will be directed across the rotunda towards the rail-mounted Godox, causing it to fire and illuminate the background. This execution is very convoluted, but necessary if the native radio triggers in the Godox units fail to communicate properly.

I bring this up because this kind of lighting can be obtained using almost any flash with manual output controls. An optical trigger can be attached to the existing flash hot shoe, or in the case of some select Nikon speedlights, the built in in SU-4 modes deployed.  I dare say that similar results can be had with very little cash output, a little imagination, and an appropriate amount of planning. 

*The Zumbrella is a proprietary shoot-through umbrella manufactured for, and sold through, David Ziser, a well-known Kentucky wedding photographer. The fabric was less opaque than the normal shoot-through umbrella, allowing more light to reach the subject.

Sunday, October 27, 2019

Minimal Location Lighting - Fall Rendezvous

1/320 second, F 5.6, ISO 500. Open Shade white balance preset. Focal length 75mm (112mm APS equivalent)

Rendezvous!  I had a chance to photograph the participants in a Fur Trade era Rendezvous held in Marin County. Most people are familiar with Civil War Reenactments, but "Rhondys" celebrate a period in American history that predates the War Between The States. It can be described as that period that started after Lewis and Clark's expedition and ended in the late 1830's when the demand for beaver pelts evaporated with the introduction of wool felt for making hats. These hearty souls, commonly called Mountain Men, would venture into the Rocky Mountains to trap beavers for their pelts, Once a year, they would come to the lowlands and meet with merchants at a "rendezvous" to trade the plews (processed beaver skins) for supplies (and liquor!). The event was an excuse to let off some "steam" and indulge in some rough and tumble play. 

Today, all sorts of people meet at club-sponsored rendezvous to celebrate the life style and self sufficiency of the Mountain Men.  Participants dress in period correct clothing, camp in period correct "primitive" tents, cook their meals over open fires (when it's safe to do so), and test their marksmanship skills, just as they did 150 years ago.

The plastic tool box sits beside the tree branch used to identify the mark where the subjects would stand.

The Setup: I decided to make some formal photos that the club might use for their web site. Since the fall leaves were in full color, I chose a fully-leafed maple tree as a background. The morning sun was streaming through the leaves so the background gave me a variety of bright yellows to work with. I found a suitable "mark" on the ground for my subjects to stand on, and then proceeded to set up a light stand to support a shoot-through umbrella. The flash happened to be a Godox with its built-in radio trigger. Any flash that could be fired off camera could have been used, but the fast recycling time would definitely speed things up. The flash was position about 7 feet from my subjects, the distance and exposure determined using the "selfie" method. The camera was a simple, 6 megapixel Nikon D70. I used both a 28-70 Tamron and a 70-300 Nikkor.

Focal Length: 140mm (210 APS equivalent)
For the photograph at the top of the post, I positioned my lady pioneer in the shade of a tree so that the dappled sunlight would create highlights on her shoulders. I instructed my subject to lift her chin until she could see the entire umbrella. This would prevent the brim of her hat from casting a shadow over her eyes. Just before shooting, I would re-direct her gaze towards the camera. Unfortunately, my subject tilted her head down at the last moment, casting a slight shadow on the eyes. Since this was the best smile of the series, it's the one I will post. 

This 3/4 length shot (right) was made by backing away from my subject and increasing the focal length to 140mm. This de-focused the background even more, making it more abstract. Since the distance from the subject to the flash remained the same,  no changes in exposure were necessary, providing I stayed with an aperture of 5.6. I was not using a constant aperture zoom lens, so extending the focal length always decreased the maximum working aperture. F 5.6 was a  valid setting for all of the lens focal lengths.

Posing Note: I wanted the end of the rifle barrel to be at the same level as my subject's eyes.  I used the plastic toolbox shown in the layout photo to support the weight of the rifle while elevating the muzzle to eye level. The box was outside of the frame and wouldn't appear in the final photo.

Focal Length 75mm (APS equivalent 105mm)
Gary Cooper: I couldn't help but think of Gary Cooper when this reenactor struck a stern, man-of-the-frontier pose. I shot from a low angle to give the illusion of height. The longer focal length of the lens minimized any foreshortening, so his hands appear in proper proportion to the subject's face.

Full Length Shot: By simply backing away from my subject, I could produce a  full length portrait. If you look closely, you can see that the illumination begins to fall off slightly below his waist. When "aiming" your shoot-through umbrella, try to point the shaft directly at your subject's face, not at the center of their body. You'll want the facial expression to be the visual center of attention, so make sure it's the brightest region in your photograph.

Final Notes: These photos were not made with my primary cameras. The Nikon D70  I used was removed from active service long ago. The appropriate APS lenses were relatively inexpensive when compared with the constant aperture zooms I normally use. But these lenses have proven themselves as sharp enough for most purposes. When using these older cameras, it is important that you frame your image as tightly as possible so you can use every last one of those precious pixels. I set my camera to create both a normal JPG and a RAW image simultaneously. This way I can fine tune my exposure in RAW when major exposure corrections are necessary, and use the JPG when it isn't.

It isn't necessary to spend a lot of money on a lithium battery powered flash if you need both power and fast recycle time. You can always use two flashes set to one-half power.  This will shorten your recycling time significantly. I described the home-make double flash mount here. You will also need a reliable trigger, and one suitable candidate is described here.