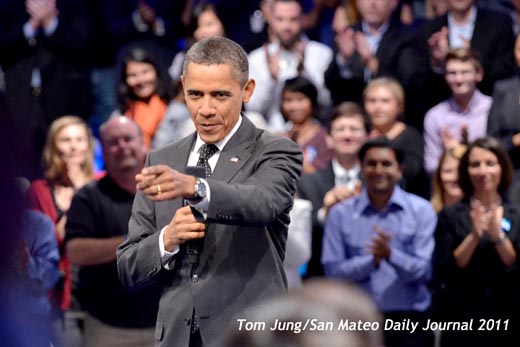
Monday, September 26, 2011. President Obama was scheduled to present a Town Hall type meeting a the Computer History Museum in Mountain View. I arrived at 6:30am to find out that I was too late to get access to the shooting riser that had been set aside for still photographers covering the event. Not that I was late, mind you. I just mistakenly tried to enter the law enforcement entrance and spent 10 precious minutes trying to find the Media Entrance, which was locked when I found it. Now I'm in a pickle. Two more senior photographers from the San Mateo Daily Journal, Scott Lenhart and Andrew Scheiner, were far better prepared than I, as they arrived at 5:30 (the suggested opening) and dropped off their equipment and were now relaxing until we all could enter the hall and begin preparing our equipment at 9:00 am, sharp.
Somehow, either because I was lucky or pitiful, I managed to get a hand check of my equipment by a Secret Service agent. After the obligatory wanding, I headed into the hall and tried to stake out a spot. I wound up at the far right end of the riser next to the sound mixing station and behind two network video cameras. By 10:00am, nearly a full hour before the President's arrival, our shooting area was beginning to get crowded.
Good Idea #1: Always Carry A Speedlight: The Secret Service specifically said, "No Flash Photography", but since President Obama was an hour away, I felt that these "color commentary" shots would certainly be permissible. I wanted a shot of the melee that was forming in front of me, but all of the spotlights were pointed at the stage, which left us in the dark, literally. I needed a splash of light to illuminate the foreground. I could have used the flash built into the top of your camera, but the light would have been uneven, fading rapidly as the distance increased. In addition, if used in the TTL mode, the flash and camera would have been easily fooled by the disparity of distances within the frame.
Instead, I mounted an SB-800 on the D7000 and pointed it straight up into the ceiling, which was probably 20 feet above us. Since my current camera settings (shutter speed 1/125 and an 11-16mm Tokina set to F4) included an ISO of 1600, I was able to aim the flash straight up and bounce light off the ceiling. The light, now traveling a distance of over 40 feet, evenly lit the players in front of me, and completely disappeared towards center stage. And while the White Balance setting was at Auto, the deep blue drapes must have compensated for the warm tone of the spotlights, a happy accident and a believable rendering of the stage-lit audience. The flash was set to manual at 1/8 power and gave plenty of light. If you examine the people at the far right edge of the photo, you can see the "daylight" from the flash start to fade, and the tungsten light start to pick up, as the distance from the lens increases.

The speedlight's power setting was determined through trial and error, and since the overall appearance of the photo was pleasing, I kept shooting until I saw something interesting in the foreground. Thank goodness for digital cameras and the preview mode!
If you carefully examine this image, you can see that my shooting position was not the best. There were two real problems. The first was the height of the video cameras. If you drew an imaginary line across the tops of the two cameras, you can see that my view of the President would be obstructed when he sat down. This meant that I would be forced to shoot between them, and would be their mercy if the operators panned their cameras from side to side. Also, the big Linkedin logo was at an angle from my vantage point. This would not look good as a background.

With all of the light directed toward center stage, everything in the immediate foreground was nearly black. Without my flash, this Point-And-Shooter was completely silhouetted against the background drapes. But the brightness of the LCD on the camera appeared to be equal to that of the background. I liked this shot because it was both a study in "blue" and it illustrated how one photographer overcame the shortcomings of his shooting position.
Good Idea #2: Live View Rocks (sometimes): I needed to get a photo with a little more context, one that said, if not shouted, "Linkedin". Seeing the oversized logo in the center, I positioned myself so I could photograph it dead-on without any perspective distortion. I finally got to a good position, but found that EVERYBODY had bunched up directly in front of me, obviously trying to get the same vantage point. While I could have just blindly held my camera aloft and did the "shoot and chimp" routine, I turned on Live View, and while holding the camera above me, adjusted its position until I could see that the logo was parallel with the top edge of the LCD screen. I shot several photos, keeping one eye on the alignment in the LCD and the other on the President. When he made a thoughtful gesture, I shot, being careful not to disturb the camera held precariously above my head at arm's length.
Good Idea #2: Live View Rocks (sometimes): I needed to get a photo with a little more context, one that said, if not shouted, "Linkedin". Seeing the oversized logo in the center, I positioned myself so I could photograph it dead-on without any perspective distortion. I finally got to a good position, but found that EVERYBODY had bunched up directly in front of me, obviously trying to get the same vantage point. While I could have just blindly held my camera aloft and did the "shoot and chimp" routine, I turned on Live View, and while holding the camera above me, adjusted its position until I could see that the logo was parallel with the top edge of the LCD screen. I shot several photos, keeping one eye on the alignment in the LCD and the other on the President. When he made a thoughtful gesture, I shot, being careful not to disturb the camera held precariously above my head at arm's length.

I was well pleased with the final photo. You can clearly see that the heads of photographers and the bodies of the video cameras, but they helped to frame the image and refine the composition. Interestingly enough, this wasn't my first choice, as I felt the logo was a little over the top. But the Editor in Chief, seeing the photo, pushed it to the front page, above the crease, and gave it a full four columns of width.
Sometimes, you just get lucky.
*The quote is usually associated with actor John Wayne (1907-79) who allegedly used it, or a similar variant, in the western "Stagecoach". Or was it "Hondo"? Or "Shane"? WikiAnswers cites Fred MacMurray (1908 – 1991) as saying it in "The Rains of Ranchipur" in 1955.
Play it again, Sam.

