Monday, June 17, 2024

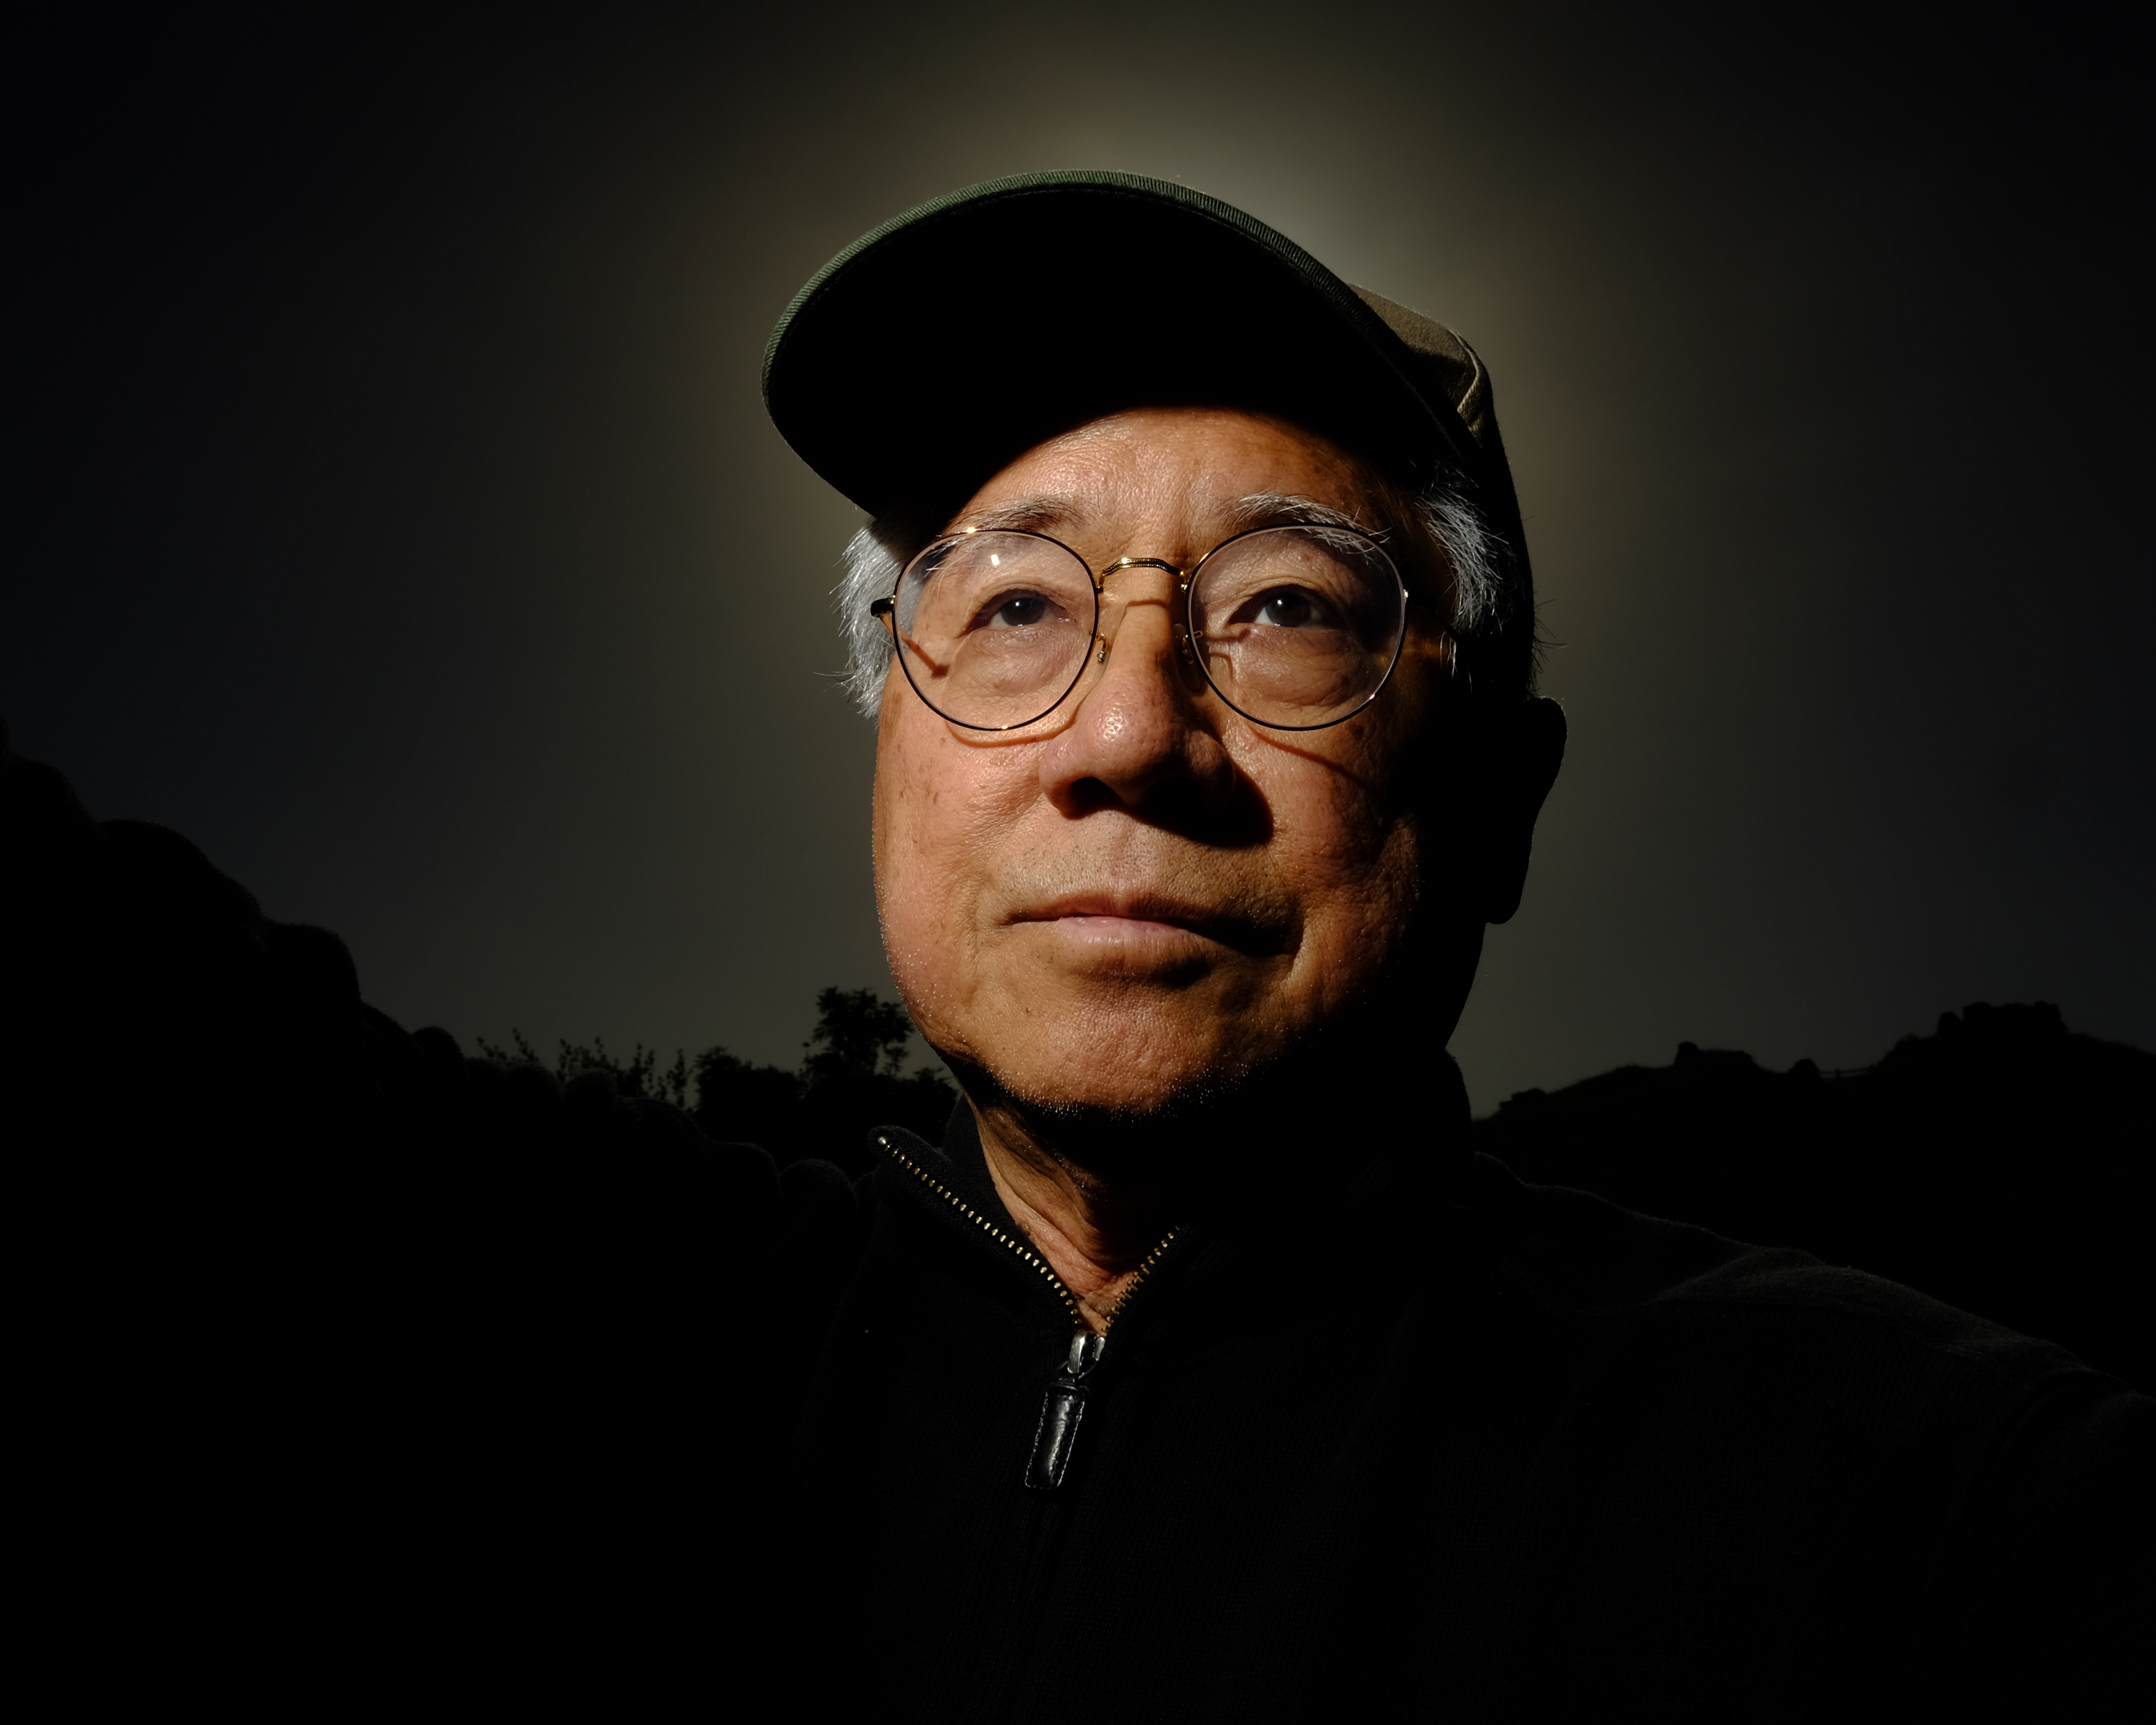
Selfie Scramble With A Side Of Flash

Cropped Image. 1/1000, F 16.0, ISO 400
My selfies are not a fan favorite. But there are three advantages to being your own subject:

  • Your subject is always on time,
  • Your subject never complains, and
  • Your subject never offers unsolicited suggestions.
These selfies were made from a base exposure of 1/1000 second, F 8.0, and and an ISO setting of 400. I used my tiny FlashQii, triggered with the dedicated wireless trigger. 

Cherubic: That's me. When you make a selfie from arm's length, you could experience some distortion due to foreshortening, that alteration of apparent relationships between near and far subjects. Ideally, the best distance between the photographer and the subject is three feet. This particular image was made at a distance of about eighteen inches, and then cropped to the desired framing. Shooting from a low angle creates its own set of perspective problems. However, this image was presented as an exercise in exposure control, which I'll cover later in this post. I will admit to using a fair amount of editing magic to produce this version.

Managing Backlight
: For these shots, the sun was at my back. To prevent lens flare, I position the camera so that the shadow from my head prevented any direct sunlight from entering the lens. This is easier in the early morning because the sun is lower on the horizon. I made this sample shot early in the afternoon when the sun was nearly overhead. As you can see, the shadow cast by my head completely covers the lens itself. And obviously, I would be looking directly into the lens.

Shots On The Fly: You may conclude that the adjustments may not appear logical. In retrospect, these adjustment were made on the fly, and sometimes two adjustments may cancel themselves out. It's simpler to remember that it's the final photo that counts, and that incremental changes will be made with whatever adjustments are available. There are some settings that have a "hard deck":
  • Exposure: 1/1000 of a second is the shortest setting that can capture the full output of the small flash I'm using. 1/2000 of a second results in "clipping" part of the flash discharge, resulting in less usable light illuminating your subject.
  • Aperture: F 16.0 is the smallest mechanical aperture available to most lenses. Manufactures know that small apertures decrease image sharpness due to diffraction. or the scattering of light as it turns the corner around the edge of the aperture blades. A built in neutral density filter might have helped, if my camera had one.
  • ISO: The lowest setting available to my Fuji bodies is ISO 100. 
1/1000, F 16.0, ISO 100

Full Tilt Boogie: This photo was made at the shortest possible exposure. I reduced the aperture from F 8.0 to F 16.0, a net loss of two f-stops, or a reduction to one-quarter of my base exposure.  By dropping the ISO value from 400 to 100, I reduced the exposure by another two f-stops. This image is "straight out of camera" (SOOC), with no adjustments whatsoever. The sky is nearly black, as were the shadows cast on my face. This was the ultimate photographie de nuit, made at 8:18 am in the presence of a bright morning sun.

The exposure was made with the sun at my back and I positioned the camera so that the lens was completely shielded from the sun by the shadow of my head. That faint glow was probably from the scattering of light from the atmospheric moister. No dodging or burning, simply au natural.

1/500, F 16.0, ISO 100

This second shot was taken after I made a one-stop adjustment to the exposure time. The sky is not as dark, while the flash exposure is pretty much the same. My face does appear brighter, but this could easily be due to a change in the Flash To Subject distance, as absolute consistency is difficult to maintain when you are both the model and the photographer. Being the good subject I didn't complain or offer any unsolicited suggestions.

The Finale: The photo at the top of this post was an attempt to use the sun as my backlight and light my face with a flash bounced off the wall of a white house. Bouncing a flash will usually result in a two to three stop reduction in flash output. I started out at full power and experienced some significantly longer recycle times. The flash batteries were getting a little tired, and I was getting some major underexposure until I realized that I wasn't waiting for the flash to re-charge to full power.

Uncropped Image
One helpful byproduct of bouncing my flash is the expanded surface area of the light source, resulting in soft-edged shadows and enormous catchlights. But there are limits to what you can accomplish in the selfie mode. First off, you are extremely limited to your light placement. You would have to be a contortionist to produce anything other than straight-on butterfly lighting (lighting where the nose shadow appears directly below the nose). If I had an assistant, or even a light stand, I could have been much more creative. Also, this is the best I could do, and from a lighting perspective, it isn't bad. The other problems resulting from the short working distances would be much harder to correct. so for this photo I must remain my smiling, cherubic self. This is the uncropped original.

I have an upcoming self-assignment where I'll be using this exact same camera and flash combination to capture some photographs of parade marchers getting ready to celebrate Gay Pride month in San Mateo. Along with the Fuji X-70 and the little Q20ii flash, I will carry my full kit in case I need a camera system with a little  more juice. We'll see how this all works out. Wish me luck.

Post Script: The parade didn't lend itself to the small camera approach. You can read about it here.

Monday, June 10, 2024

Pride Parade In San Mateo

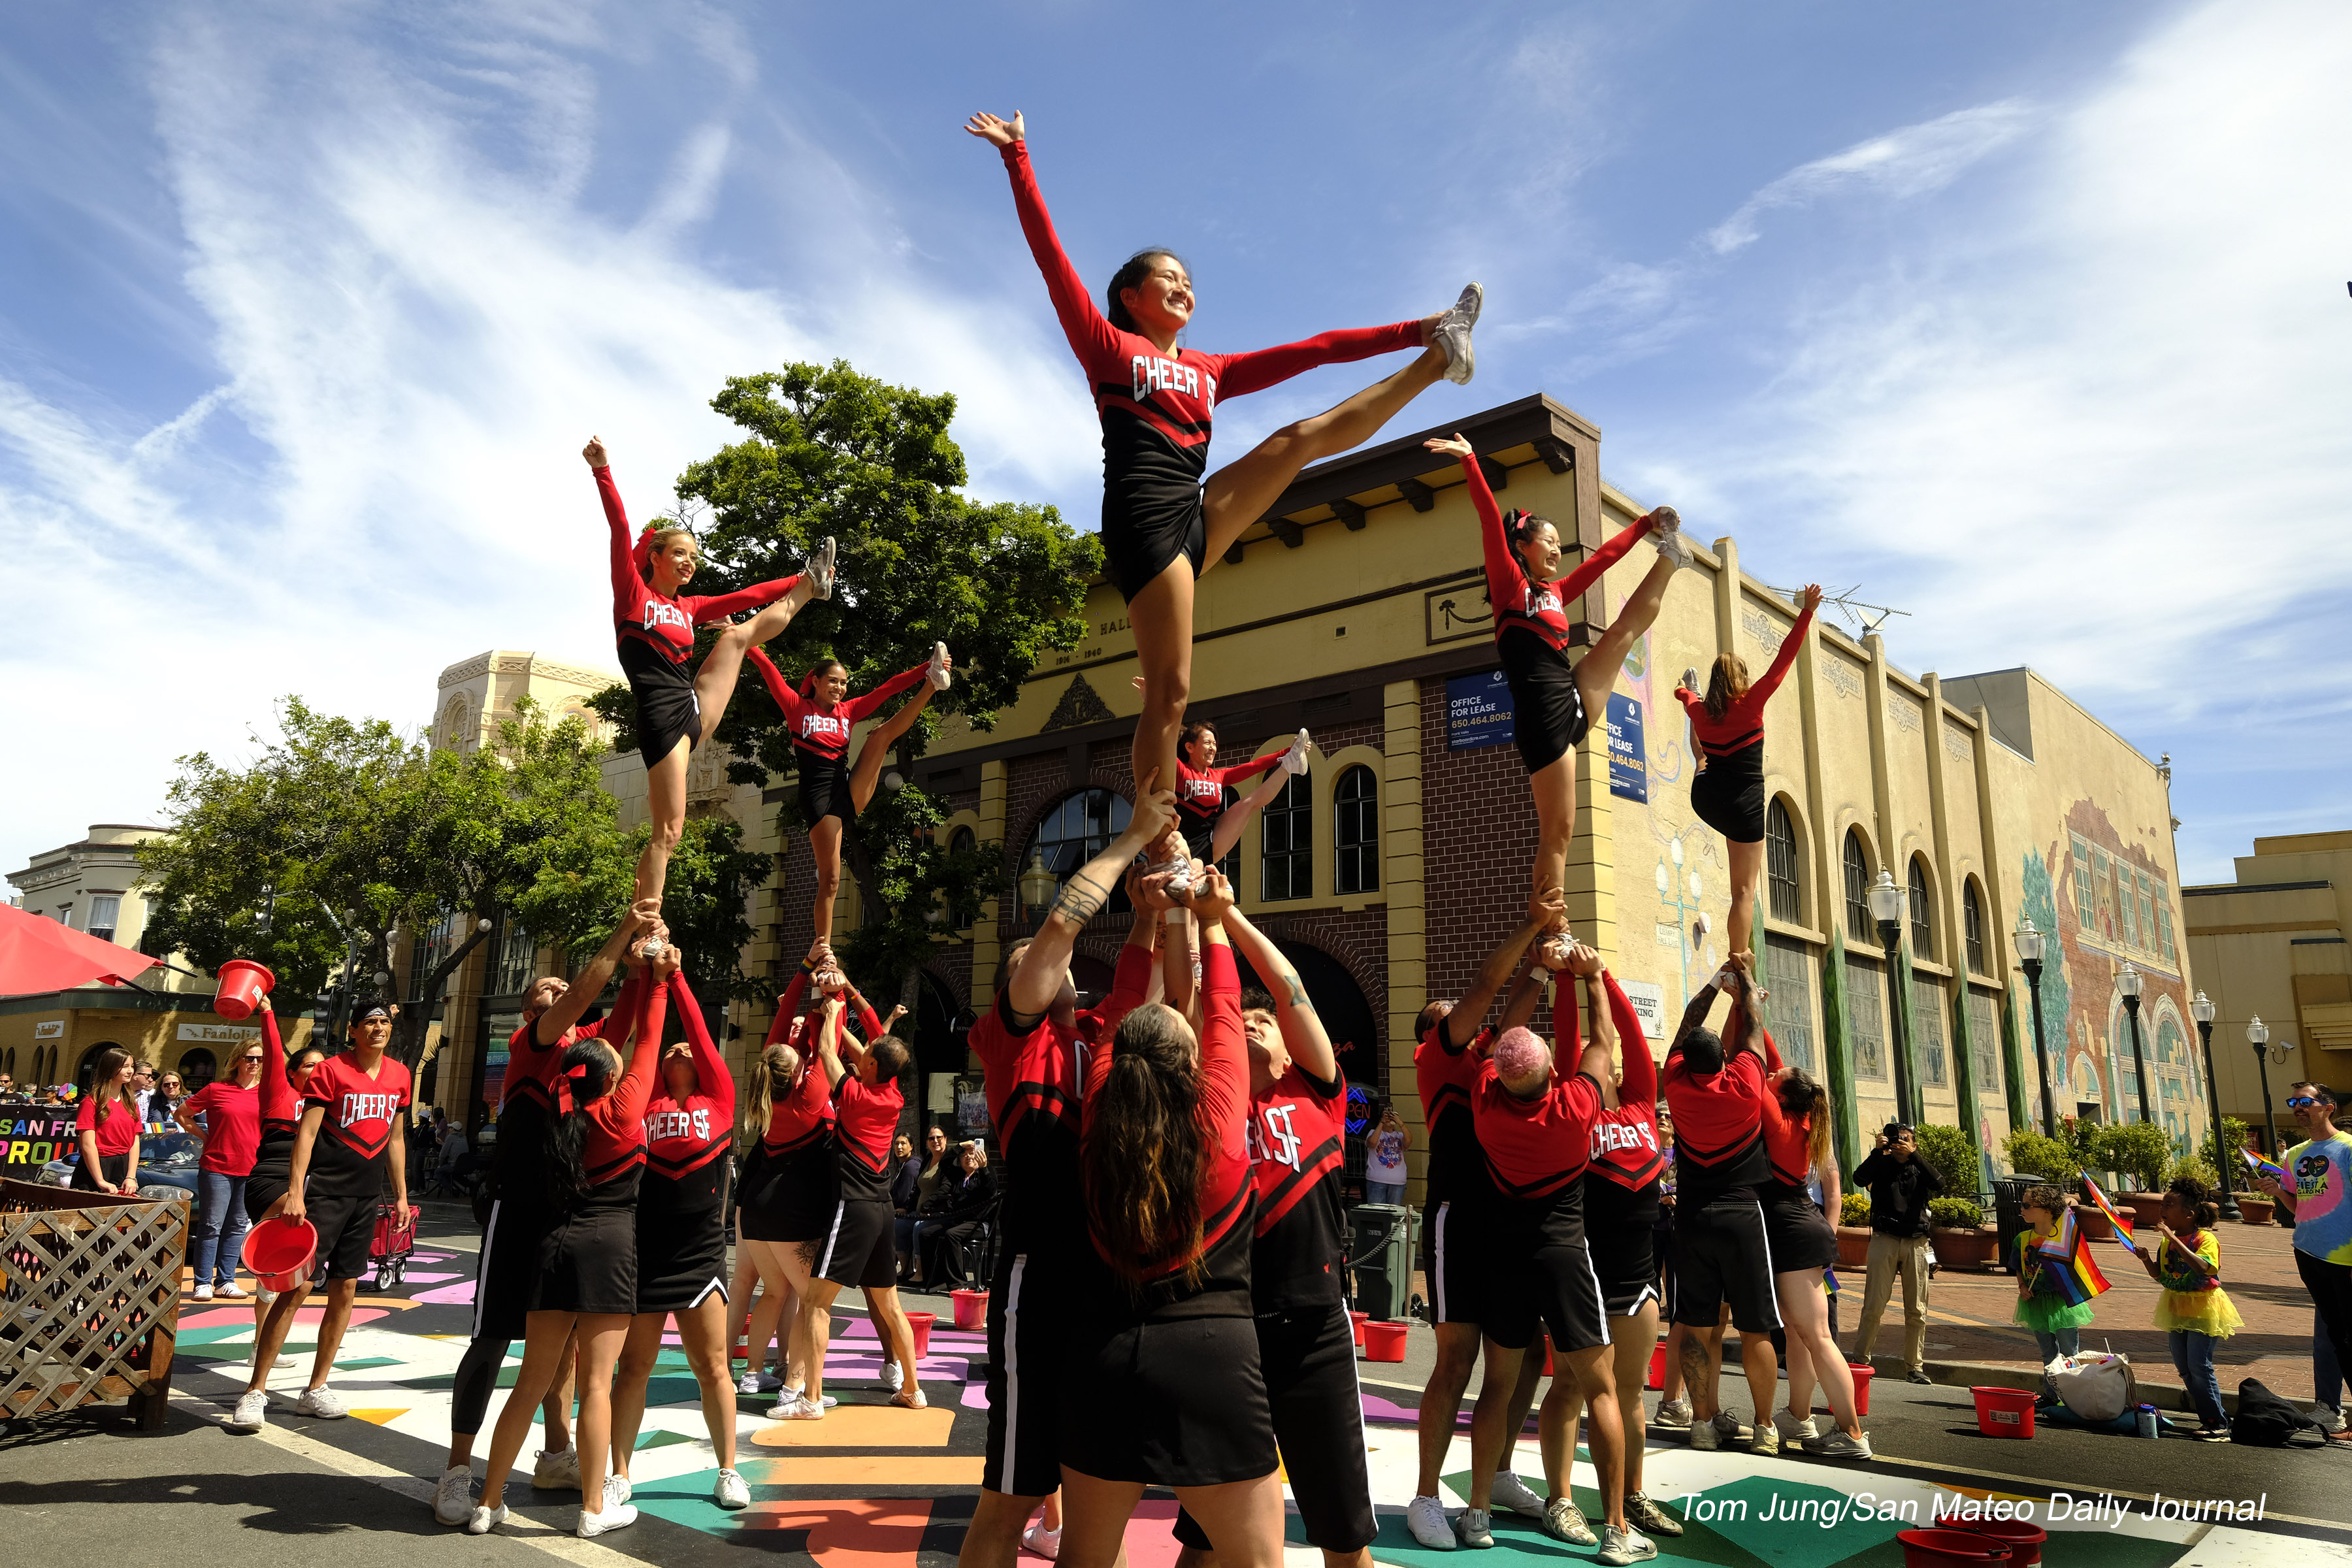
The Staging Area: The Pride Day Celebration is a "thing" in San Mateo. The last time I photographed it was in  2019. That photo featured the El Camino Reelers, a square-dancing club demonstrating some basic square dance moves during the main program in Central Park. This was the first time I photographed the parade itself. I arrived during the setup period before the parade, and was pleased to find the group Cheer SF practicing in the staging area on B Street.

I had intended to refine my "up close" technique using my X-70 and a small FlashQii speedlight. I quickly realized that the little point-and-shoot couldn't keep up during these fast action sequences, so I abandoned the effort and went back to a X-T2 and the 10-24mm zoom lens. The flash was a shoe-mounted Godox V1, a flash with more power than the FlashQii and adjustable beam setting that allows me to concentrate the light into a narrower angle. The head was angled up slightly to reduce the light on the immediate foreground.

1/250 second, F 11.0, ISO 200

1/250 second, F 11.0, ISO 200
These are samples of when the foreground flash is correctly balanced with the sky. The background buildings are pretty much left to fend for themselves, illumination wise, and provide the necessary location context. Flash output was not recorded.
1/250 second, F 11.0, ISO 200
This shot was made at a greater distance, so I tilted the head up slightly, reduced the beam angle to 69 degrees, and set the output to Full. The lack of illumination around the center is apparent, but as a photo, it does emphasize the most interesting person in the group. However, she is too small to effectively draw the viewer's attention, so in that regard the image wasn't worth submitting. If she had her arms extended in a more interesting pose, it might have worked. With her arms tightly at her side, it doesn't.

At this point I was trying to get my subjects in motion during their performance, but I found that the recycle time of the flash, brief as it was, prevented me from making multiple exposure bursts, which would have given me a series of photos from which to choose.

Change In Tactics: As the cheer team began moving down B Street, I moved to a position slightly in front so I could shoot at a 45 degree angle. As it turned out, the sunlight would illuminate the group from a 45 degree angle, so they were front lit as they marched past. I turned the flash off, and set the camera to record using the Low Speed Burst setting, which was about 4 frames per second. I also set the camera for manual focusing and by using the Manual Focus Assist feature, I could choose exactly what portion of my subject would be in focus. This eliminated any possibility of delays caused by "focus seeking", and allowed me to concentrate on recording the moment of peak action. Exposure was set to Aperture Priority.

The march towards Central Park followed a specific sequence: march, set down red buckets, perform, ask for donations, repeat. I would move ahead of the group, and as soon as they put down their buckets, I would position myself and frame the shot. Then I would establish focus on the nearest subject and wait. When the performers were at the top of their lifts, I would fire a burst. Because the action ended so quickly, the bursts were seldom more than four shots.
These two shots were taken about a block apart. I submitted the second shot because my main subject was higher on the horizon and in sharp contrast to the blue sky.  Also, by touching her ankle, the performer's leg and arm created a "hole" which tends to draw the viewer's attention for just a moment longer.

I didn't realize that when I made the shot, all six cheerleaders were at the height of their lifts, and for the most part, are easy to count. I realize now that if I had crouched a little lower and positioned myself more the camera right, that elusive sixth cheerleader would have been a little easier to see. But I didn't have the opportunity in real time, and some of these fine points are hard to identify when you're worried about just getting up off your knees and moving to the next shooting position. I guess that's the challenge that keeps it all interesting.

Must have been a slow weekend. The photo ran on Page 1, right at the crease.