 |
| Photo #1 |
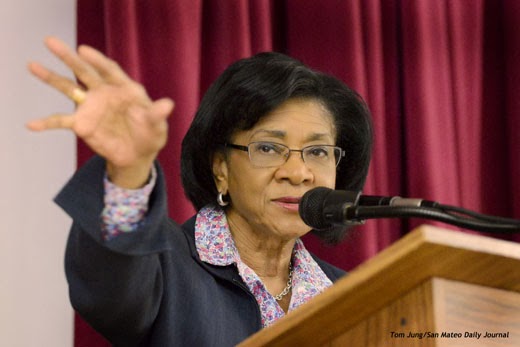
I recently made this photo of Belva Davis, a true pioneer in Bay Area journalism. I am an unabashed fan of her work, and religiously watched her Friday "This Week In Northern California" on local public television. I always enjoyed listening to her speak, and thought it a special treat when she was one of the speakers at an event I was covering for the Journal. Let's get the technical stuff out of the way: The camera was a Nikon D7000, 70-200 2.8 Nikkor, 1/160 of a second at F 3.2, ISO 6400 equivalent. It took me over 150 shots, nearly a full card, to get an image that I was pleased with.
I make a lot of podium shots. Politicians, Motivational Speakers, Authors, I've done them all. Sometimes you'll find a real gem, a man or woman with a perfect smile, a good stage presence, and the wherewithal to pause occasionally and look up from his or her notes. But just as often, your subject will be the exact opposite. Podiums are a true gift because you don't always get exactly what you want. You just say, "Thank you", and move on.
I actually enjoy shooting podiums, as the offer challenges to both composition, and timing. Aside from the obvious, here are some things you'll need to consider.
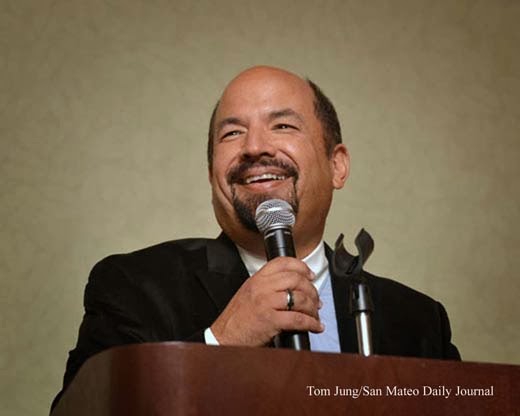
Lighting: I seldom encounter a situation where the lighting was arranged by a real lighting professional, so white balance settings are "close" at best, and position haphazard at worst. If one is lucky, the Incandescent white balance preset will work well, or well enough to adjust properly in post production. Assuming that aspect is under control, I move on to other aspects of the photo.
Shooting Position: I prefer to photograph speakers from the subject's left side. I find that a photo will have greater impact if the subject faces the viewers left. Since viewers usually read from left to right, they will visually scan the image in the same manner and will meet the subject's gaze "head on". A minor point to be sure, but one that gives the image some additional impact.
Background: I usually don't get to stand up for these shots unless I am very far away. Most of these shots were taken while kneeling on the floor, close to the stage. I try to stay at least ten feet away and rely on a relatively long zoom lens to get these tight shots. The low shooting angle can sometimes work to your advantage, since you can include large portions of the background to add context to the photo. When I can, I move to a position where the background adds to the informational value of the photo.
Hands: The hands often add some action to the image, and I watch how the speaker uses them. You can usually get an idea of a person's speaking style in the first few minutes. In all these samples, the hands add visual interest to the photo, and because they are usually away from the body, they are more easily seen. If the subject is right handed, the gesture won't be lost against the body. Also, try to NOT cut any finger tips off!
Mouth: In the image of Ms. Davis (Photo #1), the edge of the mouth is clipped slightly. It is not unusual for the microphone to cut into some part of the subject's face, so be careful. Sometimes the upper lip will cast a shadow on the subject's teeth. To avoid this, wait until they are looking into the light before you shoot.
Eyes: Avoid cutting off the far eye. Either get both eyes, or just the near one. Shadows caused by deeply set eyes can also be a problem. Again, wait until they are looking up before you shoot. This can be difficult because many speakers never seem to look up from their notes.
 |
| Photo #2 |
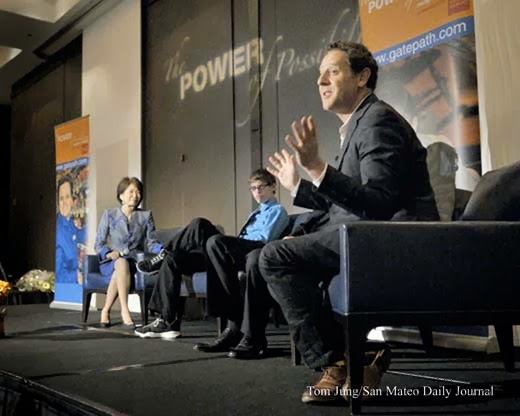
Photo #2 was made during a presentation by an independent film director who was discussing his recent film. The event was a fund-raising luncheon titled "The Power Of Possibilities". I made it a point of shooting with a wide angle lens from a low angle to include as much of the background as possible. Without the background, the image has no context. The rather harsh stage lighting was from the left, and the main subject faces directly into it. The hands are clearly delineated from the dark background, and the open fingers add some visual interest. Notice the single eye.
 |
| Photo #3 |
 |
| Photo #4 |
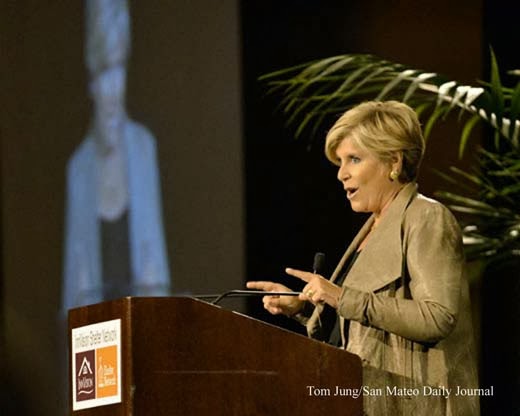
In Photo #4, the background helps to define the environment, just as it did in Photo #2. Again photographing from the subject's left, her eyes are focused on the audience, and her hands are clearly visible, separated as they are from the out-of-focus background. This open hand gesture adds to the impression that the speaker is ready to listen to input from the audience, which is precisely her intent. I probably could have increased the depth of field by shooting with a smaller aperture, but that would required an excessively long exposure time. When shooting indoors, you also risk the chance of subject movement, something Vibration Reduction won't prevent.
 |
| Photo #5 |
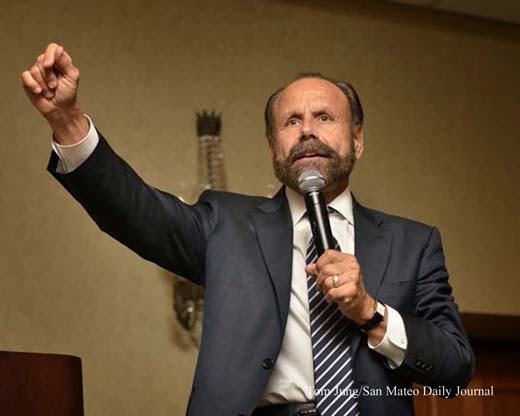
Photo #5 has all of the qualities of a good podium shot, in spite of the fact that the subject is standing in the middle of the room. All of the important facial features are clearly visible, and there is just a hint of teeth showing when he speaks. The arm is held up and away from the body, and his raised hand appears natural. Incidentally, this shot was taken with an on-camera flash aimed at the ceiling with a shield to prevent direct light from spilling onto his face. Shooting from a low angle eliminates most of the ground clutter, giving a clean image. The image was not submitted because the subject was not the keynote speaker.
 |
| Photo #6 |
All of the images in this collection have some common qualities. They have animated poses, good detail and proper treatment of the hands and eyes. But remember that these images were chosen from dozens of potential candidates, many of which differed only slightly from the one that I ultimately submitted. You can't predict when you'll make the winning shot, but you can learn to recognize it when you're at your computer, reviewing the day's take.
Addendum: You may wonder why certain images, particularly Photos #2 and #4, while properly exposed, lack a degree of color accuracy. They were made using the light that was available. This is often a mish-mash of of incandescent and fluorescent light sources, a mixture that is results in a less than ideal color rendition. I was not able to take a white balance reading at the podium, so I chose one of the white balance presets, crossed my fingers, and hoped that I could correct it in post processing. Photos #5 and #6 were on-camera speedlight ceiling bounce, which explains the color accuracy of the image and soft quality of the light. Photo #1 was shot with north light from a bank of windows to the subject's right.
No comments:
Post a Comment